
Installation Guide


10
8
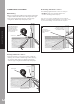
BACKROLL LAST FEW INCHES
TO REMOVE MEMORY
FROM TROUGH
CUT A 1" WIDE BY
3
/4" TAB
TO PREVENT WICKING
AND FOLD
DOWN TAB
CUT OFF EXCESS TROUGH 1"
AWAY FROM THE BACK OF
THE DOWNSPOUT WALL
4F
» Pull trough tight to ensure memory is released,
and place second staple on inside joist
through downspout. (4E)
» On outside joist, form a trough into downspout
while lining up the edge of the score mark with
inside of joist. Place third staple through trough
and downspout on outside joist. (4E)
» Cut a 1" wide by 3/4" tab at center edge of trough
(fold tab down) to prevent wicking. (4F)
» Pull corner at ledger and outside joist tight
keeping entire length of trough smooth and
wrinkle-free so as not to impede water flow. (4E)
» Place fourth staple on outside joist. (4E)
» Continue stapling every 6" to 8" from downspout
to ledger on both joists to secure. (4E)
» Trough material must cover all exposed
wood on surface of deck
SCORE DOWN THE MIDDLE
OF THE TROUGH TO REMOVE
WRINKLES IF NEEDED WITH A
SCREEN SPLINE ROLLER
4H
RUN A WATER TEST
TO ENSURE WATER RUNS
TO DOWNSPOUT
TROUGH WILL PITCH 1/4"
PER 1' OR MORE
4G
NOTE:
In extreme temperature swings, trough material
will expand and contract. Some wrinkling is acceptable but
should not impede the flow of water.
»
To test for correct slope, pour a cup of water on
trough at ledger board ensuring water runs to
the downspout. (4G)
»
Follow above step for the remaining troughs.
BASIC INSTALLATION