
Installation Guide


38
HOW TO INSTALL DECKING
HOW TO INSTALL TREX HIDEAWAY
®
UNIVERSAL HIDDEN FASTENERS
(TREX TRANSCEND
®
, ENHANCE
®
, ESCAPES
®
, ACCENTS
®
)
NOTE: See page 39 for additional instructions if installing Escapes.
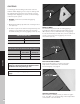
PARTS
TOOLS NEEDED
NOTE: Maximum spacing of deck boards using
Hideaway system is 16" (40.6 cm) on center. Fasteners
provide 1/4" (0.6 cm) gap when installed correctly.
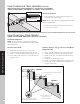
Installing Start Clips and First Board
1. Install start clips on edge of ledger board, centered
on each joist. Secure clips with screws.
2. Push grooved edge of deck board into start clips.
Important: First board MUST be straight and well
secured.
Installing Universal Fasteners
3. Insert fastener into grooved edge of deck board.
4. Align screw hole in fastener with center of joist.
Continue along the length of the board at every joist.
NOTE: Screw only half way down. DO NOT fully tighten.
Installing Second Board
5. Slide second board into place, making sure
fasteners fit into groove. Install the next universal
fastener on the other side of the second board in
the same manner as Steps 3 and 4. DO NOT fully
tighten the screw.
Complete Installation
6. Tighten screws on
fasteners in first row.
Proceed with Steps
3 through 5, tightening
down each row after
board that follows is
in place. Be sure to use
a long #1 square bit.
Installing Last Board
Option 1:
Using Fascia Board
7a. Pre-drill pilot holes
at an angle through
grooved edge of deck
board into ledger
board. Install 2-1/2"
(6.4 cm) screws
through pilot holes to
secure. Attach a
fascia board flush with deck surface.
Option 2:
With Deck Board
Overhang
7b. Pre-drill pilot holes at
45° angle from below
deck surface through
rim joist. Seat last
board into fasteners
overhanging rim joist.
Secure board with
2-1/2" (6.4 cm) screws using pilot holes. Position
fascia board below overhanging deck board.
1
2
2
3
1
1
2
4
5
1/4" (0.6 cm)
2
6
1
2
7a
Start clip
Universal fastener
1
2
7b