
Installation Guide


87
DESIGNER RAILING
HOW TO INSTALL STANDARD STAIR RAILING
TREX DESIGNER SERIES
NOTE: Trex rails meet major building codes for use as
a guardrail system. Local municipalities may require a
graspable handrail on stairways. Trex offers an ADA
code-compliant handrail system. Check with your local
building code officials for local requirements.
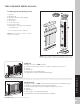
Installing Posts for
Stair Railing
1. In most cases, a
railpost or post
sleeve longer than
39" (99.1 cm) is
required for the lower
stair rail sections
to accommodate
stair angle. Both top
and bottom posts need to be installed on outside
corners (nose) of stair treads.
NOTE: Posts, post sleeve skirts, and post sleeves are
installed per standard Designer railing instructions.
See page 82.
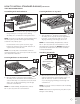
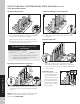
Measuring and Cutting Railings
2. Determine length and angle of top and bottom rail.
Set railings on the nose of the stair tread and mark
line at each intersection.
Cut rails on marks and place in position on
supports. (Supports can be made from scrap
material.)
NOTE: Allow a minimum clearance of 1” (2.5 cm) from
stair treads.
NOTE: Check local building codes for railing height
requirements.
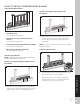
Installing Bottom RSBs on Upper and Lower Posts
3. Position bottom rail between posts and set to
proper height from stair tread. Support on blocks
cut from scrap materials. Mark both posts where
underside of the bottom rail intersects.
4. Position one RSB centered on upper post with top
of bracket aligned with mark on post, flat side
DOWN, and secure with two 2" (5.1 cm) screws.
Using a second RSB, turn upside down and
interlock into bottom bracket on upper stair post.
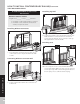
5. Position one RSB centered on lower post with
top of bracket aligned with mark on post, flat side
UP, and secure with two 2" (5.1 cm) screws. Using
a second RSB, turn upside down and interlock
into bottom bracket on lower stair post.
1
22
3
1
4
3
2
1
5
2
3