
Installation Guide


104
ADA HANDRAIL
HOW TO INSTALL TREX
®
ADA RAILING
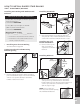
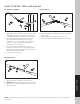
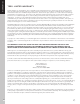
End Loop - Horizontal
18" x 12" x 18" (45.7 cm x 30.5 cm x 45.7 cm)
1. Apply adhesive to all metal contact surfaces. Slide
straight joiner into end loop and aluminum rail
support.
2. Pre-drill holes using 1/4" (0.6 cm) drill bit and
attach top bracket to mounting surface using an
appropriate connector (a 3/8" (1 cm) lag bolt at
least 2" (5.1 cm) long should be used when
mounting to a wood surface).
3. Attach bottom bracket in the same manner.
Place end loop in appropriate location on bracket.
Pre-drill four holes in end loop with an 11/64"
(0.4 cm) drill bit at appropriate location and attach
with screws (provided). Snap bolt covers into place.
4. Using PVC adhesive, attach hand rail end cap (sold
separately) to unfinished end of rail.
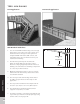
End Loop - Angled
18" x 12" x 18" (45.7 cm x 30.5 cm x 45.7 cm)
NOTE: Rail and end loop must be cut to appropriate
angles before installing.
1. Apply adhesive to all metal contact surfaces. Slide
adjustable joiner into end loop and aluminum rail
support. Make sure adjustable joiner is plumb.
2. Pre-drill holes using 1/4" (0.6 cm) drill bit and
attach top bracket to mounting surface using an
appropriate connector (a 3/8" (1 cm) lag bolt at
least 2" (5.1 cm) long should be used when
mounting to a wood surface).
3. Attach bottom bracket in the same manner.
Place end loop in appropriate location on bracket.
Pre-drill four holes in end loop with an 11/64"
(0.4 cm) drill bit at appropriate location and attach
with screws (provided). Snap bolt covers into place.
4. Using PVC adhesive, attach hand rail end cap (sold
separately) to unfinished end of rail.
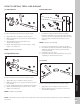
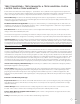
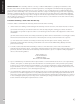
Post Return - Horizontal
1. Apply adhesive to all metal contact surfaces. Slide
straight joiner into post return and aluminum rail
support.
2. Pre-drill holes using 1/4" (0.6 cm) drill bit and
attach bracket to mounting surface using an
appropriate connector (a 3/8" (1 cm) lag bolt at
least 2" (5.1 cm) long should be used when
mounting to a wood surface).
3. Place post return at appropriate location on
bracket. Pre-drill two holes in post return with an
11/64" (0.4 cm) drill bit at appropriate location and
attach with screws (provided).
4. Snap bolt covers into place.
METAL ADHESIVE
6
1
2
4
3
METAL ADHESIVE
7
1
2
3
4
METAL ADHESIVE
8
3
2
1
4
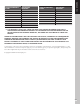
NOTE: A PVC adhesive may be used to ensure a tight seam on the exterior tube. Make sure adhesive cures per manufacturer’s
instructions.