
Installation Guide


59
TRANSCEND RAILING
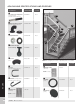
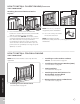
Attaching Top Rail – Crown or Beveled Rail
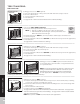
8. Place Crown or Beveled rail on RSBs with balusters
in rail channels. Attach top rail to RSB with two self-
tapping screws (provided).
9. Slide baluster spacer up and snap into top rail. Place
optional top rail gaskets on each end of rail.
Attaching Post Caps
10. Secure post caps with
silicone or PVC adhesive.
NOTE: Clean-up any excess
adhesive before drying.
NOTE: Beveled rail cannot be used as top rail in this
application.
Important: ONLY use with 4" x 4" (10.2 cm x 10.2 cm)
post and post sleeve. Cutting post and post sleeve
ONLY apply to the Classic style railing.
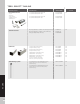
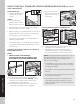
1. Installing Pressure-Treated Posts
See instructions on page 57.
Cutting Post and Post
Sleeve
1a. Mark and cut post and
post sleeve measuring
from deck surface:
» 36-3/16" (91.9 cm)
for 36" (91.4 cm)
height.
» 42-3/16" (107.2 cm)
for 42" (106.7 cm) height.
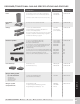
2. Installing Post Sleeve Skirts and
Post Sleeves See instructions on page 57.
3. Installing Railing Support Brackets (RSBs)
See instructions on page 57.
4. Cutting Railings
See instructions on page 58.
5. Attaching Bottom Rail (Universal or
Beveled Rail) and Foot Block
See instructions on page 58.
6-7. Placing Baluster Spacers and Balusters
See instructions on page 58.
HOW TO INSTALL STANDARD CROWN OR BEVELED RAILING/CONTINUED
TREX TRANSCEND
®
HOW TO INSTALL CLASSIC RAILING
TREX TRANSCEND
®
1
8
x2
2
2
9
Option
2
2
10
3
1
36-3/16"
(91.9 cm)
or
42-3/16"
(107.2 cm)
36-3/16"
(91.9 cm)
or
42-3/16"
(107.2 cm)
1a