
Installation Guide


62
TRANSCEND RAILING
HOW TO INSTALL STANDARD GLASS PANEL CROWN OR BEVELED
RAILING/CONTINUED
TREX TRANSCEND
®
1. Installing Pressure-Treated Posts
See instructions on page 57.
2. Installing Post Sleeve Skirts and Post
Sleeves See instructions on page 57.
3. Installing Railing Support Brackets (RSBs)
See instructions on page 57.
4. Cutting Railings
See instructions on page 58.
5. Attaching Bottom Rail (Universal or
Beveled rail) and Foot Block
See instructions on page 58.
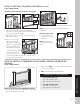
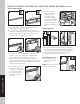
Attach Weatherstripping and Positioning Panel
6. Push black-edged trim onto upper and lower edges
of panel. Be sure trim runs entire length of glass.
Extra trim can be cut with razor blade or scissors.
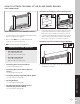
7. Position panel with weatherstripping into lower rail
channel. Center panel between posts with about
2" (5.1 cm) of air space on each side of panel.
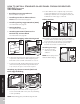
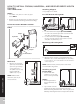
Attaching Top (Crown or Beveled) Rail and
Panel Support Molding
8. Place top rail over RSB brackets and glass panel.
Secure rail to RSBs with 1-1/2" (3.8 cm) self-drilling
screws (provided).
NOTE: Avoid hitting glass panel while using the drill.
9. Push PSM into rail to complete snap connection.
Lower rail PSM edge rests on top of rail. Top rail
PSM snaps flush into rail. If using Beveled rails, the
PSM will rest on the edges on the rail.
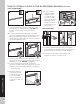
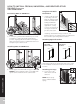
Hiding Brackets
10. Cut Transcend baluster spacer into four lengths
equal to distance between the glass panel and posts.
Cut slowly and one at a time, to avoid chipping.
11. Snap spacer into bottom and top rail to hide
brackets and create a seamless look.
Attaching Post Caps
12. Secure post caps
with silicone or PVC
adhesive.
NOTE: Clean-up any excess
adhesive before drying.
11
2
12
3
1
10
1
1
8
2
9
7
2" (5.1 cm)2" (5.1 cm)
63-1/2"
(161.3 cm)
6