
Installation Manual


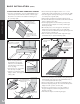

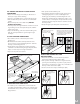

7. DOUBLE EXTENDED DECKS (OVER 19’)
» Place downspouts on the opposite ends from where
the existing deck and the deck extension meet.
» Install a trough from the blocking of the extension
to the downspout.
» Tape all seams and edges as per previous
instuctions.
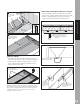
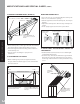
8. LOW PROFILE CAN LIGHTS
» When installing low profile can lights below the
trough, make sure the trough is not in contact with
the recessed can.
PLACE DOWNSPOUTS ON THE ENDS
EXTENDED DECK
MODIFIED DOWNSPOUTS
» For joists 8” to 12” you must modify the downspout.
» Tear or cut out the front opening.
» Cut through the back of the downspout, from top to
bottom.
» Adjust the downspout to fit in the bay and staple to
secure.
» Finish by taping the seam from top to bottom.
CUT DOWNSPOUT
THROUGH THE BACK
TOP TO BOTTOM
ADJUST SIZE AND STAPLE
TO THE BACK OF THE BAY
TAPE SEAM
TOP TO BOTTOM
TROUGH SHOULD NOT MAKE CONTACT
WITH THE RECESSED CAN LIGHT
MAXIMUM DEPTH FOR TROUGH IS 4”
4”
TROUGH
SIDE VIEW
DECKING
JOIST
JOIST
OPTION: ADD A PIECE OF CEMENT SIDING
OR DRYWALL TO DEFLECT THE HEAT FROM
THE TROUGH
RUN A BEAD OF
CAULK BETWEEN
BEAMS
TAPE OVER ENTIRE BEAM TO
ENSURE PROPER SEALING
WHEN ATTACHING TROUGH
AND DECKING
9. INSTALLING A TROUGH OVER A DOUBLE OR
TRIPLE BEAM
» Caulk between each beam to ensure a water tight
seal between the beams.
» Cover the top of the beam with the trough material
that overlaps into both adjacent bays. Tape seams
and trough material where screws penetration may
occur.
MODIFICATIONS AND SPECIAL CASES (CONT.)
PLACE BLOCKING BETWEEN JOIST
TO BEST UTILIZE 12’ OR 16’ TROUGH
MATERIAL
MODIFICATIONS & SPECIAL CASES
8
7
8
9