
Installation Manual


1. PREP
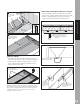
Apply blocking mid-span between joists. Block-
ing should be angled back to leave a minimum of 2
½”-3” from the top of the joist. Turn blocking around
so screws do not puncture trough. (This blocking
method only applies when using Trex® RainEscape®,
for blocking instructions for a standard Trex Eleva-
tions™ see instructions for Elevations.)
Please note: To properly install the Trex RainEscape
system over the Trex Elevations system requires a
minimum of 2 people.
ANGLE BACK SPAN
2
1
/2” - 3”
INSTALL SPAN UPSIDE DOWN
TO AVOID SCREWS PUNCTURING
THE TROUGH
CUT 3” -6” STRIPS OF DOUBLE SIDED TREX RAINESCAPE
TAPE AND PLACE EVERY 16” TO 20” ALONG THE JOIST &
PERIMETER, LEAVING BACKING ON
REMOVE TAPE BACKING AND PLACE DOWNSPOUTS INTO THE JOIST BAY
CUT DOWNSPOUT
THROUGH THE BACK
TOP TO BOTTOM
ADJUST SIZE AND STAPLE
TO THE BACK OF THE BAY
TAPE SEAM
TOP TO BOTTOM
INSTALLATION USING THE TREX ELEVATIONS™ SYSTEM
ELEVATIONS SYSTEM
9
3. DOWNSPOUTS
» Remove the backing on the double sided tape and
place the downspout in the joist bay.
» Repeat the process the same as you would in a
standard TrexRainEscape installation.
2
2. TAPE AROUND JOIST AND PERIMETER
» Cut 3”-6” strips of the TrexRainEscape double sided
tape and place every 16” - 20” along the joists and
perimeter leaving backing on.
3
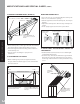
4. TROUGHS
» Remove the backing on the double sided tape on
one side of the joist and place the first side of the
trough as you would in a standard installation.
» Place new strips of the Trex RainEscape double
sided tape along the top of the adjoining trough and
install as you would in a standard installation. (4A)
4
REMOVE TAPE BACKING AND PLACE THE TROUGH
IN THE JOIST BAY AS YOU WOULD IN A STANDARD
INSTALLATION
4A
ADD NEW TAPE TO
THE TOP OF THE
INSATLLED TROUGH
AND PLACE SECOND
TROUGH. REPEAT THE
PROCESS FOR ALL
REMAINING TROUGHS
SEALING THE
SYSTEM
» Tape the finished
system as you
would in a stan-
dard installation.
1