
Installation Manual


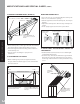

3. INSTALLING THE TREX® RAINESCAPE® TROUGH
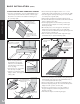
» For ease of installation, it is recommended that you
fold a heavy crease down the center of the trough.
Be sure to account for the oset if installing for a
12” joist bay. (3A)
» When working with the
Trex RainEscape trough
material, ensure that the
smooth/shiny side always
faces up. (3B)
» Line up the 1
1
/2” score with
the second joist. (3B)
» If there is no flashing at the
ledger, slide 3” of trough material under the existing
siding. (3C)
» Place first staple at ledger board on 1
1
/2” score
mark inside joist to tack trough, on second joist. (3B)
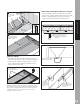
» Unroll trough to downspout using 1
1
/2” score mark.
on inside joist as guide. (3E)
» Cut trough to length to back wall of downspout.
» To remove memory from sheet, backroll the last few
inches of the trough. (3D)
» Pull trough tight to ensure memory is released,
and place second staple on inside joist through
downspout. (3D)
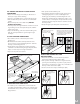
» On outside joist, form a trough into downspout
while lining up the edge of the score mark with
inside of joist. Place third staple through trough and
downspout on outside joist.
» Cut a 1” wide by
3
/4” tab at center edge of trough
(fold tab down) to prevent wicking. (3D)
» Pull corner at ledger and outside joist tight keeping
entire length of trough smooth and wrinkle-free so
as not to impede water flow. (3E)
» Place fourth staple on outside joist at ledger. (3E)
» Continue stapling every 6” to 8” from downspout to
ledger on both joists to secure. (3E)
» To test for correct slope, pour cup of water on
trough at ledger board ensuring water runs to
downspout. (3F)
» Follow above step for remaining troughs.
UNROLL USING 1
1
/2” SCORE MARK
ON INSIDE OF JOIST AS A GUIDE
SLIDE TROUGH UNDER FLASHING
PLACE FIRST STAPLE
UNROLL TO THE DOWNSPOUT
SMOOTH/SHINY SIDE FACES UP
BACKROLL LAST FEW INCHES
TO REMOVE MEMORY FROM
TROUGH
CUT a 1” WIDE BY
3
/4” TAB
TO PREVENT WICKING
ADD A BEAD OF CAULK
AT THE LEDGER BOARD
IF NO FLASHING EXISTS
RUN TROUGH BEHIND
SIDING
1
2
3
4
PLACE 3RD STAPLE THROUGH
TROUGH AND DOWNSPOUT
PLACE FIRST STAPLE
AT LEDGER
PLACE SECOND
STAPLE BEFORE
DOWNSPOUT
FINISH STAPLING EVERY
8” TO 10” GOING FROM
SIDE-TO-SIDE UNTIL YOU
REACH THE LEDGER
RUN A WATER TEST TO ENSURE
WATER RUNS TO DOWNSPOUT
BASIC INSTALLATION (CONT.)
TO EASE INSTALLATION, FOLD A
CREASE DOWN THE CENTER OF
THE TROUGH BEFORE INSTALLING
IF INSTALLING IN A 12” JOIST
BAY THE FOLD NEEDS TO BE
OFFSET TO ACCOMMODATE THE
JOIST BAY
CUT OFF EXCESS TROUGH 1”
AWAY FROM THE BACK OF THE
DOWNSPOUT WALL
3A
3B
3C
3D
3E
3F
BASIC INSTALLATION
4