
Installation Manual


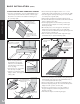

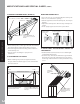

CUT 1” OFF THE BACK OF THE DOWNSPOUT
THAT FACES THE CANTILEVER
ATTACH TROUGHS
ATTACH A SECOND TROUGH
FROM THE BACK OF THE
CANTILEVER AND EXTEND
BEYOND THE EXISTING
TROUGH
TRIM OFF EXCESS
TROUGH MATERIAL
4C. DOUBLE OR TRIPLE PICTURE FRAME:
LADDER BOX
» Place a 11” blocking horizontally on the ends of
the bay to support 45° decking.
» Install a 2 x 4 ladder box to support Downspouts.
» Trim o all downspout nozzels to accommodate
gutter.
» Place Downspouts into ladder box (DO NOT
REMOVE OPENINGS)
» Install a piece of trough material over the 11” block-
ing, making sure to overlap downspouts and the
adjoining trough.
» Tape over blocking, joints and seam making sure
that all screw penetrations go through trough
and tape.
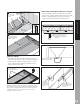
5. CANTILEVERED DOWNSPOUT
» Tear o the cut-out on the front panel of the
downspout.
» On the back side of the downspout draw a line
from corner to corner extending down 1”. Cut the
downspout following the line.
» Staple the trough material from the end of the
cantilever over the existing trough. Repeat all the
steps as necessary for trough installation.
» Tape over all joints and seams.
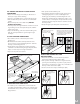
6. OBSTRUCTIONS AND POSTS
» To install a post or obstruction on the inside rim
joist, first mark the edges of the post on the trough
and draw two lines, corner to corner. Cut along the
diagonal lines.
CUT OUT THE END OF
DOWNSPOUT AROUND
THE POST
SLIDE A SCAPE
PIECE OF TROUGH
MATERIAL OVER THE
CUT-OUT
CREATE
TABS
ON THE
PATCH
MODIFYING DOWNSPOUT FOR
OBSTRUCTIONS
» Trace the obstruction on the downspout and
remove the material with a knife. (6A)
» Cut a patch of trough material 2” larger than the
opening and create flaps on patch as per previous
instructions (obstructions and posts) and slide over
the top of the obstruction. (6B)
» Cover cut out area and post with tape. (6C)
TAPE AROUND POST
AND PATCH AREA
MODIFICATIONS & SPECIAL CASES
7
5
» Pull up tabs and install the post.
» Tape starting at bottom of the trough, up the post
overlapping layers to assure a water tight seal.
working up around the post extending down onto
the trough. Cut the tape at a 45 degree angle on all
corners. Place a small piece of tape over the corners
where the trough and post meet, to seal the corners
from any leaks.
» Staple trough as per the previous instructions.
MARK EDGES OF POST ON TROUGH
AND CUT DIAGONAL LINES
FROM CORNER TO CORNER
PULL UP TABS ON ALL FOUR
CORNERS AND INSTALL
THE POST
WRAP THE TROUGH AROUND THE POST EXTEND-
ING DOWN ONTO THE TROUGH. CUT THE TAPE AT
A 45 DEGREE ANGLE ON ALL CORNERS WHERE
THE TROUGH AND POST MEET TO SEAL THE
CORNERS FROM ANY LEAKS
6
6A
6B
6C