INSTALLATION GUIDE
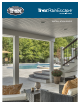
CREATE YOUR OUTDOOR LIVING ROOM Trex RainEscape is a unique under-deck drainage system – a network of troughs and gutters–keeps rain, spills and snow melt from dripping through elevated deck boards, creating a dry patio area on the ground level below, perfect for adding lighting fixtures, ceiling fans, entertainment systems, and more.
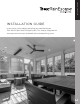
GENERAL INFORMATION INSTALLATION GUIDE In your hands, you’re holding everything you need to build your Trex® RainEscape® Deck Drainage System. This step-by-step guide will show you how to turn your underdeck into an outdoor living space.
GENERAL INFORMATION T R E X ® R A I N E S C A P E ® I N S TA L L AT I O N G U I D E BASIC INSTALLATION Parts ............................................................................................................................................................................... 3 Tools ............................................................................................................................................................................... 3 Prep ..................................
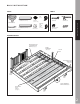
BAS I C I NSTA L LATIO N PARTS TOOLS TAPE (4" x 50') TROUGH (20mil, 20" x 16') Wall Flash (1/4" x 1" x 25') STAPLE GUN CAULKING GUN REGULAR STAPLES (3/8" or longer) UTILITY KNIFE CAULKING* (10.5oz tube) TROUGH (20mil, 20" x 12') 4x4 Post Flash ELEVATIONS TAPE (DOUBLE SIDED) (21/2" x 50') BASIC INSTALLATION DOWNSPOUT (40mil) *One tube covers 35 ln. ft. w/1/4" bead FRAMING DETAIL INSTALLATION OF THE FLAT BLOCKING AND RAILING (See pg. 8) INSTALL DOWNSPOUTS (See pg.
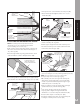
BAS I C I NSTA L LATIO N 1. PREPARATION »Read all instructions completely before beginning. 2C »Place a midspan nailer on the underside of joists to keep them straight and prevent rolling. »Can be removed when soffit or ceiling is installed. 1 BASIC INSTALLATION SIDE VIEW DOWNSPOUT SHOULD EXTEND AT LEAST 1" INTO THE GUTTER PLACE A TEMPORARY NAILER UNDER JOIST 2. INSTALLING THE TREX RAINESCAPE DOWNSPOUT »Cut downspouts along one 12" or 16" side of score mark based on joist spacing.
» Line up the 1 1/2" score with the second joist. (4C) 3C CAULK "Z" FLASHING WITH TREX RAINESCAPE CAULK CUT MORTAR » Place first staple at ledger board on 1-1/2" score mark side.
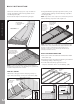
BAS I C I NSTA L LATIO N »To test for correct slope, pour a cup of water on trough at ledger board ensuring water runs to the downspout. (4E) »Follow above step for the remaining troughs. »Using Trex RainEscape tape, tape ALL seams, joints and perimeter making sure the flashing is taped to the trough. (4H) NOTE: Tape works off of compression and must be pinched between decking and joist to make a tight seal.
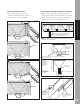
INSTALLATION OF FASCIA »Two suggested ways to seal fascia: INSTALLING A GUTTER SYSTEM (not included) »Before installing a gutter system perform a water test to clean out the system and check for any leaks. »Attach a standard gutter system to collect the water from the Trex RainEscape downspouts.
M O D I F I C AT I O N S A N D S P E C I A L C A S E S CANTILEVERS (Trex RainEscape can accommodate any angle or radius – max. of 3') (See pg. 9) PICTURE FRAME (See pg. 8) EXTENDED DECK (See pg. 11) DOUBLE OR TRIPLE BEAM (See pg.
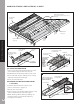
5C. DOUBLE OR TRIPLE PICTURE FRAME: LADDER BOX »Place a 11" blocking horizontally on the ends of the bay to support 45° decking. »Install a 2 x 4 ladder box to support downspouts. »Trim off all downspout nozzles to accommodate gutter. »Place downspouts into ladder box (DO NOT REMOVE OPENINGS). »Install a piece of trough material over the 11" blocking, making sure to overlap downspouts and the adjoining trough.
M O D I F I C AT I O N S A N D S P E C I A L C A S E S 9. SURFACE MOUNT POST »When using surface mount post, pre-drill holes then use a small amount of Butyl caulk on screw threads to seal holes. »DO NOT use too much caulk or it will overflow on deck and post mount. 9A 11. MODIFIED DOWNSPOUTS »For odd joist spacing you must modify the downspout. »Tear or cut out the front opening. »Cut through the back of the downspout, so that downspout fits bay opening.
. DOUBLE EXTENDED DECKS (OVER 19') 14 SIDE VIEW DECKING MAXIMUM DEPTH FOR TROUGH IS 4" 13 4" JOIST JOIST PLACE DOWNSPOUTS ON THE ENDS TROUGH TROUGH SHOULD NOT MAKE CONTACT WITH THE RECESSED CAN LIGHT PLACE BLOCKING BETWEEN JOIST TO BEST UTILIZE 12' OR 16' TROUGH MATERIAL OPTION: ADD A PIECE OF CEMENT SIDING OR DRYWALL TO DEFLECT THE HEAT FROM THE LIGHT 14.
I N S TA L L AT I O N U S I N G T H E T R E X E L E VAT I O N S ® SYS T E M 3. DOWNSPOUTS 1 » Remove the backing on the double-sided tape and place the downspout in the joist bay. » Repeat the process the same as you would in a standard Trex RainEscape installation. 3 REMOVE TAPE BACKING AND PLACE DOWNSPOUTS INTO THE JOIST BAY INSTALL ELEVATIONS MID-SPAN JOIST BLOCKING FROM THE BOTTOM OF THE JOIST TO ALLOW ROOM FOR THE TROUGH 1. PREP »Apply blocking mid-span between joists.
2 0 -Y E A R WA R R A N T Y READ THESE WARRANTY TERMS CAREFULLY BEFORE INSTALLING OR USING THE TREX RAINESCAPE DECK DRAINAGE SYSTEM. YOUR INSTALLATION AND USE OF THE SYSTEM OR ANY OF ITS COMPONENTS INDICATES THAT YOU AGREE TO BE BOUND BY THESE TERMS. IF YOU DO NOT AGREE TO ALL OF THE TERMS OF THIS WARRANTY, RETURN THE PRODUCT TO THE PLACE OF PURCHASE FOR A FULL REFUND. This warranty gives you specific legal rights, and you may also have other rights which vary from State to State. 1.
F R E Q U E N T LY A S K E D Q U E S T I O N S Q: Do you have installation videos? A: Yes, go to youtube.com and type in "Trex RainEscape". Q: Can I install the system myself? A: Yes, with the easy-to-follow instructions that come with the Trex RainEscape system, utility knife, staple gun and caulking gun are all you need to install the system in one or two hours on most decks. The installation goes quicker with two people.
HELPFUL TIPS TREX RAINESCAPE IS EASIER TO INSTALL WITH TWO PEOPLE Snow build-up Snow will sit on the decking and, as it melts, will run through the system. Leaves If leaves and debris accumulate in the troughs, a standard washing or a hard rain will clean out the system. If the tape will not stick In areas, such as the perimeter, brick or stucco, where the Trex RainEscape tape will not stick, use the Trex RainEscape caulking to adhere the material. Caution Do not splice trough material.
N OT E S NOTES 18
EXPANDS YOUR OUTDOOR LIVING SPACE PROTECTS THE SPACE BELOW YOUR DECK FROM RAIN, SUN AND OTHER ELEMENTS PROTECTS YOUR FLOOR JOISTS FROM MOISTURE
To view TrexRainEscape video installation instructions please snap QR code. FIND US ON trexrainescape.com Trex® RainEscape® and Trex® Protect™ are manufactured and/or distributed by Dri-Deck Enterprises, LLC. Trex® is a trademark of, and is used by Dri-Deck Enterprises, LLC. under a license with, Trex Company, Inc. © 2017 Trex Company, Inc. All rights reserved. Trex® and the Trex logo are federally registered trademarks of Trex Company, Inc., Winchester, Virginia.