
Installation Guide


BASIC INSTALLATION
BASIC INSTALLATION
6
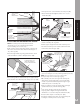
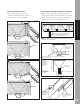
3. FOUR TYPES OF FLASHING:
With Flashing
»
When using flashing add a bead of caulk at the
ledger board and between the flashing and trough.
Tape over the flashing to the top of the of the
trough. (3A)
Without Flashing
»
If there is no flashing at the ledger, slide 3" of
trough material under the existing siding. (3B)
Flashing with Brick or Stucco
»
Cut into mortar or cement joint. (3C) Caulk "Z"
flashing into mortar. Install trough under flashing
as shown in (3A).
No Flashing with Brick or Stucco
»
If installing against brick or stucco and you
DO NOT need a 100% water tight seal, use the
caulking method. (3D)
ADD A BEAD OF CAULK
AT THE LEDGER BOARD
IF NO FLASHING EXISTS EXTEND THE
TROUGH BEHIND THE SIDING
3B
3A
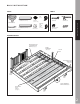
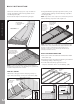
1. PREPARATION
»
Read all instructions completely before beginning.
»
Place a midspan nailer on the underside of joists
to keep them straight and prevent rolling.
»
Can be removed when sot or ceiling is installed.
PLACE A TEMPORARY
NAILER UNDER JOIST
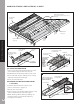
2. INSTALLING THE TREX
RAINESCAPE DOWNSPOUT
»
Cut downspouts along one 12" or 16" side of
score mark based on joist spacing.
»
Install all downspouts along rim joist and/or ledger
board. Cut-out side should face open deck bay.
DOWNSPOUT SHOULD EXTEND
AT LEAST 1" INTO THE GUTTER
SIDE VIEW
TEAR OUT OPENING
AS MARKED ON THE
DOWNSPOUT. (IN
COOLER WEATHER USE
A UTILITY KNIFE)
10"
12" center
10-1/4" 14-1/2"
16" center
»
Downspout should extend 1" into gutter: cut or
extend as necessary. (2C)
1
2A
2B
2C
3A
WHEN USING
FLASHING, ADD A
BEAD OF CAULK AT
THE LEDGER BOARD
AND UNDER THE
FLASHING. TAPE
OVER THE FLASHING
TO THE TOP OF THE
TROUGH.
5-1/4"4"