
Installation Guide


BASIC INSTALLATION
TAPE ALL SEAMS ON
THE TROUGHS AND
DOWNSPOUTS
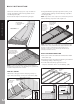
CUT WALL
FLASHING TO
LENGTH
PUSH AGAINST HOUSE
(TAPE WILL COMPRESS)
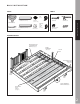
SNAP A CHALK
LINE DOWN THE
CENTER OF THE
JOIST ON TOP OF
TAPE TO ENSURE
PROPER DECK
FASTENING
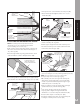
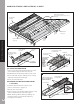
TRIM EXCESS TROUGH
AT SEAMS, KEEPING
OVERLAP
KEEP KNIFE FLAT TO
AVOID SLICING
INTO TROUGH
TRIM EXCESS
(APPROX. 4’ BACK)
4’
4G
SCORE DOWN THE MIDDLE
OF THE TROUGH TO REMOVE
WRINKLES IF NEEDED WITH A
SCREEN SPLINE ROLLER
4F
NOTE: Trex RainEscape Caulk can be used instead of tape,
if preferred. If using caulk, it must be applied between ALL
product overlaps and between product and joist on
perimeter of deck. In cases where tape will not stick,
(usually on brick or stucco).
4H
4I
4J 4K
BASIC INSTALLATION
RUN A WATER TEST
TO ENSURE WATER RUNS
TO DOWNSPOUT
TROUGH WILL PITCH 1/4"
PER 1' OR MORE
4E
8
»
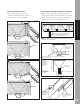
Using Trex RainEscape tape, tape ALL seams, joints
and perimeter making sure the flashing is taped to
the trough. (4H)
NOTE: Tape works o of compression and must be pinched
between decking and joist to make a tight seal.
TAPE ALL SEAMS
»
Trim excess trough at seams, keeping overlap so
tape will cover the top of the joist and seams. (4G)
WALL FLASHING FOAM STRIP
»
Cut a piece of the self-adhesive wall flash the width
of the deck. (4I)
»
Peel release paper from the wall flashing and adhere
to decking, siding or flashing. (4J)
»
Push first deck board up against house to
compress wall flash. Then secure decking. (4K)
NOTE: In extreme temperature swings, trough material
will expand and contract. Some wrinkling is acceptable but
should not impede the flow of water.
»
To test for correct slope, pour a cup of water on
trough at ledger board ensuring water runs to
the downspout. (4E)
»
Follow above step for the remaining troughs.