
Installation Guide

83
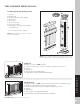
DESIGNER RAILING
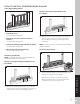
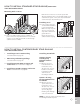
Assembling Rails with Balusters
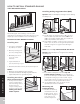
5. Place bottom rails on their sides, lip sides facing up.
Using TrexExpress
™
Designer Series Railing
Assembly Tool, set balusters in designated slots.
NOTE: Using two assembly tools and overlapping these
will allow you to span the entire length of the railing
section for a 6' (1.83 m) span.
Insert balusters into top rail’s channels, align
bottom rails parallel to top rails with balusters at
equal distance from both ends.
NOTE: If assembly tool is not available, maximum
spacing for balusters is 5" (12.7 cm) on center or 3-5/8"
(9.2 cm) between balusters.
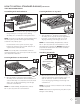
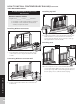
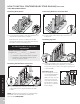
Securing Balusters to Bottom Rail
6. Move TrexExpress
™
Designer Series Railing
Assembly Tool to bottom rail and hold balusters in
contact with rail lip. Secure balusters to bottom rail
with 2" (5.1 cm) 16 gauge finishing nails through
underside of bottom rail.
NOTE: For added stability, drill pilot holes and use
#8 - 2" (5.1 cm) screws to secure balusters.
Securing Balusters to Top Rail
7. Slide TrexExpress
™
Designer Series Railing
Assembly Tool to top rail and check alignment of
balusters. Secure balusters with 2" (5.1 cm)
16 gauge finishing nails through side of rail.
NOTE: For added stability, drill pilot holes and use
#8 - 2" (5.1 cm) screws to secure balusters or nail
thru both sides of the top rail. ALWAYS hold nail gun
perpendicular to baluster to be sure the nail drives
securely into baluster.
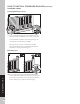
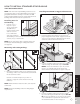
Attaching Foot Blocks
8. Measure distance from deck surface to top of
channel in bottom rail, approximately 3-1/2" - 4"
(8.9 cm - 10.2 cm). Secure foot blocks with
2" (5.1 cm) 16 gauge finishing nails through side
of bottom rail.
NOTE: 2" (5.1 cm) screws can also be used. Pre-drilling
would be required.
NOTE: Foot blocks are required every 18" (45.7 cm) for
Designer Series Railing.
1
1
5
1
1
6
2
HOW TO INSTALL STANDARD RAILING/CONTINUED
TREX DESIGNER SERIES
1
1
1
7
2
18"
(45.7 cm)
3-1/2" to 4"
(8.9 cm to 10.2 cm)
8