
Installation Guide


44
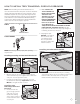
HOW TO INSTALL DECKING
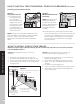
HOW TO INSTALL 4X4 AND 5X5 STRUCTURAL PORCH POSTS/CONTINUED
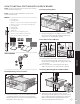
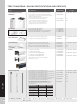
Attaching Decorative
Column to Mounting
Plate
4. Slide the decorative
column over the support
tube leaving about 24"
(61 cm) exposed.
NOTE: DO NOT slide decorative column on rough
surfaces to avoid scratching.
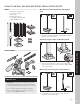
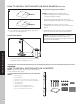
Installing Filler Strips
5. Slide a filler strip into each side of decorative
column in-between aluminum support tube and
inside wall of column. Do this on all 4 sides.
6. Slide decorative column down over filler strips and
onto bottom mounting plate until column sits flush
as shown.
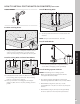
Placing Second
Mounting Plate
7. Place second supplied
mounting plate on top
of aluminum support
tube (inside decorative
column) and secure
using four #10 x 1.000"
screws (provided).
NOTE: The sides of the two mounting plates must be
parallel to each other as shown above.
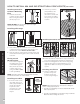
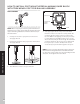
Installing Post Skirts
8. Cut out a notch on the
inner wall of two post
skirts (not provided) as
shown. This will be
required to allow
clearance for screw
heads installed in
Step 11.
9. Slide two post skirts
(not provided) onto
top and bottom of
decorative column and
place entire assembly
into opening in desired
location.
Attaching Decorative Column to Deck Flooring
10. Rotate decorative column 45° to expose mounting
holes in mounting plates both at top and bottom.
11. Fasten mounting plates to floor and ceiling using
appropriate fasteners (not provided) for your
application. Make sure the post is plumb and
square.
Finishing Installation
12. Slide post skirts into
position on top and
bottom of post and
secure using PVC glue.
NOTES: When attaching Trex Transcend
®
or Designer
Series
®
railing to porch posts:
» Use #10 x 2 self-drilling screws to attach RSB's to flat
side of porch posts.
» Use #10 x 3 self-drilling screws when using Trex Bird's
Mouth to attach railings to corners.
24"
(61 cm)
24"
(61 cm)
4
5
6
7
8
9
1
10
2
1
11
2
1
12
2