
Installation Guide

90
DESIGNER RAILING
1
1
9
2
2
2
10
5-1/2"
(14 cm)
3
1
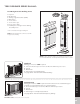
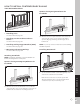
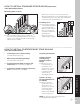
Installing Bottom Rail
9. Secure bottom rail with screws through top of rail
and into the outermost hole in RSBs.
Bottom rail can also be secured to posts with
16 gauge finishing nails, toenailed from bottom of
rail and 1" (2.5 cm) in from the posts.
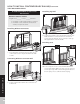
Installing Stair Baluster Connectors
10. Place stair baluster connectors 5-1/2" (14 cm) on
center and secure to top and bottom rails with
screws.
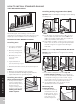
NOTE: Stair baluster connectors are sold separately.
Black 3/4" (1.9 cm) Stair Baluster Connectors
Part number: BK075SCON
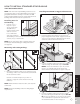
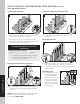
Connecting Balusters to Bottom Rail
11. Lower each baluster down onto connectors on
bottom rail.
Installing Top Rail
12. Lower top rail with connectors between posts
onto RSBs and then place balusters on connectors.
Secure rail sections with screws up through bottom
of rail into RSBs.
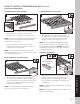
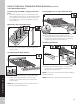
Finishing Posts
13. Posts and post sleeves
can be trimmed but this
is not a requirement.
Make sure tops of posts
are level. Secure post
caps with construction-
grade adhesive. Clean-
up any excess adhesive
before drying.
HOW TO INSTALL CONTEMPORARY STAIR RAILING/CONTINUED
TREX DESIGNER SERIES
11
12
2
1
Top
Rail
Top
Rail
Bottom
Rail
Bottom
Rail
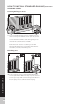
DETERMINING NUMBER OF BALUSTERS
AND SPACING
Number of balusters needed
Length of rail ______" ÷ 5.5 = ______balusters
» If number is odd, balusters will be centered.
» If number is even, balusters will be offset
2-3/4" (7 cm) from center.
2
13
3
1