
Installation Guide


65
TRANSCEND RAILING
NOTES: Read all instructions BEFORE installation.
» You must purchase the 1/4" (0.6 cm) tempered glass
panels. See dimensions below.
» Glass panels ONLY for use with maximum 6'
(1.83 m) on center post spacing.
» NOT recommended for stair applications.
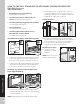
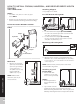
1. Installing Pressure-Treated Posts
See instructions on page 57.
2. Installing Post Sleeve Skirts and Post
Sleeves
See instructions on page 57.
3. Installing Railing Support Brackets (RSBs)
See instructions on page 57.
4. Cutting Railings
See instructions on page 58.
5. Attaching Bottom Rail (Universal or
Beveled rail) and Foot Block
See instructions on page 58.
Attach Weatherstripping and Positioning Panel
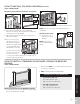
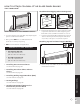
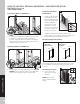
6. Push black-edged trim onto upper and lower edges
of panel. Be sure trim runs entire length of glass.
Extra trim can be cut with razor blade or scissors.
7. Position panel with weatherstripping into lower rail
channel. Center panel between posts with about
2" (5.1 cm) of air space on each side of panel.
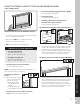
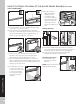
Attaching Top Rail and Panel Support Molding
8. Cut 2" x 4" (5.1 cm x 10.2 cm) to same length of the
inverted Universal rail.
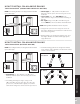
HOW TO ATTACH COLONIAL STYLE GLASS PANEL RAILING
TREX TRANSCEND
®
8
7
2" (5.1 cm)2" (5.1 cm)
63-1/2"
(161.3 cm)
6
TEMPERED GLASS PANEL DIMENSIONS
» 36" (91.4 cm) high rail:
1/4" x 30" x 63-1/2" max.
(0.6 cm x 76.2 cm x 161.3 cm)
» 42" (106.7 cm) high rail:
1/4" x 36" x 63-1/2" max.
(0.6 cm x 91.4 cm x 161.3 cm)