Installation Guide: Fence www.TrexFencing.com For Questions, Contact Trex Fencing Technical Support. Phone: 877-700-8739 Email: Info@TrexFencing.
Trex® Seclusions® Fencing www.TrexFencing.com PLEASE READ CAREFULLY Do not return product before contacting Trex Fencing for instructions: 877-700-8739 Installation Assistance Professional installation support is just a phone call or email away: 1-877-700-8739 or Info@TrexFencing.com. Trex® Seclusions® Fence Colors Saddle Woodland Brown Winchester Grey* *When it is new, Winchester Grey looks similar to Woodland Brown. As it weathers shortly after installation, it will lighten to a grey color.
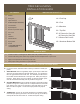
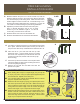
TREX SECLUSIONS INSTALLATION GUIDE ® □ □ □ □ □ □ □ □ □ □ □ □ □ □ TOOLS NEEDED ITEMS USED PER SECTION (6’ Tall) Stakes A String line A 1 Post Cap Tape measure B 1 Post 12” Miter Saw (Recommended) Circular Saw B Speed square C 4 Brackets D Shovel or post hole digger D 1 Top Rail 4 ft Level Drill E Hammer Wheel Barrow E 13 Pickets for 6’long Kit 19 Pickets for 8’long Kit F 2 Bottom Rail Covers C Spray Paint F Pencil 2” Finish Nails / Nail Gun or Composite Screws G 1 Aluminum Bottom R
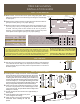
TREX SECLUSIONS INSTALLATION GUIDE ® STEP 2: LAY OUT FENCE LINE A Mark location of all end and corner posts using spray paint. Place stakes and string lines so that the string runs along the outside edge of these posts. Property pin B Determine the location and size of each gate and mark the location of Holes Marking For Digging Post Holes Post Location (for 6' long kits) or 96" (for 8' long kits) from the marks made in steps A and B. This may leave a short section at the end.
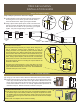
TREX SECLUSIONS INSTALLATION GUIDE ® STEP 5: CUT POSTS TO HEIGHT Skip to Step 6 if posts have been set to height A Locate transition posts (posts where ground changes slope) and string lines 74-1/2” above ground. This will create a reveal as shown below. Adjust your height if desired. B Using a pencil and a speed square, draw a line where the 74 1/2" string line crosses the uphill side of the post. Transfer this line around all four sides of the post using your speed square.
TREX SECLUSIONS INSTALLATION GUIDE ® STEP 7: CUT & INSTALL BOTTOM RAILS A Measure between the post or for a more accurate cut, hold the A&B aluminum bottom rail next to the posts in line with the rail brackets, with the deeper pocket facing down. Mark the bottom rail to transfer angles to ensure accurate cuts. Cut the rail using a nonferrous metal cutting blade (Wear Eye Protection). Cut the rail 1/2” smaller to avoid scratching the posts during installation.
TREX SECLUSIONS INSTALLATION GUIDE ® STEP 9: INSTALL PICKETS A Notch the first picket in each section at a 45 degree angle, measuring 2” each A 2” direction. This will keep the picket from interfering with the bracket. Do not notch 2” the last picket until you know which direction it will face. If the posts are set at the max width on center, the first and last picket will face the same direction. For shorter sections, the first and last pickets may face in opposite directions.
For drawings, technical specifications, and other architectural information, please refer to our website: trexfencing.com/trade-resources/technical-center/ Be sure to research local codes and other requirements for your area prior to installing your fence. An installation preparation checklist is available on our website: trexfencing.