
Installation Guide


TREX SECLUSIONS
®
INSTALLATION GUIDE
ITEMS USED PER SECTION (6’ Tall)
BEFORE YOU BEGIN
TOOLS NEEDED
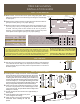
STEP 1: DETERMINE INSTALL METHOD FOR UNEVEN TERRAIN
□ Stakes
□ Pencil
□ String line
□ Tape measure
□ 12” Miter Saw (Recommended)
□ Circular Saw
□ Shovel or post hole digger
□ Drill
□ Wheel Barrow
□ 4 ft Level
□ Hammer
□ Spray Paint
□
2” Finish Nails / Nail Gun or
Composite Screws
□ Speed square
>> Confirm location of underground utilities with local providers before you dig.
>> Check local zoning laws, which may regulate the size and placement of your fence.
>> Apply for local permit as directed by local code.
A
B
C
D
E
F
G
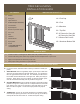
1 Post Cap
1 Post
4 Brackets
1 Top Rail
13 Pickets for 6’long Kit
2 Bottom Rail Covers
1 Aluminum Bottom Rail
A
B
C
D
E
F
G
A
1
For uneven terrain, determine which method you will use to install your
panels:
This fence gradually “steps” up the slope so that each
section is the same length and the rails remain level. You will need to
fill in the gap below the fence with soil. The downhill post will need to
be set taller to allow attachment of the upper rail. Taller posts may be
required. When laying out fence (STEP 2) spacing between posts
must be measured horizontally and not parallel to the ground.
2
This fence follows the grade or slope with the rails
parallel to the ground. Taller posts are not required but the horizontal
post spacing may need to be reduced to avoid rails being too short.
Miter cut rails to fit grade. On extreme slopes pickets may require
cutting.
3
STEP METHOD:
SLOPING METHOD:
A fence can be easily transitioned to a different height.
Horizontal post spacing will need to be reduced (see fig.3 in STEP 2)
and top rail will need to be miter cut. Pickets will require cutting.
TRANSITION:
1
2
3
©2016 TFSC
19 Pickets for 8’long Kit
>> Wear proper safety protection for eyes and ears.