
Installation Guide


TREX SECLUSIONS
®
INSTALLATION GUIDE
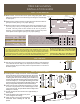
STEP 2: LAY OUT FENCE LINE
A
C
B
Opening
Between
Posts
Gate
Posts on
Center
Panel
Size
Standard Panel
Large Panel
44-3/8”
63-7/8”
46-1/4”
65-3/4”
51-1/4”
70-3/4”
2 Standard Panels
2 Large Panels
44-3/8”
63-7/8”
91-1/2”
130-1/2”
96-1/2”
135-1/2”
1 Standard & 1 Large Panel 111” 116”
Gate Post Spacing
Fig. 2
Advanced Tips and Tricks:
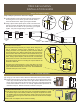
STEP 3: DIG HOLES
30”
12”
A
A
A
C
D
E
B
C
D
E
74-1/2”
STEP 4: SET POSTS TO HEIGHT
0”
6”
12”
18”
24”
96”
94¼”
91½”
88”
83⅝”
Drop in
4 ft
Max on Center
6’Kit 8’Kit
4 ft Level
Fig. 3
Determine the amount of vertical drop in a 4’
horizontal distance by placing a 48” level on the
ground and raising it until it is level and then
measuring from bottom of the level to the ground.
Consult the chart to the right for maximum post on center.
0”
12”
24”
36”
48”
Ex. For 8’ kit, if ground drops 6” in 4’, then max centers is 94¼”.
When transitioning from one fence height to the next, use transition chart.
Ex. Sloping from a 6’ to a 3’ fence with 6’ kit, set post center at 52”.
Transitions
Drop
67½”
66½”
64⅜”
61¾”
58⅝”
96”
94”
90¾”
85½”
78¾”
Max on Center
6’Kit 8’Kit
67½”
65¼”
60¼”
52”
29”
73½”
73½”
TRANSITION
POINTS
A
B
73-1/2”
Mark location of all end and corner posts using spray paint. Place
stakes and string lines so that the string runs along the outside edge
of these posts.
Determine the location and size of each gate and mark the location of
gate post centers (see fig. 2 for proper spacing).
Mark the locations of the remaining post centers by measuring 67 1/2"
(for 6' long kits) or 96" (for 8' long kits) from the marks made in steps
A and B. This may leave a short section at the end. If ground is
slopping, or fence transitions to a different height, the posts may need
to be spaced closer together (see fig.3 for proper spacing).
For uniform post spacing, mark the location of the remaining posts in step C by
measuring the distance (in inches) between the marks made in steps A and B. Divide
these measurements by 67 1/2" (for 6' long kits) or 96" (for 8' long kits) and round up
to determine the number of sections. Now divide the distance between the marks by
this number (number of sections), this will be t
he distance between the posts.
Ex. For a 69’ fence line on flat terrain using an
8’ kit: 69 x 12 = 828” / 96” = 8.625 Now round
up = 9 sections. Now 828” / 9 = 92” on center.
6’ kit: 69 x 12 = 828” / 67.5 = 12.27 Now round
up = 13 sections. Now 828” / 13 = 63 5/8” o.c.
Dig holes for posts making sure not to disturb the stakes. Holes should be
12” in diameter and 30” deep (or as required per local codes or conditions).
Holes should be dug so that they allow for equal amounts of concrete on
all sides of posts.
If setting posts to height, set all end, corner and transition
posts (posts where ground changes slope) first. String a line
from the top of these posts to determine the height of the
remaining posts. Now, set the remaining posts so that the top
of these posts align with this string. Note: If posts are not being
set to exact height (i.e., cut to height after setting) insure that
posts are set to the proper depth as indicated in Step 3, then
string for height after all posts are set and follow Step 5.
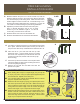
Insert post int
o hole. typical finish post height for a 6’ fence
is 74-1/2” to top of post or 73-1/2” to bottom edge of crown
cap (if using 8’ posts, the post will be raised to height when
adding the concrete).
Fill hole around post with concrete mix to approximately 2”
below grade.
Level and plumb posts making sure post is
next to string but not touching.
Allow concrete to set as per manufacture’s
instructions before installing the rails and
pickets.
Property
Property
pin
Stakes For
Fence Lines
Holes
Marking For
Digging Post
Holes
Property
pin
Post
Location
Fig. 1
Gate Posts
Corner Post
End Post