
Installation Guide


41
HOW TO INSTALL DECKING
HOW TO INSTALL TREX TRANSCEND
®
PORCH FLOORBOARDS
NOTE: When installing Trex Porch Floorboards in a
non-covered environment, the porch structure should be
slightly sloped to help allow for proper drainage. Joists
should be sloped 1/8" (0.3 cm) per foot away from the
house to facilitate drainage. Refer to your local building
code official for recommendations BEFORE building
sub-structure. When installing Trex Porch Floorboards
under cover of a roof, no slope is required.
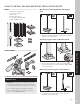
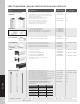
PARTS
TOOLS NEEDED
NOTE: Refer to page 33 for proper joist spanning
requirements.
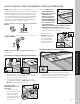
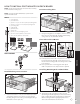
Installing Start Clips and First Porch Floorboard
1. Measure 3/8" (1 cm) off of edge of ledger board,
and install start clip onto ledger board, centered on
each joist. Secure clips with screws.
2. Push grooved edge (longer edge side) of porch
floorboard into start clips. Important: First board
MUST be straight and well secured.
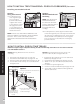
Installing Trex
Hideaway® Universal
Fasteners
3. Insert fastener into
grooved edge (shorter
edge side) of porch
floorboard, making
sure to align screw hole
in fastener with center
of each joist.
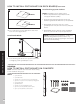
4. IT IS SUGGESTED
THAT IN ORDER TO
KEEP THE FASTENER
STRAIGHT AND
SECURE, CUT AN 18
"
(45.7 cm) PIECE OF
PORCH FLOORBOARD
SCRAP BOARD AND
USE THIS AS AN AID
(USE SMALLER LIP
SIDE) TO HELP HOLD THE HIDDEN FASTENER
DOWN BEFORE SCREWING THIS IN. This will
help make sure the fastener stays fully straight for
remaining boards to be attached.
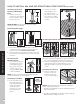
5. Fully tighten (but
DO NOT over tighten)
the screw into each
joist while keeping
the scrap board in
firm place against the
hidden fastener.
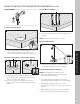
Installing Second Porch Floorboard
6. Slide second porch floorboard into place, making
sure fasteners fit into groove. Install the next universal
fastener on the other side of the second porch
floorboard in the same manner as Steps 3 - 5.
1
3/8" (0.95 cm)
2
2
3
1
1
2
2
Scrap board
5
4
6
Start clip
Universal fastener