
Installation Guide

60
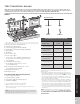
TRANSCEND RAILING
NOTE: Beveled rail cannot be used as top rail in this
application.
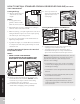
1. Installing Pressure-Treated Posts
See instructions on page 57.
2. Installing Post Sleeve Skirts and Post
Sleeves See instructions on page 57.
3. Installing Railing Support Brackets (RSBs)
See instructions on page 57.
4. Cutting Railings
See instructions on page 58.
5. Attaching Bottom Rail (Universal or
Beveled Rail) and Foot Block
See instructions on page 58.
6-7. Placing Baluster Spacers and Balusters
See instructions on page 58.
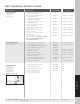
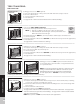
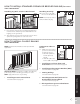
Attaching the Inverted Universal Rail as
Top Rail
8. Place inverted Universal rail onto RSBs with
balusters in channel. Attach Universal rail to RSBs
with two self-tapping screws (provided).
9. Place deck boards (DO NOT use Escapes, Select,
or Contour deck boards for top rail) over Universal
rails. Attach boards on each post with Trex-
recommended composite screws at a diagonal.
Secure boards to Universal rails with 2" (5.1 cm)
pan-head screws (provided) at an angle every 16"
(40.6 cm) on center.
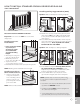
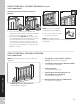
10. Slide baluster spacers up and snap into Universal rails.
NOTE: If necessary, cut tips off
rail gaskets prior to installation.
11. Use scarf cut for posts where
two deck boards meet.
NOTE: If installing in weather
below 40°F (4.5°C), leave 1/8" (0.3 cm) gap between
deck boards.
HOW TO INSTALL CLASSIC RAILING/CONTINUED
TREX TRANSCEND
®
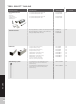
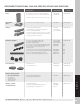
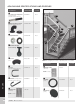
HOW TO INSTALL COLONIAL RAILING
TREX TRANSCEND
®
10
11
Optional
1
1
9
3
2
1
8
2