
Installation Guide


66
TRANSCEND RAILING
HOW TO ATTACH COLONIAL STYLE GLASS PANEL RAILING/CONTINUED
TREX TRANSCEND
®
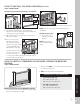
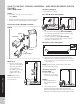
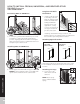
9. Place inverted 2" x 4" (5.1 cm x 10.2 cm) (place top
side down) on clean, flat surface.
10. Place Universal rail (remembering to orient this
properly so that when flipped over the Universal rail
will accept the baluster spacer and balusters), on
the 2" x 4" (5.1 cm x 10.2 cm), centered.
11. Secure 2" x 4" (5.1 cm x 10.2 cm) to Universal
rail with 2" (5.1 cm) pan head screws (provided)
approximately every 16" (40.6 cm) on center.
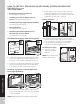
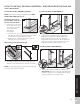
12. Place inverted Universal rail with 2" x 4" (5.1 cm x
10.2 cm) attached onto RSB’s with glass panel in the
channel. Attach Universal rail to RSB’s with two self-
tapping screws (provided).
13. Predrill a pilot hole and
toenail 2-1/2" (6.4 cm)
screw at each end of the
2" x 4" (5.1 cm x 10.2
cm) into post on back
side (side not facing
decking).
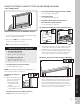
14. Install four panel
support moldings
(PSM) into rails
to complete snap
connection. Both the
top and bottom PSM
edges rest on the lip
of the rails for both
Universal and Beveled
rails.
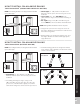
Hiding Brackets
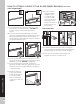
15. Cut Transcend baluster spacer into four lengths
equal to distance between the glass panel and posts.
Cut slowly and one at a time, to avoid chipping.
16. Snap spacer into bottom and top rail to hide
brackets and create a seamless look.
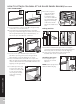
Attaching Post Caps
17. Secure post caps
with silicone or PVC
adhesive.
NOTE: Clean-up any excess
adhesive before drying.
11
13
3
1
1
12
2
14
10
9
16
2
17
3
1
15