
Installation Guide

37
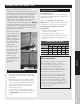
HOW TO INSTALL DECKING
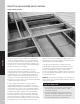
HOW TO INSTALL TREX HIDEAWAY
®
STAINLESS STEEL FASTENERS
(TREX TRANSCEND
®
, ENHANCE
®
, ACCENTS
®
)
NOTE: Cannot be used for Trex Escapes
®
.
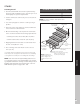
PARTS
TOOLS NEEDED
NOTE: Maximum spacing of deck boards using the
Hideaway system is 16" (40.6 cm) on center. Fasteners
provide 1/4" (0.6 cm) gap when installed correctly.
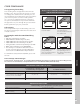
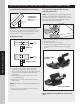
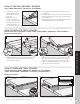
Installing Start Clips and First Board
1. Install start clips on edge of ledger board, centered
on each joist. Secure clips with screws.
2. Push grooved edge of deck board into start clips.
Important: First deck board MUST be straight
and well secured.
Installing Stainless Steel Connector Clips
3. Insert connector clip into grooved edge of deck
board.
4. Center connector clip on joist and secure with
screw (provided) at 45° angle while standing on
board and applying pressure to clip. Install one
connector clip on each joist. Connector clips
MUST be vertical to deck boards with screws
securing clips in board’s grooved edge.
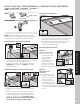
Installing Second Board
5. With next deck board in position and 2" (5.1 cm)
from connector clips, push the boards with enough
force to fully seat the clips in its grooved edge.
Check gaps between boards. Fully engaged, the
connector clip’s bump stop tab provides a
consistent 1/4" (0.6 cm) gap.
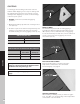
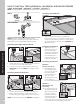
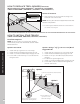
Installing the Last Board
Option 1:
Using a Fascia Board
6a. Pre-drill pilot holes
at an angle through
grooved edge of
deck board into
ledger board. Install
2-1/2" (6.4 cm)
decking screw using
pilot holes to secure.
Attach a fascia board flush with deck surface.
Option 2:
With Deck Board
Overhang
6b. Pre-drill pilot holes at
45° angle from below
deck surface through
rim joist. Seat last
board into fasteners
overhanging rim joist.
Secure last board with
2-1/2" (6.4 cm) decking screws using pilot holes.
Position fascia board below overhanging deck
board.
1
2
2
3
1
1
1
2
4
Bump stop tab
5
1/4" (0.6 cm)
2
2
6a
1
6b
2
3
4
Start clip Connector clip