
Installation Guide


89
DESIGNER RAILING
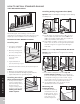
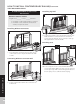
HOW TO INSTALL STANDARD STAIR RAILING/CONTINUED
TREX DESIGNER SERIES
1
1
12
3
2
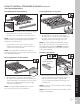
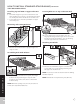
HOW TO INSTALL CONTEMPORARY STAIR RAILING
TREX DESIGNER SERIES
18"
(45.7 cm)
8a
18"
(45.7 cm)
8b
1. Installing Posts for Stair Railing
See instructions on page 87.
2. Measuring and Cutting Railings
See instructions on page 87.
3-5. Installing Bottom RSBs on Upper and
Lower Posts See instructions on page 87.
6-7. Installing Top RSBs on Upper and Lower
Posts See instructions on page 88.
Installing Foot Blocks
Option 1: If using
Contemporary
Balusters for Foot
Blocks
8a. Measure and cut
round balusters for
foot blocks every
18" (45.7 cm). Secure
baluster connectors
to bottom rail and
stair treads for
mounting balusters.
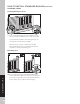
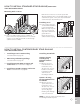
Option 2: If using
Designer Balusters for
Foot Blocks
8b. Measure and cut
square balusters for
foot blocks every
18" (45.7 cm). Secure
foot blocks with 2"
(5.1 cm) 16 gauge
finishing nails through
sides of bottom rail.
NOTE: 2" (5.1 cm) screws can also be used.
Pre-drilling would be required.
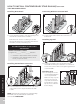
Mounting Rails on Posts
12. Place assembled railing section on RSBs on
posts and secure top rail with two 1-1/2" (3.8 cm)
screws. Secure bottom rail with screws through
outermost holes in RSBs.
Bottom rail can also be secured to posts with
16 gauge finishing nails, toenailed through the side
of rail into the posts, 1-1/2" (3.8 cm) from bottom
of rail and 1" (2.5 cm) from the post.
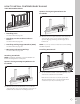
Finishing Posts
13. Posts and post sleeves
can be trimmed but this
is not a requirement.
Make sure tops of posts
are level. Secure post
caps with construction-
grade adhesive.
Clean-up any excess
adhesive before drying.
2
13
3
1