ENGLISH DIGITAL * DIGITAL * DIGITAL TRIAX DVB 63S/65S Users Manual TRIAX 1
I NT RODUCTION Safety Instructions For your own safety, please read the Safety Instructions carefully before putting your new receiver into operation. The manufacturer is not liable for damage caused by unauthorised handling or by non-compliance with the safety instructions. Do not place anything on top of the equipment as this would cover the ventilation slots allowing the heat to escape. Don’t ever open the receiver ! You might expose yourself to an electric shock.
CONTENTS Contents ...................................................................................... 3 Set-up and connections ............................................................ 4 Connection of a DVB-receiver to a satellite system ..................... 5 Conditional Access ...................................................................... 5 Operation of TRIAX SR 50/55 via RC65 ....................................... 6 Mains connection ........................................................
SET-UP AND CONNECTIONS Helpful Hints With the so-called “On Screen Display” the operation of the receiver is simplified, and the number of remote control keys minimised. All functions are displayed on the screen and can be controlled by means of a few buttons. Connected functions are compiled as “MENUS”. The function selected is marked with a blue line. In the bottom half of the screen a short comment on the function marked is displayed.
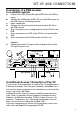
SET-UP AND CONNECTIONS Connection of a DVB-receiver to a satellite system a. b. c. d. e. f. g. h.
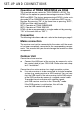
SET-UP AND CONNECTIONS Operation of TRIAX SR50/SR55 via RC65 The standard remote control for TRIAX DVB65S is RC65. This RC65 has the option to operate the analogue receivers TRIAX SR50 and SR55. The factory programming of RC65 is to be a single mode RC for DVB63S/65S only, ie the button SAT2 has no function. By pressing "OK" at the same time as pressing "SAT2", RC65 turns into a dual mode RC.
SET-UP AND CONNECTIONS Connection to a TV set By means of a SCART cable: To have the best possible picture quality you should connect receiver and tv by means of a SCART cable. Procedure: g Connect receiver (SCART-socket tv) and tv (SCART-socket) by means of a SCART-cable. If your tv is equipped accordingly, this will automatically shift to AV and thus to satellite reception when switching on the receiver.
SET-UP AND CONNECTIONS Setting of the UHF-output channel Follow this procedure: Call up the main menu by means of the menu button. Main menu > Settings Now select the menu line Settings, by marking the corresponding line by means of the cursor. Confirm with OK. This produces the sub-menu Settings. Now mark the menu line Audio/Video by means of the cursor. Confirm with OK. The sub-menu Audio/Video appears.
SET-UP AND CONNECTIONS receiver, and the receiver now transmits on the channel shown. If interference-free reception is still not possible on this channel, you must repeat the procdure until a suitable channel is found. When an optimum UHF-channel has been found, be sure to store this on your tv. In the menu Audio/Video further settings may now be made, or you may return to normal mode by means of the MENU-button. This setting is automatically stored when you exit from the menu.
SET-UP AND CONNECTIONS Serial port RS 232 The RS 232-port is used to update the software and preprogramming via PC. USB The Universal Serial Bus connector is intended for high-speed data transfer, for example between the receiver and a PC. In case the satellite receiver is used in connection with “Internet-via-satellite”, this connection is used as data transfer to the PC. Modem Your TRIAX DVB 65S has a build-in telephone modem.
SETTINGS Settings When you have connected your new receiver and put it into service, you can optimise the receiver to your own needs. OSD-language Under this menu you can set the menu language according to your own choice to the languages German, English, French, Italian, Turkish, Norwegian, Finnish, Danish, Swedish and Spanish. To change the OSD-language, proceed as follows: Call up the main menu by means of the menu-button Now select the menu line OSD-language, by marking it by means of the cursor.
SETTINGS Store by pressing OK. The back-button takes you back to the main menu. Basic setting In order to optimise the DVB-receiver you can set it to your own needs. Call up the main menu by pressing menu. Mark the line settings by means of the cursor. Confirm by pressing OK. Now the sub-menu Settings appears. Main menu > settings Other basic settings Now mark the line basic setting by means of the cursor. Confirm with OK. The menu basic setting (basis) appears.
SETTINGS Settings > Basis Parental lock: Your receiver is provided with a parental lock. Programs locked (see page 25) can thus only be set after entering a 4-digit PINNo. On this line you can set or cancel the parental lock by means of the OK-button. Time difference GMT (hrs.): Your receiver is provided with a timer, being synchronised via satellite reception according to Greenwich Mean Time. You just have to correct the time by means of the OK-button in accordance with your local time.
SETTINGS Settings > Basis UHF-output channel See page 7. SCART-mode: In this line set by means of the OK-button in accordance with your tv FBAS, RGB or S-VHS. For standard-tv you let the setting RGB remain. Subtitling: In this line set by means of the OK-button you can select subtitle on or off. Installation When you have set your receiver according to your individual requirements, you must if required now set the receiver in accordance with your aerial.
SETTINGS > Settings > LNB The following settings can be made in this sub-menu: DiSEqC on/off DiSEqC (see Chapter Technical Terms) is used for the control of major aerial systems. On this line the DiSEqC is switched on/off by means of the OK-button. Setting of matrix switch and LNB-features The menu lists the 4 switch criteria of DiSEqC-control. Your receiver has been pre-programmed to receive ASTRA in switch setting A/A and EutelSat in a multiswitch setting B/ A.
SETTINGS > Settings > LNB Now edit the menu > Settings > LNB until the indications of this menu correspond the indications of your receiver. Set no satellite for the switch criteria not required. Additional Settings Having set the matrix-switch of your DVB-receiver of your receiver system, you must now test and if necessary correct the additional settings of your receiver system. To do this, mark in the line Check LNB proceed for the satellite you want to test. Confirm with OK.
SETTINGS Test-Transponder The following sub-entries of this menu only have to be entered if you want to test a satellite signal from a satellite (User 1 to 17) which has been entered by yourself. Transponder frequency: Enter in this line by means of the numeric keys a frequency at which digital programs are being transmitted. Polarisation: Enter in this line by means of the OK-button the polarisation level (horizontal or vertical), at which the program wanted is transmitted.
SETTINGS Program search As already mentioned, your receiver has been pre-programmed for the reception from the satellites ASTRA and EUTELSAT. You have several options for program search in order to be able to receive new programs or programs from other satellites. After the search, your screen will display the number of programmes found by your receiver, and how many of these are new. New programs appear in red colour in the program list, and can then be entered into the user’s list acc.
SETTINGS Search > Satellite Under this menu item you can make a search for a special satellite. In that case all other satellites are not being searched. Select the menu line satellite by marking it by means of the cursor-button. Confirm with OK. Start search appears on the screen. However, first you have to select the satellite which you want to search. For this purpose, press the button OK. A menu window with the four satellite positions now appears.
SETTINGS Symbol rate: The symbol rate describes the number of data transmitted per second, e.g. 27000 (27000 symbols per second). Enter the corresponding symbol rate by means of the numeric keys. When you have completed all enterings, you start searching by marking up the line start search in red colour and confirm by pressing the OK-button. Please also note the screen insertions.
SETTINGS Resetting factory pre-setting Delete all program memory You can reset the factory pre-set LNB-setting at any time. If the program list is out of date due to changes by the program providers, you all also delete completely and then make a new search. Call up the main menu by means of the menubutton. Now select the menu line settings by marking it red by means of the cursor-button. Confirm with OK. The sub-menu > settings now appears.
SETTINGS System configuration This sub-menu displays the specific data of the equipment. Mark up this line in the sub-menu Settings by means of the cursor-button. Confirm with OK. The back-button or the menu-button will allow you to exit from the menu. Change of basic programming If you are not satisfied with the pre-programming of your receiver you can change the program list to suit your needs. This function is also needed for sorting the programs after searching.
SETTINGS Here all packages with corresponding programs are listed. Already existing programs are displayed in white colour, just found programs in red colour. Programs which already are in the user’s list are provided with a red cross. Encoded programs are marked with a key. Now, mark up by means of the cursor-button a program or package you want to edit. By pressing the button OK this field is now provided with a red cross (setting up in the user’s list).
SETTINGS Sorting of programs To sort the user’s program list to suit your needs, proceed as follows: Call up the main menu by means of the menubutton. Now mark up the line tv-programs by means of the cursor-button to sort tv-programs, or radio programs to sort radio programs. Confirm with OK. Now the sub-menu > Programs appears. Mark up the line sort by means of the cursorbutton.. Confirm with OK. Now the user’s program list appears.
SETTINGS Locking of programs If you wish so, you can lock programs. A locked program will not be displayed on the screen, until after setting the program you have entered your personal PIN-number. Once this number has been entered, the lock will remain cancelled until the receiver is switched off again (Standby) To lock a program, proceed as follows: Call up the main menu by pressing the menubutton.
SETTINGS Change of PIN The PIN-number has been factory pre-set at 0000. To activate the program lock you must in stead of the factory pre-setting enter your personal PIN-number. NB ! Do not forget the PIN-number. In case, however, that you should forget it, please contact your tv-retailer ! To change the PIN-number, proceed as follows: Mark up the line Change PIN by means of the cursor-button. Confirm by pressing the OK-button. Now enter the wanted new PIN-number by means of the numeric keys.
SETTINGS Software TRIAX A/S has the right of ownership of the software. As the owner of DVB 63S/65S you have the right to apply the software for this equipment. No kind of re-engineering or copying of the software for other purposes must be made without a written permission from TRIAX A/S. TRIAX A/S reserves the right to alter the software at any time. Update of software TRIAX DVB 63S/65S can currently be upgraded with new software made available by TRIAX.
OPERATION Power ON/OFF Switch on the receiver by pressing the ON/OFF button of the receiver or remote control. When you again press the ON/OFF button of the receiver or remote control, the receiver is switched off. The receiver is now in standby mode, and the display shows the time. To completely disconnect the receiver from the mains press the mains switch on the back of the receiver. Switch on the receiver, press the mains switch again. Program selection By means of the program up/down-buttons.
OPERATION By means of the program list: Press the List-button. A program list now appears. In tv-mode only tv-programs appear, and in radiomode only radio programs. The actually set program appears in blue colour. Now you can mark up red the program wanted by means of the cursorbutton. By pressing the OK-button, the program now selected is set up. The cursor-buttons up/ down move the cursor to the next/previous line of the text. The cursor-buttons left/right move to top/ bottom, respectively, of the page.
OPERATION Volume control You can control the volume of your receiver. This facilitates the use of the receiver as in this way you have all important functions in your remote control and thus only seldom have to use the remove control of your tv. Adjust the volume of your receiver by means of the button Volume + to be louder and by the button Volume - to be weaker. By pressing the button Mute the sound is switched off/on respectively by again pressing this button.
OPERATION Switch between tv/radio Besides tv-programs, the pre-programming also includes radio programes. In this case the tv-picture is not displayed, but only the name of the program. Switch-over to radio reception by means of the button tv/radio. The receiver now switches over to the radio program you listened to last. When you press the button tv/radio again, you switch over to the tv-program you watched last.
OPERATION Video text If transmitted, the video text is displayed on your tv. Use the remote control of your tv to operate video text. In case of disturbances on your tv, like e.g. interference of video text and picture, you must set your receiver to CVBS-operation. (Settings>Audio/Video, SCART mode). EPG When pressing “i” on your Remote Control, the EPG appears on the screen. You will then get a list of all the programs being transmitted at the actual time. This list is called the NOW-list.
OPERATION survey of the program of today on the different channels too. Press ”green” to recall this survey. Booking by means of EPG In all EPG menu’s, you can book any program shown just by means of moving the cursor to the program and pressing ”OK”. If the program is currently transmitted the receiver will immediately tune to the program. If the program is transmitted at a later time, the program is being ”booked”, i.e. the receiver will automatically tune to the program once the transmission starts.
TROUBLE SHOOTING When all the data are entered, you just confirm by activating the ”accept function” (yellow). Now your receiver automatically starts on the desired time and tunes to the desired program.
TECHNICAL TERMS Aerial cable: Connecting cable between the modulator of the satellite receiver and the aerial input of the tv, as an alternative if there is no SCART-socket. AV: see SCART Coaxial cable: Connecting cable between LNB and satellite receiver, for the transmission of signals received and power supply of the LNB. Data compression/MPEG1/MPEG2 For the transmission of the present tvstandard (625 lines and 50 Hz image replication frequency) there is a digital data quantity of 216 Mbit/s.
TECHNICAL TERMS Modulator Circuit in the satellite receiver or the VCR, for connection to the tv by means of an aerial cable. Mode determines whether a mono or stereo program is received. Satellite receiver: The signals received and converted by the LNB cannot be processed by the tv. In the satellite receiver they are processed in such a way that at its outputs there are audio and video signals (AV) which are transmitted to the tv.
TECHNICAL SPECIFICATIONS DBS-Tuner Input frequency range Input level range Noise level DBS tuner input Input impedance Output for 1.
TECHNICAL SPECIFICATIONS AUX-SCART: Input Output: Serial port RS 232: Type Bitrate Connector Function USB port: Type: Bitrate CVBS and RGB CVBS RS 232, bi-directional 38 kBit/s max. D-SUB-connector, 9-pole Update f. operating software Bulk Modus (quasi DMA): 2,5 Mbit/s Generic EP (Interrupt): 0,4 Mbit/s Connector USB-Connector B-Type Function Data transmission between IRD and PC Modem: TS1-V32bis Type: The integrated modem supports the standard ITU-T: V 32bis (14400 bit/s).
TECHNICAL SPECIFICATIONS Remote control system: Sub-system addresse Modulation frequency: Infrared wave length Power supply: Power input: Input voltage: RC-5 8 (SAT 1) 36 kHz 950 nm Mains connection <29 W (in operation, horizontal polarisation / 400 mA LNB current) <20 W (in operation, without LNB) < 3 W (standby) 180 V…250 V / 50 Hz A/C General Ambient temperature: Air humidity Dimensions: (wxdxh) Weight: +15° ...
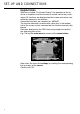
IN T RO D U CT ION Telephone line LNBindput Aerial input Connector to analogue RX Connector to TV Safety Instructions VORSICHT! ELEKTROSCHOK-GEFAHR NICHT ÖFFNEN! CAUTION! RISK OF ELECTRIC SHOCK DO NOT OPEN! PARALLEL PORT AERIAL DC 13/18V MAX 0,4 A SERIAL PORT TELEPHONE USB RECEIVER 2 LNBoutput TV AUX IN/OUT Serial port Parallel port (option) TV AUDIO OUT DOLBY DIGITAL/PCM R USB port AC 230 V 50 Hz MAX 30 VA L To aerial Optical Digital/ input on output analog the TV (optional) audio outpu