HOW TO OPERATE YOUR COOKER Dear Customer, Buying a new oven isn't something you do often and whether you've been cooking for many years or this is your first oven, please read these instructions carefully. They are designed to help you get to know your new vane and to achieve the best possible results. It may take a while to adapt to using the new features. Don't forget, technology is constantly changing our lives and this is illustrated in new oven design.
WARNINGS ELECTRIC COOKERS Important = | Please read this instruction Book before using the = appliance IT 1S MOST IMPORTANT THAT THIS INSTRUCTION BOOK SHOULD BE RETAINED WITH THE APPLIANCE FOR FUTURE REFERENCE. SHOULD THE APPLIANCE BE SOLD OR TRANSFERRED TGO ANOTHER OWNER, OR SHOULD YOU MOVE HOUSE AND LEAVE THE APPLIANCE, ALWAYS ENSURE ‘THAT THE BOOK IS SUPPLIED WITH THE APPLIANCE IN ORDER THE THE NEW OWNER CAN BE ACQUAINTED WITH THE FUNCTIONING OF THE APPLIANCE AND THE RELEVANT WARNINGS.
appliance, supervise children at ail times and do not allow them to touch the cooker or hob surface or be in the vicinity of the appliance until i¢ has cooled after use. Ensure that all packaging, both inside and (where applicable) onside the appliance is removed before the appliance is used. If you use a saucepan which is smaller than the heated area on the hob the handle may become hot. Future that you protect your hand before touching the handle.
CONTENTS Page Warnings to Users 2 Distillation € Before Use 6 Manual Control 6 Reversible Main Oven Dons 7 The Controls 8 The Ceramic Hob with TRINITY HALOGEN HEAT (where applicable) 9 The Ceramic Cooking Panel 8 Your Questions Answered 10 The Radiant Hob ° Saucepans ?” The Hob Lit 2 Operation of the Heated Areas “w The Grill “ The Second Oven B Warming Compartment 5
CONTENTS Page The Main Fan Oven *© Timer Control 23 Cleaning Cleaning the Ceramic Hob Cleaning the Grill Cleaning the Second Oven 20 Cleaning the Main Oven 20 Stay Clean Liners Cooking 30 Cleaning o Even Cooking Chart 3 Instructions for Cooking a Complete Meal 32 Customer Service Centers 33 Help us to Help You 35 Before Calling a Service Engineer.
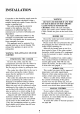
INSTALLATION Connection to the electricity supply must be made by a competent elect 1, using a4 suitable double pole switch. re that the cooker is standing level. “The cable connecting the electricity supply to this appliance must have conductors of sufficiently high cro sectional area to prevent overheating and degradation. Six square millimeters (6.0mm?} is the minimum recommended cross-sectional area.
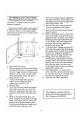
REVERSIBLE MAIN OVEN DOOR Tools required are one cross head {overdrive) screwdriver and one small adjustable spanner. The main oven door of the cooker can be changed from left to right-hand hinging. if required. This is a reasonably simple operation if carried out in accordance with these instructions. 1. Open main vane door, Remove main oven door stay by sliding the clip off the door stay securing pin on lower hinge bracket.
THE CONTROLS Front left hotplate Back left hotplate Back right hotplate Front night hotplate » P The full il The center section gruff mEI Om OO OO0
THE CERAMIC HOB WITH TRINITY HALOGEN HEAT (where applicable) Your TRINITY HALOGEN HEAT ceramic hob will introduce you to a form of bob cooking which is new and truly revolutionary, combining the benefits of conventional elements and TRINITY HALOGEN HEAT. The TRINITY HALOGEN HEAT area has special tungsten halogen lamps, which transmit heat very efficiently upwards through the ceramic glass.
to remove any rough edges and take off any deposits left from manufacture. Any guidelines o recommendations given by the saucepans or cooking utensils react should be followed. SIZES Pans should be approximately the same size 45 the cooking arcs ~ up 10 225 mm (%in) diameter saucepans on a nominal 180 mm. (7in) heated area. H smaller pans are used on the TRINITY HALOGEN HEAT area, care should be taken as the shandies may get hot.
Hft pots and pans onto the heated areas rather than 1o sited them. What do I do with “spills™? Allow the hob to cool before cleaning, Remove spills with @ clean. damp cloth (no detergent). If there is detergent in the cloth, you may leave a layer of soil-laden detergent on the hob surface which can slut in discoloration flextime the area is switched “on™, This is why dishcloths or washing-up sponges should not he it happens the special Clearer-Conditioner provided will remove it.
THE RADIANT HOB (where applicable) USE OF THE HOB THE HOB LID The hotplates give rapid heat and are fast boiling. The control switches provide a very flexible control from slow simmer to fast boil. The highest number is the softest sating. ‘These switches have intermediate positions. The numbers do not denote any set temperature, but after using the hob a few times no difficultly will be experienced in selecting an appropriate setting.
OPERATION OF THE HEATED AREAS 1. Place the saucepans with contents note the cooking area and mm the control switch to an appropriate setting. The ‘highest setting will allow the maximum amount of heat 16 be transferred to the pan for initial fast boiling or heating, but it is important to be guided by any particular recommendations given in the saucepan manufacturer’s instructions regarding the use of heat settings to suit the type of pan, Close fitting lids on the saucepans will ensure faster resells.
THE HIGH SPEED GRILL “The whale area of the grill can be used for grilling and toasting large quantities or the center section only for cooking smaller quantities of food. The grill door must he left open during grilling.
THE SECOND OVEN The second ‘oven s the small oven, it thermostatically controlled and van be used for cooking dishes on a small maximum of 12 queen cakes or scones one baking troy. If desired small joints which require slow roasting can be cooked in this oven. The oven is heated by an element at the top of the compartment, and a lower element under the base of the compartment, USL OFT OND OVE! 1. Before cooking in the oven ensure that the grill splash tray/deflector is in position. 2.
THE MAIN FAN OVEN 1, 'The oven doer should be opened by pooling the handle at the top and closed with a gentle push. 2. Before switching the oven “on’. arrange the shelves in position, There are up t© three shelves provided to allow for bulk baking on a maximum of three feels at any one time. The even heat distribution in the oven allows most dishes to be cooked equally well on any shelf position. The shelf positions are numbered from the Bottom upwards. 3.
DEFROSTING THE FAN OVEN When the defrost switch is on, the fan only operates Le. without heat. This enables some foods © be defrosted more quickly than conventional methods due to the fast circulating air in the oven. although the actual speed of defrosting will be determined by the ambient temperature. The type of foods suitable for thawing without heat are delicate frozen foods ta be served cold, such as fruit, cream, fresh cream or butter-cream filled cakes and gateau, cakes coated with icings.
THERMAL GRILLING IN THE FAN OVEN (using the grilling grid provided) Thermal grilling (by hot air) in the fan oven with the door closed offers an alternative method of cooking food stems normally associated with conventional grilling. Kebabs, fish, chops and sausages may be thermal grilled in the fan oven using the special grid where provided. Varied and/or bulk loads of food such as chicken portions ar mixed grill may be successfully cooked.
Below are recommendations for cooking a breakfast and mixed grief by thereat gritting using the rifling grid. Breakfast Tomatoes Mushrooms Toast Chipolata Sausages Bacon Oven Temperature: 200°C Time: 20 min 1 Halve the tomatoes and place in the meat tin with the mushrooms. 2 Spread sties of bread on both sides with either butter or white fat. 3 Place the grid in position. Cover with bread. sausages and bacon rashers.
TIMER CONTROL (where fitted) FULLY AUTOMATIC TIMER MINUTE MINDER Planner section of control knob. B. Outer section of control knob. 1. Clock second hand. 2. Hand for minute minder. 3. Off position for minute minder. 4. Start timer indicator line. 5. Stop time indicator. Cook time. Ara indicating completion of automatic programmer. Chert only this area is visible return conker to manual (sce page 22} 8 Dot indicator.
Setting the Timer Control Follow these simple steps: A, TO SET THE TIMER TO SWITCH ‘ON’ AND *OFF* AUTOMATICALLY OPERATION NOTES 1. Make sure the electricity supply is switched ON. 2. Place food in oven, 3. Check that the clock shows the correct Push in and rum the inner section of the knob time of day. Adjust if necessary (A) clockwise or anticlockwise as required. 4. Set the step time.
TO RETURN THE COOKER TO MANUAL OPERATION Follow the steps below to ensure that after use the oven is returned fo manual, otherwise it will mot operatic. At the end of 3 timed cooking operation only the ares will be visible. Turn the outer section of the knob (By clockwise weal the [725) area is 10 longer visible and the dot indicator ® is against the stop. Turn the oven control on o check that the oven operates manually. The oven indicator light will come on. “Furn the oven control off.
TIMER CONTROL (where fitted) FULLY AUTOMATIC TIMER Auto display . Minute minder button Cooking hours button . Stop ime bunion . Cooking symbol . Manual selector button . Setting knob NP WS WON = This timer will automatically switch the oven on and off to the selected times. T lase includes a clock and minute minder. ‘The ovens will not operate unless the clock has been set. CLOCK The clock will operate even if the automatic control is not being vised. If the cooker is switched off at the wall control panel.
Setting the Timer Control Follow these simple steps: A.TO SET THE TIMER TO SWITCH ‘ON’ AND ‘OFF” AUTOMATICALLY OPERATION NOTES 1. Make sure the electricity supply iy switched ON. 2. Place food in oven, 3. Check that the clock shows the correct Press any two buttons ar the same time turn time of day. Adjust if necessary. the sexting knob the correct time is reached. Release the buttons. 4. Set the LENGTH OF COOKING Push it the cooking hours button, 3 at the TIME required.
B. TO SET THE TIMER TO SWITCH “‘OFF’ ONLY Follow points 1-3 previously then: 5. Set the LENGTH OF COOKING TIME required, Push in the cooking hours button, at the same rime turn the setting knob until cooking time is metered in the display. Release the button, The auto display will glow. 6. St the oven (o the required temperature. The oven indicator Kg ht should be ON. 7. To check the stop time. The stop time can be checked ar any time riding the cooking period by pressing the stop bunion.
CLEANING THE ELECTRICITY SUPPLY MUST BE SWITCHED OFF BEFORE CANING Al exterior surfaces are hard wearing. easily cleaned and impervious 16 alt normal heat and spillage encountered during cooking, Vitreous enamel can be chipped hy a bard blow and reasonable ware should he exercised. The exterior surfaces including the oven doors should be cleaned using a little detergent in hot water. and polished with a soft cloth.
Remember: * I a wet paper towel Is used o remove spillovers from warm cooking areas. be careful to avoid steam burns. * Never mix different household cleaning prod chemical mixtures may interact. with objectionable or even hazardous results, * Do not use a sponge or dishcloth. They sy Eave a firm of soil-laden detergent water on heating area which may turn brown and resemble a discoloration next time arcs is heated.
generously, a heavy film may be left that will burn on and discolor when the elements are heated. 1f, after the use of the recommended materials, there are some persistent stains or marks on the hob, the hob should be cleaned using "Ajax” or "Vim" Powder Cleaner.
CLEANING THE SECOND OVEN To minimize oven soiled wi caking at the temperatures and shelf positions recommended. "Stay-Clean’ panels may have been fetid 10 this oven and instructions for cleaning these ure given in the section e of Stay-Clean”, 1f any spillage drops onto the vitreous enamel base. normal oven cleaners may be used to remove it.
STAY-CLEAN LINERS (where fitted) T CARE OF STAY-CLEAN C lmnmg of the "Stay-Clean .surtax ¢ i initiated by an inclusion of sp in the enamel; these are matched when the temperature of the oven is raised. and aided by oxygen. result in the flagella ic. food splatter and grease being destroyed. The linings clean themselves during normal toasting and baking. As cleaning may be improved by exposure to a higher temperature.
OVEN COOKING CHART The oven temperatures arc intended as a guide only. It may be necessary 1o increase or decrease the temperature by 10°C to suit individual preferences and requirements. Note: Shelf positions are counted from the bottom of the oven AMEN FAN OVEN SECOND OVEN Food Frisbee Cooking.
INSTRUCTIONS FOR COOKING A COMPLETE MEAL IN THE FAN OVEN Many people today like to cook meat at comparatively low temperatures. When these dower temperatures are used the jot is often more tender: also there!is very little splashing of fat onto the oven interior during cooking. When a "Full Meal” including in a joint, resat potatoes, fruit pic and Yorkshire Pudding is required. cooking times may vary sightly according to the thickness of the joint and how "well done” one likes the meat and potatoes ec.
HELP US TO HELP YOU Please determine your type of inquiry before writing or telephoning: i, SERVICE In the event of your appliance requiring service, Trinity Bendix Domestic Appliances have an arrangement with Electrocute Group Service. Before calling out an Engineer, please ensure you have read the details under the heading ‘Service Check’, and have the model number and purchase date to hand.
BEFORE CALLING A SERVICE ENGINEER We strongly recommend that you tarry out the following checks on your appliance before calling a Service Engineer, 1t may be that the problem is « simple one which you can solve yourself without the expense of a Service Call. 1f our Service Engineer finds that the problem is one of those listed helot. you will be charged Yar the call whether or not the appliance is under guarantee PROBLEM The cooker dares not work. The gill does aot work.
RATING PLATE The rating plate is situated on the plinth near the base of the cooker. It gives the MODEL AND SERIAL NUMBER, which should be quoted in any communication or if the service department is contacted. 1t is advisable (o make a note of these below and keep for reference before the appliance is installed.