Contents Please refer to the sections in this leaflet as appropriate to the features on your particular model.
WARNINGS ELECTRIC COOKERS IT IS MOST IMPORTANT THAT THIS INSTRUCTION BOOK SHOULD BE RETAINED WITH THE APPLIANCE FOR FUTURE REFERENCE. SHOULD THE APPLIANCE BE SOLD OR TRANSFERRED TO ANOTHER OWNER, OR SHOULD YOU MOVE HOUSE AND LEAVE THE APPLIANCE, ALWAYS ENSURE THAT THE BOOK IS SUPPLIED WITH THE APPLIANCE IN ORDER THAT THE NEW OWNER CAN BE ACQUAINTED WITH THE FUNCTIONING OF THE APPLIANCE AND THE RELEVANT WARNINGS.
@® Cookers and hobs become very hot with use, and retain their heat for a long period of time after use. You must therefore take care when using the appliance, supervise children at all times and do not allow them to touch the cooker or hob surface or be in the vicinity of the appliance until it has cooled after use. @® Ensure that all packaging, both inside and (where applicable) outside the appliance is removed before the appliance is used.
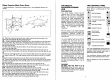
Glass Exterior Main Oven Door 1 bladed screwdriver, 1 poi-drive screwdriver and 1 small adjustable spanner are needed. (i) Open door wide and support the door whilst removing the three screws in the bottom left hinge bracket (A), then remove the door. (ii) Remove the top left hand hinge bracket (B). (iii) Using an adjustable spanner remove the door catch and plate from the right hand side of the cooker, (C).
The Ceramic Cooking Panel The smooth ceramic glass panel is nonporous and durable. Beneath it there is one Trinity Halogen heat area, located under a decorative oval area on the surface and three conventional elements, each one located under a decorative circular area on the surface. Intermittently the conventional elements may be seen glowing through the ceramic surface when the heated area is on. Use of your Ceramic Hob 1. Ensure that hob and pans are clean and dry. 2.
Deep Fat Frying SPECIAL FRYING NOTE: For safety purposes when deep fat frying, fill the pan only one-third full of fat or oil, do not cover the pan with a lid and do not leave the pan unattended. In the unfortunate event of a fire, switch off at the electricity supply and cover the pan with a lid or damp cloth to assist in smothering the flames. Do not leave the fat or oil in the frying pan on the hob to store it, in case the hob is inadvertently switched on. 1.
THE HIGH SPEED GRILL The whole area of the grill can be used for grilling and toasting larger quantities or the center section only for cooking smaller quantities of food. Operation of the Rapid (Whole) Grill To operate the grill turn the grill control clockwise from the ‘O’ position. For grilling and toasting, the control should normally be turned to 5 for initial preheating of 2 minutes and then adjusted as necessary.
THE FAN MAIN OVEN Use of the Oven 1. The oven door should be opened by pulling at the top right hand corner and closed by a gentle push. 2. Before switching the oven ON, arrange the shelves in position. There are up to 4 shelves provided although it is not necessary to use them all. Cranked and straight shelves provide a variety of positions. 3. The even heat distribution in the oven allows most dishes to be cooked equally well on any shelf position.
TIMER CONTROL (some models) Fully Automatic Timer MINUTE MANUAL SETTINGS FOR MINDER OPERATION INTERCONTINENTAL -OFF cook stop time time ANTICLOCKWISE MINUTE MINDER SEMIAUTOMATIC PROGRAMMER OF COO TIME AND STOP TIME This timer will automatically switch the oven on and off to the selected times. It also includes a clock and minute minder. Clock The clock will operate even if the automatic control is not being used. If the cooker is switched off at the wall control panel, the clock will stop.
To Return the Cooker to Manual Operation Follow the steps below to ensure that after use the oven is returned to manual, otherwise it will not operate. This may not come on immediately due to the cycle of the thermostat. At the end of a timed cooking operation the auto light will come on. Turn oven control to off position ‘0’. If the auto light is on at the end of cooking it will now go out. Turn the STOP/COOKING TIME.
Setting the Timer Control Follow these simple steps: A. PHOTOSYNTHETIC SWITCH ‘ON’ AND ‘OFF AUTOMATICALLY OPERATION 1. Make sure the electricity supply is switched ON. 2. Placeholder. 3. Check that the clock shows the correct time of day. Adjust if necessary. 4. Set the STOP time. 5. Set the START time. 6. Set the oven control to the required temperature. NOTES Push in and turn clock knob clock-wise or anti-clockwise as required.
CLEANING THE CERAMIC HOB THE ELECTRICITY SUPPLY MUST BE SWITCHED OFF BEFORE CLEANING All exterior surfaces are hard wearing, easily cleaned and impervious to all normal heat and spillage encountered during cooking. Vitreous enamel can be chipped by a hard blow and reasonable care should be exercised. The exterior surfaces including the oven doors should be cleaned using a little liquid detergent in hot water, and polished with a soft cloth.
WARNING: Cleaner Conditioner must be applied regularly after the use of other cleaners, otherwise over a period of time the surface of the ceramic glass will roughen and cleaning will become progressively more difficult. Staining may also occur. IMPORTANT NOTES: 1. In the event of the hob being scratched, silage will collect and appear as fine lines. These are not fully removable but can be minimized by the daily use of Cleaner Conditioner. These scratches do not affect cooking performance. 2.
OVEN COOKING CHART The oven temperatures are intended as a guide only. It may be necessary to increase or decrease the temperature by 10°C to suit individual preferences and requirements. Note: Shelf positions are counted from the bottom of the oven.
CUSTOMER SERVICE CENTERS In the event of your domestic appliance requiring service this can be obtained by calling the nearest Customer Service Center on the number given below. The areas are defined by Postcode for easy reference.
BEFORE CALLING A SERVICE ENGINEER We strongly recommend that you carry out the following checks on your appliance before calling a Service Engineer. It may be that the problem is a simple one, which you can solve yourself without the expense of a Service call.
N8 Rating Plate The rating plate is situated at the top of the back panel on the rear of the cooker or on the plinth near the base of the front of the cooker. It gives the MODEL AND SERIAL NUMBER, which should be quoted in any communication or if the service department is contacted. It is advisable to make a note of these below and keep for reference before the appliance is installed. MAKE AND MODEL NO. SERIAL NO.