CONTENTS Conservation Specifications Installation The Electrical Connections Using ¥ our Machine Freezing Fresh Food Health and Safety Guidelines Looking After Your Machine Maintenance And Cleaning What Happens If Something Goes Wrong? Page 5 Page 6 Page 7 Page 11 Page 12 Page 14 Page 15 Page 16 Page 17 Page 19
1t is most important that this instruction book should be retained with the appliance for future reference. Should the appliance be sold or transferred to. another owner, or should you move house and leave the appliance, always ensure| that the book is left with the appliance in order that the new owner can get to know the functioning of the appliance and the relevant warnings. Warnings and Guidance These warnings are provided in the interest of safety.
circumstances should solid ice be forced off the Hing or shelves, The appliance should be left for 2 hours after installation before it is turned on in order to allow the refrigerant to settle. Do not place carbonated or fizzy drinks in the freezer as it creates pressure on the container, which may cause it to explode, resulting in damage to the appliance: This appliance is heavy. Care should be taken when moving it. Ice lollies can cause frost burns if consumed straight from the freezer.
CONSERVATION in The Interest Of The Environment: When disposing of your old fridge, freezer or fridge/freezer. Check with you cola! Council or Environmental Health Officer to see if there are facilities in your area for collecting the gas from the appliance for re-cycling. This will help reduce the amount of CFC gas released into the atmosphere. Help to keep your countryside tidy use authorized disposal sites for your old appliances. For Maximum Efficiency: Make sure that the appliance is cleaned properly.
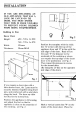
INSTALLATION IF YOU ARE DISCARDING AN OLD APPLIANCE THAT HAS A LOCK OR CATCH ON THE DOOR, YOU MUST ENSURE THAT THIS IS MADE UNUSABLE TO PREVENT YOUNG CHILDREN FROM BEING TRAPPED INSIDE. Building in Size Decor Door Height: 690 720 x H=820 740770 x H=870 Width: 596mm Thickness: 20mm MAX Fig. Fg2 Position the template wile the thick fine "X in line with the top of the appliance door and "2’ in line with the side edge of the door.
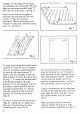
:template on the inside of the decor Door aligning, the vertical line "W’ and align the previously marked scale 'Y” with the top of the door, see Fig. 3. Please ensure that the template is perfectly flat and both the "W’ line ind the 'Y’ line are correctly positioned. Mark on the decor the positions for the top:2 brackets using holes A, see Fig. 4.
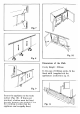
Secure the appliance to the work surface (Fig, 10). If this is not practical, a batten must be fitted securely between the appliance and the worktop in order that the appliance can be rigidly fixed, Dimensions of the Plinth Cavity Height: 8§20mm In the case of 100mm plinths, fit the black infill (supplied with the appliance} as shown in Fig.
In the case of plinths exceeding 100mm and up to 135mm, cut the slack infill (supplied with the compliance} as shown in Fig. 12 and fit t as shown in Fig. 13. 1 the case of plinths exceeding 35mm and up to 170mm, proceed vita the cut-out as shown in Fig. 11, Cavity Height: 870mm In the case of 150mm plinths fit the black infill (supplied with the appearance) as shown in Fig. 13. In the case of the plinths exceeding 150mm and up to 185mm, cut the black infill (supplied with the appliance) as shown in Fig.
THE ELECTRICAL CONNECTIONS WARNING: THIS APPLIANCE MUST BE EARTHED The manufacturer declines any liability should this safety measure not be observed. If the plug that is fitted to your appliance is not suitable for your socket outlet, it must be cut off gnd the appropriate plug fitted.
USING YOUR MACHINE The Thermostat Control The thermostat control knob is situated in fridge in the top right hand corner {as you are facing the machine}, also in the housing is the light bulb. The thermostat control knob is numbered 0 7. Open the door and turn the thermostat control knob to '0° position. The temperature adjustment is obtained by turning the thermostat control to the required setting. A medium setting generally most suitable.
Door Shelves The shelves can be located in 3 different positions to suit your own storage requirements. To remove a shelf, hold the shelf at each end and lift upward, To refit the shelf, engage the groove on either end of the shelf into the door location-and-shide-the-shelf-downward: Cabinet Shelves The shelves can be adjusted to different positions to suit the size and amount of food being stored.
FREEZING FRESH FOOD Freeze only top quality, fresh and thoroughly cleaned food. In any 24 hours you can freeze up to kg6 of fresh food. First switch on the fast freeze switch, before placing fresh food in the freezer to be frozen. Place the fresh food to be frozen in the top basket, food is completely frozen 24 hours later, When the food is completely frozen it can be transferred to one of the other 2 baskets.
HEALTH AND SAFETY GUIDELINES Because of consumer demand, preservatives have been removed farm may per-prepared food. This together with the changes in shopping habits to a once-a-week shop, mean that the safe handling and storage of food is even more important than ever. The following tips should help you to ensure that the fad i your home is in as perfect condition as possible. Keep the time between buying chilled and frozen food and placing it in your fridge or freezer as short as possible.
LOOKING AFTER YOUR MACHINE Defrosting The fridge compartment is equipped with a fully automatic defrosting arrangement which comes into operation at each cycle of the thermostat. The resultant water runs into the channel below the cooling plate and down through a tube into the evaporating tray at the rear of the appliance. The defrost water then evaporates automatically, The defrost water drain hole should be cleared at regular intervals to ensure that there are no food particles blocking it.
MAINTENANCE AND CLEANING Before any maintenance or cleaning DISCONNECT the appliance from the electricity supply and remove ALL loose accessories. Cleaning The Interior Cabinet Clean the interior cabinet, door and accessories with a clean cloth dampened with a solution of warm water and bicarbonate of soda (Sml to 0.5 liter of water). Strong smelling food may leave the fridge with a slight odor.
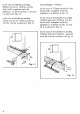
Replacing The Interior Light Bulb Before carrying out the following instruction, DISCONNECT the appliance from the electricity supply and remove ALL shelves, The light bulb is easily accessible at the rear of the thermostat housing. See Fig. 17 Fig. 17 Unscrew the bulb by turning it ina clockwise direction, when viewed from the rear of the housing. When you have replaced you light bulb, reconnect the appliance fo the electricity supply.
WHAT HAPPENS IF SOMETHING GOES WRONG? If your appliance fails to work properly and you have followed these instructions carefully, contact your {coal Electrolyte Group Service Center, whose details can be found by Rooking in the directory in the back of this instruction book or look under *E" in your-local telephone directory.