IMPORTANT USER INFORMATION PLEASE READ THIS INSTRUCTION BOOK BEFORE USING THE APPLIANCE IT I8 MOST IMPORTANT THAT THIS INSTRUCTION BOOK SHOULD BE RETAINED WITH THE APPLIANCE FOR FUTURE REFERENCE. SOLD OR TRANSFERRED TO ANOTHER OWNER, OR SHOULD THE APPLIANCE BE SHOULD YOU MOVE HOUSE AND LEAVE THE APPLIANCE, ALWAYS ENSURE THAT THE BOOK IS SUPPLIED WITH THE APPLIANCE IN ORDER THAT THE NEW OWNER CAN BE ACQUAINTED WITH THE FUNCTIONING OF THE APPLIANCE AND THE RELEVANT WARNINGS.
CONTENTS Conservation Specifications Installation Electrical Connections General Features Using Your Refrigerator Health And Safety Guidelines Maintenance And Cleaning What Happens If Something Goes Wrong? Rating Plate Help Us To Help You Trinity Bendix Service Centers Guarantee Page 4 Page 4 Page 5 Page 9 Page 10 Page 11 Page 14 Page 15 Page 16 Page 17 Page 17 Page 18 Page 19
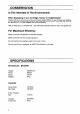
CONSERVATION In The Interests Of The Environment: When disposing of your old fridge, freezer or fridge/freezer: Check with your local Council or Environmental Health Officer to see if there are facilities in your area for collecting the gas from the appliance for re-cycling. This will help reduce the amount of CFC gas released into the atmosphere, Help to keep your countryside tidy use authorized disposal sites for your old appliances.
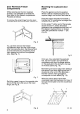
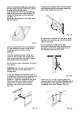
INSTALLATION This appliance is designed to be fitted into a space with the dimensions shown in Fig. 1. 190-170 "\ . Fig. 1 Final adjustment for height can be achieved by adjusting the feet on the base of the appliance {Fig. 2). Fig. 2 Reversing the door Remove the 2 screws that hold the top hinge to the door. Lay the appliance carefully on its back and remove the plastic insert. Remove the 2 screws that hold the bottom hinge to the door.
Door Reversal (Freezer Compartment) While carrying out the door reversal process, it is advisable to reverse the inner door for the freezer compartment. Proceed as follows: To remove the small hinge from the door, unscrew the 2 securing screws, see Fig. 6. You can then remove the freezer compartment door and the upper hinge. After removing the door, the closure hook must be removed by unscrewing it and then replace the hook on the opposite side. (See Fig. 7).
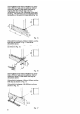
Place the template length ways along the left hand side aligning positions 'C' along the edge of the wooden door. Place position ‘A’ over the mark already made on the door and mark position 'B' through the template onto the wooden door {Fig. 11). Repeat this procedure for the right hand side of the door. Fig. 11 Before removing the mounting brackets from the appliance make a note of the mounting position of them on the appliance.
If the alliance has been installed in a cavity that is 820mm high and the plinth is 100mm maximum height, fit the black infill strip by clipping the two vertical tags into the rectangular slots on the underside of the vent housing. The infill strip can be adjusted either backwards or forwards in these slots (Fig. 15) Fig. 15 If the plinth is between 100mm-135mm cut the infill strip as shown in Fig. 17 and fiats described above. If the plinth is between 135mm 170mm cut it as shown in Fig. 15. Fig.
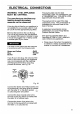
ELECTRICAL CONNECTIONS WARNING: THIS APPLIANCE MUST BE EARTHED. The manufacturer declines any liability should this safety measure not be observed. If the plug this is fitted to your appliance is not suitable for your socket outlet, it must be cut off and the appropriate plug fitted. Remove the fuse from the cut off plug. The cut off plug should then be disposed of to prevent the hazard of shocks in case it should be plugged into & amp socket in another part of your home.
GENERAL FEATURES Plastic coated tillable shelves Thermostat control knob Two recessed salad crisper Adjustable door shelves 10
USING YOUR REFRIGERATOR THE THERMOSTAT CONTROL KNOB The thermostat control knob is situated in the top right hand corner (as you are facing the machine}, also in the housing is the light bulb. The thermostat control knob is numbered 0 6. The highest number is the coldest setting. Open the door and turn the thermostat control knob to '0° position. The temperature adjustment is obtained by turning the thermostat control to the required setting. A medium setting of 2to 3 is generally most suitable.
both hands and pull forward, tilting and lifting upward, off the runners. The bottom glass shelf, slides back to allow access to the salad crisper. FROZEN FOOD COMPARTMENT 1. This 3 star compartment is not designed to freeze fresh food or cooked food. 2. The 3 star frozen food compartment of the refrigerator is designed to maintain temperature below 18°C. This temperature will allow medium term storage of frozen food up to 3 months providing the correct setting has been selected.
of insulated container is advisable. When you arrive home place the frozen food in the freezer immediately. Important Feints To Remember Do... * Cover liquids and wrap food, particularly those with strong odors. * Put vegetables and salad in the salad drawer, in plastic bags. * Cover melons and pineapples and only store for short periods. Do Not * Let food or containers touch the fridge cooling plate. * Obstruct the air flow in the fridge by tightly packing stored items.
HEALTH AND SAFETY GUIDELINES Because of consumer demand, preservatives have been removed from many per-prepared food. This together with the changes in shopping habits to a once-a-week shop, mean that the safe handling and storage of food is even more important than ever, The following tips should help you to ensure that the food in your home is in as perfect a condition as possible. * 14 Keep the time between buying chilled and frozen food and placing it in your fridge or freezer as short as possible.
MAINTENANCE AND CLEANING Before any maintenance or cleaning DISCONNECT the appliance from the electricity supply and remove ALL loose accessories. Cleaning The Interior Cabinet Clean the interior cabinet, door and accessories with a clean cloth dampened with a solution of warm water and bicarbonate of soda (5ml to 0,5 liter of water). Strong smelling food may leave the fridge with a light odor. A small dish of bicarbonate of soda solution placed in the fridge should slowly absorb these smells.
WHAT HAPPENS IF SOMETHING GOES WRONG? If your appliance fails to work properly and you have followed these instructions carefully, contact your local Trinity Bendix Service Center, whose details can be found at the back of this instruction booklet. Before you do this, however, it is worth making the following checks: * s the plug firmly connected to the wall socket and is the socket switched on? + Check the power supply by plugging in another appliance which you know is working.
Rating Plate The rating plate is situated inside the cabinet behind the salad drawer of freezer bin. It gives the model and serial numbers which should be gusted in any communication. For future reference record the information below: Model No: Serial No: Date of Purchase: HELP US TO HELP YOU Service Before calling out an engineer, please ensure you have followed the checklist. Telephone numbers are detailed on the list headed "Trinity Bendix Service Crescent. When you contact us we need to know: 1.
GUARANTEE Tth guarantee is offered to you as an extra benefit and does not affect your legal rights. Trinity Bendix products are carefully designed, manufactured, tested and inspected and in consequence we undertake to replace or repair any part found to be defective inf material or workmanship, within one year of delivery to the original purchaser, free of charge. The Company does not accept liability for defects arising from neglect, misuse, or accident.
TRINITY BENDIX we'll do the homework TRINITY BENDIX, 99 OAKLEY ROAD, FUTON, BERKSHIRES, LU4 9QQ. A Division of Emacs Limited Registered in England No. 176547 Registered Office.