User Manual Electric Cooker CSE500
Important safety information These warnings are provided in the interests of your safety. Ensure that you understand them all before installing or using the appliance. Your safety is of paramount importance. If you are unsure about any of the information in this book contact the Customer Care Department. Installation The appliance must be installed according to the instructions supplied. The installation work must be undertaken by a qualified electrician or competent person.
Do not use the appliance if the ceramic glass is damaged. If a fault or crack becomes visible, disconnect the appliance immediately from the electricity supply and contact your local service force centre. Do not place foil or plastic containers on ceramic glass. During use the appliance becomes hot. Care should be taken to avoid touching the heating elements inside the oven. Ensure that all vents are not obstructed to ensure ventilation of the oven cavity. Never line any part of the appliance with foil.
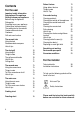
Contents For the user Important safety information Description of the appliance Getting to know your appliance Before using the appliance Rating plate Preparing to use your appliance Control panel indicator neon(s) The cooling fan for the controls Condensation and steam Cookware Grill and oven furniture 2 5 6 7 7 7 7 7 7 7 8 The ceramic hob Using the hob Recommended saucepans Hints & tips 9 9 9 9 The dual grill Using the grill Things to note The grill pan and handle Hints & tips Grilling chart 10 10 10
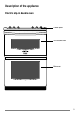
Description of the appliance Electric slip-in double oven Control panel Grill/Second oven Main oven 5
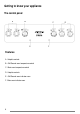
Getting to know your appliance The control panel A B C E Features A - Hotplate controls B - Grill/Second oven temperature control C - Main oven temperature control D - Hotplate controls E - Grill/Second oven indicator neon F - Main oven indicator neon 6 F D
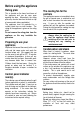
Before using the appliance Rating plate This is situated on the lower front frame of the appliance and can be seen upon opening the door. Alternatively the rating plate may also be found on the back or top of some models (where applicable). The appliance must be protected by a suitably rated fuse or circuit breaker. The rating of the appliance is given on the rating plate. Do not remove the rating plate from the appliance as this may invalidate the guarantee.
Grill and oven furniture The following items of grill and oven furniture have been supplied with the appliance. If you require replacements of any of the items listed please contact your local Service Force Centre, quoting the relevant part number. 1 grill pan (311409401) 1 grill pan handle (311468100) Note: If you require an additional handle for your grill pan, this can be ordered from your local Service Force Centre by quoting part number 311479800\6.
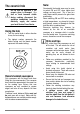
The ceramic hob Do not use the appliance if the ceramic glass is damaged. If a fault or crack becomes visible during cooking, disconnect the appliance immediately from the electricity supply and contact your local Service Force Centre. Using the hob • Turn the control knob in either direction to vary the heat setting. • The highest number represents the hottest setting and the lowest number represents the coolest setting.
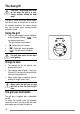
The dual grill CAUTION – Accessible parts may be hot when the grill is in use. Young children should be kept away. The grill is a dual circuit grill which means that the full area of the grill can be used or for economy purposes, the centre section only can be used when cooking smaller quantities of food. Using the grill • Turn the top oven/grill control clockwise to the full power setting ( ), then turn down as necessary. The grill settings are as follows:• ( ) Full grill area at ¼ power.
Slide the handle to the left and over the central bump on the grill pan. Ensure the handle is correctly located. It is not necessary to remove the grill pan handle during grilling. Place the grill pan on the shelf so that the pan is positioned centrally beneath the grill. To remove the handle, slide the handle to the right and lift the handle away from the cut out on the grill pan.
Grilling chart Food Bacon Rashers Beefburgers Position Grill time (mins in total) Adjust 5-6 grill 10 - 15 Chicken Joints 30 - 40 setting Chops – Lamb Pork and 15 - 20 20 - 30 Fish – Whole Trout/Mackerel grill 15 - 25 Fillets - Plaice/Cod pan 10 - 15 Kebabs grid 20 - 30 to 8 - 12 suit 10 - 20 different 20 - 30 Steaks – Rare Medium Well Done thicknesses of 6 - 12 12 - 16 14 - 20 Toasted Sandwiches food 3-4 Kidneys – Lamb/Pig Liver – Lamb/Pig Sausages The times quoted above
The second oven The second oven is the smaller of the two ovens. It is heated by elements in the top oven and bottom of the oven. It is designed for cooking smaller quantities of food. It gives especially good results if used to cook fruit cakes, sweet or savoury flans or quiche. The second oven is also ideal for use as a warming compartment to warm dishes and keep food hot. Use the lowest setting on the second oven temperature control.
Hints and tips • Arrange the shelves in the required positions before switching the oven on. Shelf positions are counted from the bottom upwards. • There should always be at least 2.5cm (1”) between the top of the food and the element. This gives best cooking results and allows room for rise in yeast mixtures, Yorkshire puddings, etc. When cooking cakes, pastry, scones, bread, etc., place the tins or baking trays centrally on the shelf.
The main oven The fan oven is particularly suitable for cooking larger quantities of food. The advantages of fan oven cooking are: Preheating The fan oven quickly reaches its temperature, so it is not usually necessary to preheat the oven. Without preheating however, you may need to add an extra 5 – 10 minutes on the recommended cooking times. For recipes needing high temperatures, e.g. bread, pastries, scones, soufflés etc., best results are achieved if the oven is preheated first.
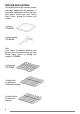
To fit the main oven shelves The shelves should be fitted with the straight rods uppermost on the frame and the forms towards the back of the oven. If not fitted correctly the anti-tilt and safety stop mechanism will be affected. • Hints and tips Arrange the shelves in the required positions before switching the oven on. Shelf positions are numbered from the bottom upwards.
Cooking chart The oven temperatures are intended as a guide only. It may be necessary to increase or decrease the temperatures to suit individual preferences and requirements. Food Biscuits Bread Bread rolls/buns Cakes: Small & Queen Sponges Victoria Sandwich (7”) Madeira (7)” Rich Fruit (8)” Christmas (8)” Gingerbread Meringues Flapjack Shortbread Casseroles: Beef/Lamb Chicken Convenience Foods Fish Fish Pie (Potato Topped) Fruit Pies, Crumbles Milk Puddings Pasta/Lasagne etc.
Roasting chart INTERNAL TEMPERATURES – Rare : 50-60°C; Medium : 60-70°C; Well done : 70-80°C MEAT TEMPERATURE COOKING TIME 20-35 minutes per ½kg (1lb) and 20-35 minutes over Beef/ Beef boned 160-180°C Mutton/Lamb 160-180° C 25-35 minutes per ½kg (1lb) and 25-35 minutes over Pork/Veal/Ham 160-180° C 30-40 minutes per ½kg (1lb) and 30-40 minutes over Chicken 160-180° C 15-20 minutes per ½kg (1lb) and 20 minutes over Turkey/Goose 160-180° C 15-20 minutes per ½kg (1lb) up to 3½kg (7lb) then 10 m
Defrost feature This function defrosts most foods faster than more conventional methods. It is particularly suitable for delicate frozen foods which are to be served cold e.g. cream filled gateaux, cakes covered with icings or frostings, cheesecakes, biscuits, scones, etc. Using defrost feature • When defrost is selected, the oven indicator neon may come ON. It will stay ON until the oven reaches room temperature and then go OFF.
• It is preferable to thaw fish, meat and poultry slowly in the fridge. However, this process can be accelerated by using the defrost function. Small or thin fish fillets, frozen peeled prawns, cubed or minced meat, liver, thin chops, steaks etc., can be thawed in 1 – 2 hours. • A 1kg/2¼lb oven ready chicken will be thawed in approximately 5 hours. Remove the giblets as soon as possible during the thawing process. • Joints of meat up to 2kg/4½lb in weight can be thawed using the defrost function.
Care and cleaning Before cleaning always allow the appliance to cool down. Cleaning materials Before using any cleaning materials on your appliance, check that they are suitable and that their use is recommended by the manufacturer. Cleaners that contain bleach should NOT be used as they may dull the surface finishes. Harsh abrasives must also be avoided. Multi-surface anti-bacterial cleaning products should not be used on the ceramic hob or on the surrounding trims.
Cleaning the control knobs and handles It is strongly recommended that only hot soapy water is used for cleaning the control knobs and handles. ANY OTHER CLEANING MATERIALS MAY DULL THE SURFACE FINISH. Cleaning the ceramic hob Make sure the ceramic glass is cool before cleaning. It is important to clean the ceramic hob daily to prevent soilage being burnt on. Take care to avoid the hob trims when cleaning the ceramic glass as they may be damaged by the cleaning agents recommended.
To remove more stubborn marks 1. 2. Bar Keepers Friend may be used to clean off more stubborn stains or to remove discolourations. It may be necessary to rub the marks hard for several minutes. Use a plastic pad specially for non-stick saucepans with Bar-Keepers Friend for removal of more stubborn soilage.
Cleaning the shelves and grill/oven furniture All removable parts, can be washed in the dishwasher. The grill pan, grill pan grid and oven shelves may be cleaned using a soap impregnated steel wool pad. Soaking first in hot soapy water will make cleaning easier. Cleaning inside the oven(s) The sides and back of the main oven compartment are coated with a special Stayclean coating. They should not be cleaned manually.
Cleaning between the outer and inner door glass The outer door glass is removable for cleaning. To remove the outer glass 1. Open the oven door slightly to gain access to the two cross head screws on the top of the oven door. 2. Loosen the two screws using a Pozidrive screwdriver. 3. Hold the door glass securely in place with one hand before removing the screws completely with the other hand. 4.
To replace the outer glass Replacing an oven light bulb 1. Holding the oven glass with both hands, gently place the locators into the holes of the brackets at the bottom of the oven door. 2. Push the top of the oven glass towards the oven door, ensuring the screw location holes line up. 3. Hold the glass in place with one hand and insert the cross head screws into the location holes with the other hand. Give the screws one turn to ensure the glass is secure.
Something not working Please carry out the following checks on your appliance before calling a Service Engineer. It may be that the problem is a simple one that you can solve yourself without the expense of a service call. In-guarantee customers should make sure that the checks have been made as the engineer will make a charge if the fault is not a mechanical or electrical breakdown. Please note that proof of purchase is required for in-guarantee service calls. Problem The grill and ovens do not work.
Service and spare parts In the event of your appliance requiring service, or if you wish to purchase spare parts, please contact your local Service Force Centre by telephoning:O870 5 929929 Your telephone call will be automatically routed to the Service Force Centre covering your post code area. For the address of your local Service Force Centre and further information about Service Force, please visit the website at www.serviceforce.co.uk.
Guarantee conditions Products of Tricity Bendix manufacture which are not marketed by Tricity Bendix.
Technical details Voltage: 230-240 Volts AC 50Hz Wattage: 10.9 - 11.8kW Height: 900mm Width: 600mm Depth: 598mm Weight: 65 kg This appliance complies with: European Council Directives 73/23/EEC. EMC Directive 89/336/EEC, CE Marking Directive 93/68/EEC. Energy Label Directive 2002/40/EC Installation instructions Warning: This appliance must be earthed. If your appliance has been damaged in transit, contact your supplier immediately. DO NOT attempt to install it.
Always ensure an air gap is maintained at hotplate level. Tiles or other forms of deep wall covering should not obscure this gap. See Fig.3. Air gap Overhanging surfaces or a cooker hood should be a minimum of 685mm above the hob. See Fig.4. Fig.3. It is important to ensure that the appliance is level after installation. Levelling feet are fitted to the appliance to accommodate uneven floors. Fig.4.
Notes www.electrolux.com www.tricity-bendix.co.