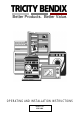
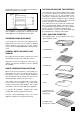
Better Products. Better Value. OPERATING AND INSTALLATION INSTRUCTIONS MODEL NO.
TECHNICAL DETAILS MODEL NO. CSI 2400 Voltage: 230/240 Volts AC 50Hz Wattage: 11.4/12.4 kW Height: 900mm Width: 550mm Depth: 600mm This appliance complies with European Council Directive 72/23/EEC. This appliance carries the C.E. mark.
CONTENTS Technical Details . . . . . . . . . . . . . . . . . . . . . . . . . . . . . . . . . . . . . . . . . . . . . . . . . . . . . . . . . . . . . . . . . . . . . . . . . . . . . . . . . 2 Contents . . . . . . . . . . . . . . . . . . . . . . . . . . . . . . . . . . . . . . . . . . . . . . . . . . . . . . . . . . . . . . . . . . . . . . . . . . . . . . . . . . . . . . . . . 3 Preface . . . . . . . . . . . . . . . . . . . . . . . . . . . . . . . . . . . . . . . . . . . . . . . . . . . . . . . . . . . . . .
CONTENTS Oven Cooking Chart . . . . . . . . . . . . . . . . . . . . . . . . . . . . . . . . . . . . . . . . . . . . . . . . . . . . . . . . . . . . . . . . . . . . . . . . . . . . . 22 Roasting Chart . . . . . . . . . . . . . . . . . . . . . . . . . . . . . . . . . . . . . . . . . . . . . . . . . . . . . . . . . . . . . . . . . . . . . . . . . . . . . . . . . . 23 4 Defrosting . . . . . . . . . . . . . . . . . . . . . . . . . . . . . . . . . . . . . . . . . . . . . . . . . . . . . . . . . . . . . . . . .
PREFACE Dear Customer, Thank you for buying a Tricity Bendix cooker. With our 80 years experience in developing and manufacturing the very best in U.K. cookers, you can be assured that you have purchased a hard working, reliable, quality product. Tricity Bendix cookers comply with British Standard safety and performance requirements. They have been approved by BEAB (British Electrotechnical Approvals Board) and are covered by a 12 month parts and labour guarantee.
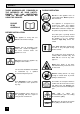
SAFETY THESE WARNINGS ARE PROVIDED IN THE INTERESTS OF YOUR SAFETY. ENSURE THAT YOU UNDERSTAND THEM ALL BEFORE INSTALLING OR USING THE COOKER. PLEASE READ CAREFULLY DURING OPERATION Do not use this appliance if it is in contact with water. Never operate it with wet hands. This appliance is designed to be operated by adults and children under supervision. Young children must not be allowed to tamper with the product or play with the controls.
Always use oven gloves to remove and replace food in the oven. Similarly always use oven gloves to remove and replace the grill pan handle when grilling. Recommendations given on page 16. Cookers and hobs become very hot, and retain their heat for a long period of time after use. Children should be kept well away from the appliance until it has cooled. GENERAL Ensure that you support the grill pan when it is in the withdrawn or partially withdrawn position.
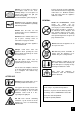
INTRODUCTION WARNING: THIS APPLIANCE MUST BE EARTHED RATING PLATE The cable should be routed away from potentially hot areas marked by X in the diagram below. Record the model and serial numbers on the back cover of this instruction book, from the rating plate. This is situated on the lower front frame of the appliance and can be seen upon opening the oven door. The appliance must be protected by a suitably rated fuse or circuit breaker. The rating of the appliance is given on the rating plate.
Overhanging surfaces or a cooker hood should be a minimum of 685mm above the hob. It is important to ensure that the appliance is level after installation. Levelling feet are fitted to the front of the appliance to accommodate uneven floors. REVERSIBLE MAIN OVEN DOOR If you require the oven door to be hinged on the opposite side, you will need to contact a qualified Service Engineer. See page 30 for your nearest Service Centre. PLEASE NOTE that a charge will be made.
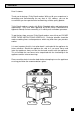
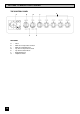
GETTING TO KNOW YOUR COOKER THE CONTROL PANEL G A B D C FEATURES A B C D E F G 10 - Timer Main Oven Temperature Control Main Oven Indicator Neon Top Oven Temperature Control Top Oven Indicator Neon Dual Grill Control Hotplate Controls F E
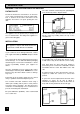
THE TIMER J A START TIME SETTING KNOB B SECOND HAND C CLOCK SYMBOL D CLOCK/MINUTE MINDER/LENGTH OF COOKING TIME SETTING KNOB H E START TIME INDICATOR G F HOUR HAND G DISPLAY WINDOW H MANUAL SYMBOL J MINUTE HAND A B C F E D 1. TO SET THE TIME OF DAY The clock will operate when the cooker is switched ON at the wall. To set, pull out and turn setting knob (D) clockwise until the right time of day is displayed, e.g. 9 a.m. as Fig.1. Fig. 1 D 2.
4. TO CANCEL MINUTE MINDER/BUZZER Turn setting knob (D) clockwise, without pulling it out until "O" or the manual symbol appears in the window as Fig.4. 5. HOW TO SET THE OVEN TIMER When using the oven timer for the very first time, it is advisable to let it operate while you are at home. The timer can be checked to show that it is operating correctly and then you will then feel confident to leave a meal to cook automatically in the future. Fig.
B) TO START COOKING NOW, THEN SWITCH OFF AUTOMATICALLY Follow the first 3 points under section 5. (A) above, and then; iv) To set the length of time you want the food to cook; turn setting knob (D) clockwise, without pulling it out, until the required cooking period can be seen in the window, e.g. 120 minutes (2 hours) as Fig. 9. v) Turn the oven temperature control to the required setting. The oven indicator neon should glow. 110 120 130 Fig.
THE SEALED HOTPLATES BEFORE USING THE HOTPLATES FOR THE FIRST TIME Turn the control knob to a medium/high setting and allow the hotplate to heat, uncovered by a saucepan for 3-5 minutes. This hardens the protective coating on the hotplates, and makes it more resistant to normal use. A harmless smoke will be given off from the hotplates. l l To operate the hotplates turn the control knobs in either direction to vary the heat setting.
DEEP FAT FRYING 6. Frying temperatures Celsius Fahrenheit Scale (oC) Scale (oF) SPECIAL FRYING NOTE: For safety purposes when deep fat frying, fill the pan one-third full of oil, DO NOT cover the pan with a lid and DO NOT leave the pan unattended. In the unfortunate event of a fire, switch OFF at the electricity supply and cover the pan with a lid or damp cloth to assist in smothering the flames.
THE DUAL GRILL USES OF THE GRILL CAUTION - ACCESSIBLE PARTS MAY BECOME HOT WHEN THE GRILL IS IN USE. CHILDREN SHOULD BE KEPT AWAY. The grill is a dual circuit grill which means that the full area of the grill can be used or for economy purposes, the centre section only can be used when cooking smaller quantities of food. SELECTING THE GRILL l l l To operate the dual grill, turn the grill control clockwise for full area grilling, and anti-clockwise for centre section grilling only.
To correctly locate the grill pan on the shelf, ensure that the cut out on the underside of the handle bracket locates over the front bar of the shelf. To check the progress of the food being grilled, the grill pan should be withdrawn on the shelf to tend the food during cooking, or the carrier shelf can be lifted away from the cooker and rested on a heat resistant work surface. l l l l Accompaniments such as tomatoes and mushrooms may be placed underneath the grid when grilling meats.
THE TOP OVEN USES OF THE TOP OVEN The top oven is the smaller of the two ovens. It is heated by elements in the top and bottom of the oven. It is designed for cooking on one level and for smaller quantities of food. It gives especially good results if used to cook fruit cakes, sweet or savoury flans or quiche. The top oven is also ideal for use as a warming compartment to warm dishes and keep food hot. Use a temperature setting of 80-100°C on the top oven control dial.
l Stand dishes on a suitably sized baking tray on the shelf to prevent spillage onto the oven base and to help reduce cleaning. l l l l Because of the smaller cooking space, lower temperatures and shorter cooking times are sometimes required. Be guided by the recommendations on page 22. For economy leave the door open for the shortest possible time, particularly when placing food into a pre-heated oven. There should always be at least 2.5cm (1") between the top of the food and the element.
THE MAIN FAN OVEN USES OF THE FAN OVEN PREHEATING The fan oven quickly reaches its temperature, so it is not usually necessary to preheat the oven. Without preheating, however, you may find you need to add an extra 5 - 10 minutes on the recommended cooking times. For recipes needing high temperatures, e.g. bread, pastries, scones, soufflés, etc., best results are achieved if the oven is preheated first. COOKING TEMPERATURES Fan oven cooking generally requires lower temperatures than conventional cooking.
TO FIT THE MAIN OVEN SHELVES l The shelves should be fitted with the straight rods uppermost on the frame and the forms towards the back of the oven. If not fitted correctly the anti-tilt and safety stop mechanism will be affected. l Back of the Oven It is recommended that when baking larger quantities, the shelf positions should be evenly spaced to suit the load being cooked. A slight increase in cooking time may be necessary.
OVEN COOKING CHART The oven temperatures are intended as a guide only. It may be necessary to increase or decrease the temperatures by 10° C to suit individual preferences and requirements. FAN OVEN FOOD Biscuits Bread Bread rolls/buns Cakes: SHELF POSITION Shelf Small & Queen Sponges Victoria Sandwich Madeira Rich Fruit Christmas Gingerbread Meringues Flapjack Shortbread Casseroles: Beef/lamb Chicken Convenience Foods Fish Fish Pie (Potato Topped) Fruit Pies, Crumbles Milk Puddings Pasta, Lasagne etc.
ROASTING CHART ROASTING CHART INTERNAL TEMPERATURES Rare : 50-60°C; Medium : 60-70°C; Well :70-80°C MEAT SECOND/FAN OVEN COOKING TIME Beef 160-180°C 20-35 min per ½kg/1lb and 20-35 min over Beef, boned 160-180°C 20-35 min per ½kg/1lb and 25-35 min over Mutton and Lamb 160-180°C 25-35 min per ½kg/1lb and 25-35 min over Pork and Veal 160-180°C 30-40 min per ½kg/1lb and 30-40 min over Ham 160-180°C 30-40 min per ½kg/1lb and 30-40 min over Chicken 160-180°C 15-20 min per ½kg/1lb and 20 min
DEFROSTING USES OF DEFROST FEATURE This fan oven function defrosts most foods faster than more conventional methods. It is particularly suitable for delicate frozen foods which are to be served cold e.g. cream filled gateaux, cakes covered with icings or frostings, cheesecakes, biscuits, scones etc. Small or thin fish fillets, frozen peeled prawns, cubed or minced meat, liver, thin chops, steaks etc., can be thawed in 1 - 2 hours. A 1kg/2¼lb oven ready chicken will be thawed in approximately 5 hours.
CARE AND CLEANING BEFORE CLEANING ALWAYS ALLOW THE COOLING FAN TO COOL THE APPLIANCE DOWN BEFORE SWITCHING OFF AT THE ELECTRICITY SUPPLY. CLEANING MATERIALS Before using any cleaning materials on your cooker, check that they are suitable and that their use is recommended by the manufacturer. Cleaners that contain bleach should NOT be used as they may dull the surface finishes. Harsh abrasives should also be avoided.
CLEANING THE GRILL DEFLECTOR, GRILL PAN, GRILL PAN GRID, MEAT TIN AND OVEN SHELVES All removable parts, except the grill pan handle can be washed in the dishwasher. The grill pan, meat tin and grill deflector may be cleaned using a soap impregnated steel wool pad. The grill pan grid and oven shelves should be cleaned using hot soapy water. Soaking first in soapy water will make cleaning easier.
REPLACING THE OVEN LIGHT BULB The type of bulb required is a 300C 25 watt small Edison Screw. Part number 572 491 5431-00/1 (Available through Tricity Bendix service centres). CAUTION: Disconnect the appliance from the electricity supply before replacing the bulb. Open the door and remove the shelves to enable easy access to the oven light assembly. Insert a flat blade screwdriver between the oven side and the glass which covers the bulb.
SOMETHING NOT WORKING? We strongly recommend that you carry out the following checks on your appliance before calling a Service Engineer. It may be that the problem is a simple one, which you can solve yourself without the expense of a service call. If our Service Engineer finds that the problem is listed below you will be charged for the call whether or not the appliance is under guarantee. If the oven is not cooking evenly or the side opening door will not stay open: * Check that the cooker is level.
SERVICE AND SPARE PARTS HELP US TO HELP YOU Please determine your type of enquiry before writing or telephoning. SERVICE It is a recommendation by the manufacturer that annual servicing of the product is done by the manufacturers approved service organisation. In the event of your appliance requiring service Tricity Bendix Limited have an arrangement with Electrolux Group Service.
CUSTOMER SERVICE CENTRES The Regional Electricity Companies are responsible for the servicing of cookers sold by their own outlets. The telephone numbers can be found in the telephone directory. Service for cookers bought from other outlets can be obtained by calling the nearest Customer Service Centre on the numbers given below. The areas are defined by postcode for easy reference.
GLASGOW GUERNSEY EH FK G KA KY1-16 ML PA1-23, PH1-7 All Codes HAVERFORDWEST SA33-39 SA41-44 SA61-73 HEREFORD HR1-9 LD1-8 SY7 ,18 NP5 NP7-8 HULL YO4 YO11-18 YO25 HU1-19 DN14 0141-647-4381 01481-46931 01437-710914 Electrolux After Sales Service 20 Cunningham Road Clyde Estate Rutherglen Glasgow G73 1PP Guernsey Electricity PO Box 4 Vale Guernsey Channel Islands Electrolux After Sales Service C Butherway 1 Church Road.
Electrolux After Sales Service NL Services Unit 333 Ranglet Road Walton Summit Bamber Bridge Preston, Lancashire PR5 8AR LANCASTER LA1-23 01772-316175 LEEDS BD DN1-7, 10-12, HD HG HX LS S WF YO1-3, 5-8 DE NG1-22 & 25 0113-2608511 Electrolux After Sales Service 64-66 Cross Gates Road Leeds LS15 7NN LINCOLN DN21 sub codes 1 2 & 5 only, LN1, 2 , 4,5,6 LN3 sub codes 4 & 5 only LN8-10 NG 23,24 31-34 PE1-13, 20-25 01522-514603 Electrolux After Sales Service Brian Hudson Unit 8 Stonefield Park Clifton S
Electrolux After Sales Service Cornwall Domestic Service Unit 7D Pool Industrial Estate Wilson Way Redruth Cornwall TR15 3QW REDRUTH TR1-20, 26, 27 PL10-15, 17, 18, 22-35 01209-314407 ROTHSAY PA20 01700-504777 Electrolux After Sales Service D McGlashan Walker Walker Engineering Glenmhor Upper Serpentine Rothesay PA20 SHETLAND Own Sales 01595-692225 Electrolux After Sales Service Tait Electronic Systems Ltd.
GUARANTEE CONDITIONS We, Tricity Bendix, undertake that if within 12 months of the date of the purchase this Tricity Bendix appliance or any part thereof is proved to be defective by reason only of faulty workmanship or materials, we will, at our option repair or replace the same FREE OF ANY CHARGE for labour, materials or carriage on condition that: l l l l l l 34 The appliance has been correctly installed and used only on the electricity supply stated on the rating plate.
RATING PLATE REFERENCE MAKE AND MODEL NO. SERIAL NO. DATE OF PURCHASE IMPORTANT NOTICE In line with our continuing policy of research and development, we reserve the right to alter models and specifications without prior notice. This handbook is accurate at the date of printing, but will be superseded and should be disregarded if specifications or appearance are changed. Better Products. Better Value. TRICITY BENDIX,99 OAKLEY ROAD, LUTON, BEDFORDSHIRE, LU4 9QQ A Division of Emaco Limited .