IMPORTANT USER INFORMATION A Please ensure that you have read the whole instruction book before using the appliance. These warnings are provided in the interest of safety. You must read them carefully before installing or using the appliance. It is important that this instruction book should be retained with the appliance for future reference.
CONTENTS Page Important User Information i Your Appliance 3 How to Install your Appliance (Before using your appliance) 4 Adjustment of Door & Reversible Hinging 7 Decor Kits g How to Use the Temperature Control Dial 10 How to Use your Appliance 1 How to Use the Fast Freeze Facility 11 Your Larder Compartment 12 Pres Food Compartment 12 Door Storage 2 Cheeseparing for Storage i3 Fresh Food Storage Guide 2 Defrosting your Larder Refrigerator 4 Replacement of Interior Light Bulb 14 Your Freezer i3 Frozen Food
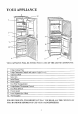
YOUR APPLIANCE YOUR APPLIANCE WILL BE FITTED WITH SOME OF THE ABOVE COMPONENTS: 1. Fridge Cooling Plate 2. Fridge Thermostat Control and interior Light Switch 3. Adjustable Shelf 4. Spout Area 5. Salad Drawer 6. Boyle Gripper 7. Fast Freeze Compartment 8. Fridge/Freezer Thermostat Control 9. Faust Freeze Switch 1. Freezer Basket 1. Level Adjusters (in 4 feet) 12, Warning Lights FOR BEST RESULTS, IT £S IMPORTANT THAT YOU READ ALL THE CONTENTS OF THIS HANDBOOK BEFORE YOU USE YOUR ANTIFREEZE.
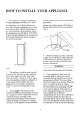
HOW TO INSTALL YOUR APPLIANCE {. This appliance is designed to operate in ambient temperatures between 10°C (50°F) and 32°C It should be located in a dry atmosphere, out of direct sunlight and away from extreme temperature not next {0 a cooker or other sources of direct heat, or in a very cold room e.g, an outhouse, where the temperatures may fall below 10°C If these ambient temperatures are exceeded the food storage temperatures given on page 10 will not be maintained, 2.
IMPORTANT 6, The wires in the mains lead are colored in accordance with the following code, GREEN & YELLOW EARTH BLUE NEUTRAL BROWN LIVE As the ca lours of the wires in the mains lead of this appliance may not correspond with the colored markings identifying the terminals in your ply, proceed as follows: The wire which is colored green und yellow must be connected to the terminal which is nuked with the lecher 'E' or by the Barth Symbol <= or color Green or Green-Yellow.
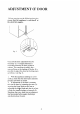
ADJUSTMENT OF DOOR Before carrying ot the following instruction ensure that the appliance is switched off at the electricity supply. Occasionally door adjustment may be necessary Le. if a slight clearance is noticeable between the door gasket and cabinet. This condition is manly due to uneven floors or the loading of the door. It is possible to adjust the doors at the hinge points as follows: {sce fig. 7). 1.
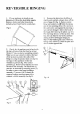
REVERSIBLE HINGING L If your appliance is already in use disconnect it from the electricity supply. Remove shelves and other loose miles including food. Store food in a cool place. 2. Bendy lay the appliance on its back with the top bled away from the floor by at least 30cm (12°) {use a stool or something similar). Make such to use a towel or cloth at the base of the product to protect the sides of the fridge measuring the product does not slip.
4. Unscrew the upper hinge pin (14) and transfer it to the opposite side, (see fig.11) Fig. 11 5. Re-fit the top door by carefully sliding it onto the upper hinge pin. 6. Turn the center hinge (9) around from its Illustrated position and transfer to the opposite side. To secure the center hinge, gently press up into top door re-fit any spacing washer(s) on the top side of the hinge, to position top door at correct height), Re-fit the two screws (10) to secure center hinge to cabinet.
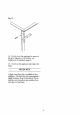
Fig, 12 14. Finally, level the appliance by means of the feel adjusters {1} in the feet see installation of appliance (page 4), 15. Switch on the appliance and replace the food. DECOR KITS A door panel decor kit is available for this appliance.
HOW TO USE THE TEMPERATURE CONTROL DIAL LARDER COMPARTMENT 1. The interior temperature of the larder compartment is automatically controlled by the thermostat. The control dial enables the desired degree of cooling 1o be selected. The control dial is numbered setting & the cooling system js switched off but the appliance is not disconnected from the electrical supply. The highest number is the coldest sting, (see fig.13) The recommended setting for models FD930W, FD930AL, CPD, CASALS, EMBODY, EYEBALL.
HOW TO USE YOUR APPLIANCE OPERATION Your freezer compartment may be fitted with: ‘Type A Models (Models CPD, CLAMPDOWN. it's own thermostat and control dial. Type B Models (Models DIWALI, EBD2AL). Its pwn thermostat and control dial with slider sv‘gtch)m ruble top surround front. {See Fig. 14 FAT FACET R easiness Shews nonpartisan, oo igh "GAIN GRUE CI Wi g possessor engage amine sushi o0 e indicator gt Test frees Sui ten o Type C Models (Medals FDO30W, FD930ALS.
YOUR LARDER COMPARTMENT TEMPERATURE] i, The function of the larder compartment is to reduce the development of organisms which cause decay and bacterial activity, and thus increase the storage life of food. 2. The fresh food compartment has been desired to operate between O°C (32°F) and 5°C (41°F) and is in accordance with British and European Standards. FRESH FOOD COMPARTMENT 1.
HELPFUL HINTS WHEN BUYING FOODS 1. Always erasure that food you purchase is of good quality and in prime condition. 2. Shop «t a reliable source and buy the “freshest” lurking packing avoid shop-worn labels or produce covered in dust. 3. Avoid buying chilled food if you cannot store it straight away. The use of an insulated container is advisable, 4. Buy and consume foods prior to the "Selim By" or "Best Before” dates. 5. When you arrive home place perishable foods in the refrigerator immediately. 6.
Shelf Position Storage Time Middle Shelves Pastry products 3-4 days cooked Meat Pies/ Sausage Rolls 2 days Cooked Fruit up to 4 days Bottom Shelves Stock and Gravies up to 4 days Fresh Fish eat same day Fresh Meats Days Fresh Poultry 2 dabs Sausages up 10 3 days. Minced Meat, Burgers 1 day Salad Drawer Green Vegetables 354 Salad Vegetables 3.5 days Fresh Fruit 5 DO NOT KEEP BANANAS IN THE REFRIGERATOR. DEFROSTING YOUR LARDER REFRIGERATOR The defrosting of the larder compartment occurs automatically.
YOUR FREEZER The EXES symbol] means that your freezer will store frozen food at 189 C F) for dong term storage and will also freeze fresh food. 1t will store food at a temperature that is 100 cold for bacterial and enzyme activity which causes decay, thus increasing the storage life If frozen correctly, food will retain texture, color, taste and nutritional content, Most fresh foods freeze well, however some freeze more successfully than others.
IMPORTANT If the temperature rises in frozen foods because of: a) non compliance with manufactures instruction. b) electric power failure, ©) due to defrosting. then recommended storage fife may be reduced and storage times may not apply. Froze food which is slowed to thaw accidentally should either be used immediately or thrown away. Alternatively i the food is uncooked and it has not been completely defrosted it cun be cooked then refrozen. NOTES: 1.
{Models SOFTWOOD, FDR00AL, CPD, ODDBALL, SWABBED, SALABLE) The maximum quantity of food you can freeze in 24 hours Is 3 kg. Run for 3-4 hours before loading with frozen food. I is important that the bottom shelf is removed from the freezing compartment see (fig. 20} 3. Place as much food as possible in contact with walls and bottom of the cabinet. After 24 hours the food will be fully frozen. NOTE: Aim to check dates on packets and rotate foods regularly.
COOL FOODS QUICKLY Hot food should not be put straight into the freezer because it can cause intensive work for the compressor and thus increase the energy consumption, Therefore it is important to cool cooked founds quickly before putting them into the freezer. Food should also be cooled quickly to prevent bacterial growth and this may be done by transferring hot foods into 1 cold container and standing it into « sink filled with iced water.
THAWING FOOD Most foods can be thawed in their original wrapping to maintain moisture and prevent any deterioration. Foods should be thawed in 4 cool place such as a refrigerator or if food is required quickly a microwave oven may be used, remembering to transfer foods from foil containers and remove wire enclosures from plastic bags. Always follow the instructions in the microwave oven's manual for thawing frozen food.
Food Freezing Guide Max, Storage Pernod Method Remarks MEAT joints Boer 1012 months Remove additional fat Pad bore ends.
Mox, Sta rage Period Method Remarks Potatoes 3 months New potatoes and chips can be frozen raw. Otherwise cook partially in one of usual forms, cool then freeze Beans {Broad, 12 months Seal oz pod, and wash, top and tail Blanch for 2 minster, coot for French or Runner Cut fare beans into shorter lengths seem time in ford water or slice. then freeze, Carrots 12 months Use salt ones. Prepare by scraping, Blanch for 3-4 mind. top and tail Cauliflower 12 months freak up the florets and wash. Blanch for 3 mine.
Max, Storage Period Method Remarks Cover with boiling water for 1 minus, then cool by dipping Into cold and peal carefully. Cut into halves, removing stone, Use syrup method of packing and freezing. Kemp fruit submerged in syrup, place crumpled grease proof papa onto, so thees is 1o oo between the surface of the figured snd the lid. Pack slaving head space, beat slightly. Do not freeze eggs i their shells as she will crack. Beat slightly, place whites in small containers just & few at & time.
COMPLETE DEFROSTING Complete defrosting will in the course of time Become necessary. This should be carried ont if the frost build up cannot be all scraped away or if it begins to interfere with the food storage. Choose a time when the stock of frozen food is low and proceed as follows: 1. Take out the frozen food. Switch the appliance off at the electricity supply and leave the door open, 2.
CLEANING ND CAR SWITCH OFF THE APPLIANCE AT THE ELECTRICITY SUPPLY, The interior of your appliance should be cleaned at regular intervals depending on usage. Always clean when food is at a minimum. 1. Empty the compartment and keep foods in a cool place. 2.
SOMETHING NOT WORKING SERVICE CHECK 1f the appliance is noisy: 1. Ensure that the appliance compressor unit has not been pushed against the wall, or that any foreign objects are not resting against the compressor unit at the base of the appliance. 2. Check the appliance is Revel, see "How to install your appliance (see page 4). 3. Ensure that the fuses at the back of the appliance are not vibrating against the cabinet or any other part. If this is so, they should be eased away gently. 4.
HELP US TO HELP YOU — SERVICE In the event of your appliance requiring service Trinity Bendix Lid. have an arrangement with Electrolyte Group Service. Before calling out an engineer, please ensure you have followed the checklist and that you have the model number and purchase date to hand. Telephone numbers are detailed on the list headed ““Trinity Bendix Service Centrist. Please note their all inquiries concerning service should be addressed to your local service center.
Trinity Bendix Service Centers SERVICE AND SPARES FOR TRINITY BENDIX ABERDEEN ALT HAM BELFAST BT BIRMINGHAM BRIGHTON BN RH BRISTOL CONVEY ISLAND CARDIFF EDINBURGH GATES HEAD GLASGOW LEEDS LEICESTER LE DE CV LNG LIVERPOOL LONDON (NORTH) SW1 SW3 SWS SW6 SW7 SSW LONDON {SOUTH) SW2 SW4 SW8 SWH SWISS-20 LONDON (WEST) NEWTON ABBOT NORWICH IP NR PE OXFORD PORTSMOUTH TON BRIDGE 0224 656569 282 T4621/2/3/4 0232 746591 021 358 7076 0273 694341 0272 211876 0268 694144 0222 460131 031 557 8383 091 493 2025 041 647 4381
Guarantee This Guarantee is offered to you 28 an extra benefit nod does not affect your legal rights. Trinity Bendix products are carefully designed, manufactured, rested and inspected and in consequence we undertake to replace or repair any part found to be defective in material or workmanship, within one year of delivery to the original purchaser, free of charge. The Company doss not accept Ability for defects arising from neglect, misuse, or accident.