IMPORTANT USER INFORMATION Please ensure that you have read the whole instruction book before using the appliance. These warnings are provided in the interest of safety. You must read them carefully before installing of using the appliance.
CONTENTS Page Important User Information 1 Your Appliance 3 How to Install your Appliance (Before using your appearance} 4 Adjustment of Door 7 Reversible Hinging 8 Decor Kits 9 Haw to Use the Temperature Control Dial 10 Your Larder Refrigerator 11 Temperatures 1 Fresh Food Compartment 11 Door Sta rage 11 Helpful Hints When Buying Foods 12 Preparing Foods for Storage 12 Fresh Food Storage Guide 12 Defrosting Your Larder Refrigerator 13 Replacement of Interior Light Bulb 13 Cleaning and Care i4 1f Going on H
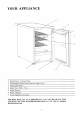
YOUR APPLIANCE 1 Refrigerator Cooling Plate 2 Thermostat Control and Interior Light Switch 3 Adjustable Shelf 4 Door Tray/Dairy Tray 5 Salad Drawer 6 Boyle Gripper 7 Level Adjusters (In feet) FOR BEST RE LTS, £ I8 IMPORTANT CON TS OF T His HANDBOOK BEFOG REFRIGERATOR, THAT YOU READ ALL THE YOU USE YOUR LARDER
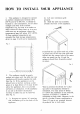
HOW TO INSTALL 1. This appliance is designed to operate in ambient temperatures between 10°C {50°F) and 32°C 1t should be located in 2 dry atmosphere, out of direct sunlight and away from extreme temperature eg, A0t EXEC 10 a cooker or other sources of direct heat, or in a very cold room eg. an outhouse, where the temperatures may fall below 10°C If these ambient temperatures are exceeded the food storage temperatures given on page 11 will not be maintained. Fig. 2 / 2.
4, Your appliance will be heavy when toadied with food and must therefore be stood on a strong firm floor, It should also be level, Adjust the level by screwing out the appropriate Revel adjusters in the front feet using your fingers or a 25mm {1") spanner (see fig. 5). Level adjusters are also available in the rear feel in the event of excessive floor unevenness.
8. The appliance must be protected by a 13A PASTA approved (BS1362) fuse, il a 134 {BS1363) plug or a non rewire able plug is used, or if any other type of plug is used by a 15A fuse either in the plug or adapter or at the Distribution Board. 9. 1f at any time a replacement required, the cross sectional area of conductors must oot be less than 0.73mm. 10, If it hectares necessary [o replace the supply cord, the cable clamp should be tightened so as to retain the new cord. 11.
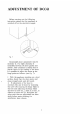
ADJUSTMENT OF DOOR Before carrying out the following instruction ensure tha the appliance is switched off at the electricity supply. Occasionally door adjustment ray be necessary ic. if a shift clearance is noticeable between the door gasket and cabinet. This condition is mainly due to uneven floors or the loading of the door, {t is possible to adjust the foots ai the fine points as follows: (see fig. 7).
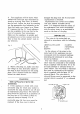
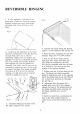
REVERSIBLE HINGING I 1f your appliance is already in use disconnect it from the electricity supply. Remove shelves and other loose items including food. Store food in a cowl place, Referrer 2. Anciently lay the appliance on Hs hack with the top held away from the floor by at least 30cm (127} (use @ stool of something similar). Do not support the appliance on the rear ventilation grill (see fig. 8 for correct positioning.
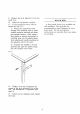
9. Replace the level adjuster {11} in the small foot, 10, Stand the refrigerator upright, 11, If your appliance has a side fix handle {sce fig. 11y i) Protect the paintwork from damage with masking tape or other suitable material between the blade and pained surface, while using a Blunt knife or simile instrument to carefully pries out the plastic plugs from alternative handle positions on ihe opposite side of the door.
HOW TO USE THE TEMPERATURE CONTROL DIAL 1. The interior temperature of the refrigerator is automatically controlled by the thermostat. The control dial enables the desired degree of cooling fo be selected. The control dial is numbered. 6. On setting ® the refrigerator is switched off. The highest number is the coldest and setting 4 will usually be found suitable for normal operation, (see fig. 12} 2.
YOUR LARDER REFRIGERATOR 1. The function of a refrigerator is to reduce the development of organisms which cause decay and bacterial activity, and thus increase the storage life of food. 2. The fresh food compartment has been designed to operate between 0°C (32°F) and §°C (4I°F) and Is in accordance with British and European Standards. FRESH FOOTY COMPARTMENT 1.
HELPFUL HINTS WHEN BUYING FOODS Ways ensure that food you purchase is of good quality and in prime condition. 2. Shop ar a reliable source and buy the “freshest” looking packing avoid shopworn labels or produce covered in dust, 3. Avoid buying chilled food if vou cannot store it straight away. The use of an insulated container is advisable, 4. Buy and consume foods prior to the “Sell By'' or "'Best Before” dais 3. When you arrive home place perishable foods in the refrigerator immediately. 6.
Shell Position Middle Shelves Storage Time Pastry products 3-4 days Cooked Meat Pies/ Sausage Rolls 2 days Cooked Fruit up to 4 days Bottom Shelves Stock and Gravies 2 days Fresh Fish cal same day Fresh Meats 3 days Fresh Poultry 2 days Sausages up to 3 days Minced Meats, Burgers 1 day Salad Drawer Green Vegetables 3-5 days Salad Vegetables 3.5 days Fresh Fruit 5 days DO NOT KEEP BANANAS IN THE REFRIGERATOR. DEFROST REFRIGERATOR The defrosting of the larder refrigerator cowries automatically.
_ NG A SWITCH OFF THE APPLIANCE THE ELECTRICITY SUPPLY. The interior of your larder refrigerator should be cleaned at regular intervals depending on usage. Always clean when food is at a minimum. 1 Empty the compartment and keep foods in a cool place.
SOMETHING NOT WORKING RV If the appliance is ok 1. Ensure that the appliance compressor unit has not been pushed against the wall, or that any foreign abject are not resting against the compressor unit at the base of the appliance. 2 Check the appliance is level, see “How to install your appliance” section. 3 Ensure that the tubes at the back of the appliance are not vibrating against the cabinet or any other part. If this i $0, they should be eased away gently.
HELP US TO HELP YOU — In the event of your appliance requiring service Trinity Bendix Lid. have an arrangement with Electrolyte Group Service. Before calling out an engineer, please ensure you have followed the checklist and that you have the model number and purchase date to hand.
Trinity Bendix Service Centers SERVICE AND SPARES FOR TRINITY BENDIX ABERDEEN DD IV KW AB PH ALT HAM BELFAST BT BIRMINGHAM BRIGHTON CONVEY ISLAND CARDIFF EDINBURGH GATES HEAD GLASGOW LEEDS SEDNA LIVERPOOL.
Guarantee This Guarantee is offered to you as an extra benefit and does not affect your legal rights. Trinity Bendix products are carefully designed, manufactured, tested and inspected and in consequence we undertake 1o replace or repair any part found 1o be defective in material or workmanship, within one year of delivery to the original purchaser, free of charge. The Company does not accept liability for defects arising from neglect, misuse, or accident.