OPERATING & INSTALLATION INSTRUCTIONS SLIP IN ELECTRIC COOKER RE50GC PLEASE READ THIS INSTRUCTION BOOKLET BEFORE USING THE APPLIANCE
TECHNICAL DETAILS MODEL NO. RE50GC Voltage: 230-240 Volts AC 50Hz Wattage: 9.4-10.3kW Height: 900mm Width: 500mm Depth: 600mm Weight: 55kg This appliance complies with: European Council Directive 73/23/EEC. EMC Directive 89/336/EEC. CE Marking Directive 93/68/EEC.
CONTENTS Technical Details .................................................................................................................................... 2 Contents .................................................................................................................................................. 3 Preface ..................................................................................................................................................... 5 Safety .........................
CONTENTS Defrost Feature ....................................................................................................................................... Uses of Defrost Feature .................................................................................................................. Selecting Defrost ............................................................................................................................ Things to Note .....................................................
PREFACE Dear Customer, Thank you for buying a Tricity Bendix appliance. With our 80 years experience in developing and manufacturing the very best in U.K. appliances, you can be assured that you have purchased a hard working, reliable, quality product. Tricity Bendix appliances comply with British Standard safety and performance requirements. They have been approved by BEAB (British Electrotechnical Approvals Board) and are covered by a 12 month parts and labour guarantee.
SAFETY THESE WARNINGS ARE PROVIDED IN THE INTERESTS OF YOUR SAFETY. ENSURE THAT YOU UNDERSTAND THEM ALL BEFORE INSTALLING OR USING THE APPLIANCE. Do not allow young children to play with any part of the packaging. After installation, please dispose of the packaging with due regard to safety and the environment, your local authority can arrange this. PLEASE READ CAREFULLY DURING OPERATION This appliance is not intended to be operated by means of an external timer or separate remote control system.
Do not leave utensils containing foodstuffs, e.g. fat or oil in or on the appliance in case it is inadvertently switched ON. Take care to follow the recommendations given for tending the food when grilling. Do not leave the handle in position when grilling as it will become hot. Cookers and hobs become very hot, and retain their heat for a long period of time after use. Children should be kept well away from the appliance until it has cooled.
INTRODUCTION WARNING: THIS APPLIANCE MUST BE EARTHED RATING PLATE To move the appliance, open the main oven door, and lift the appliance by holding inside the top of the oven compartment. This is situated on the front frame of the appliance and can be seen upon opening the door. Alternatively the rating plate may also be found on the back or top of some models (where applicable). The appliance must be protected by a suitably rated fuse or circuit breaker.
GRILL AND OVEN FURNITURE GENERAL NOTES ON USING YOUR APPLIANCE The following items of grill/oven furniture have been supplied with the appliance: We suggest that you run the oven elements for 10 – o 15 minutes at 220 C to burn off any residue from their surfaces. The procedure should be repeated with the grill for approximately 5 – 10 minutes. During this period an odour may be emitted, it is therefore advisable to open a window for ventilation.
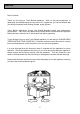
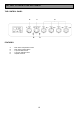
GETTING TO KNOW YOUR APPLIANCE THE CONTROL PANEL A E C B D FEATURES A B C D E - Main Oven Temperature Control Main Oven Indicator Neon Top Oven/Grill Control Top Oven Indicator Neon Hotplate Controls 10
ELECTRONIC MINUTE MINDER (SIE340 WHITE ONLY) 1= (-) DECREASE CONTROL & MINUTE MINDER 2= (+) INCREASE CONTROL ( ) COOKPOT SYMBOL The electronic minute minder can indicate the time of day, operate as a minute minder and it can be used to time and switch off the main oven. 1 Fig.1 Please note that this is a 24 hour clock, for example 2.00pm is shown as 14.00. In the following pages we explain how to use the minute minder and set the time of day.
2. THE MINUTE MINDER Fig.5 IMPORTANT The minute minder can be used to time a set cooking period. At the end of the cook time the minute minder will automatically switch off the main oven if in use. The minute minder gives an audible reminder at the end of any period of cooking up to 23 hours and 59 minutes. To set press button (1) and the display will read 0.00, see Fig. 5. Release button (1) and press and hold button (2).
5) LOCK FEATURE - MAIN OVEN ONLY Fig. 12 Please read the following information with care. TO LOCK THE OVEN USING THE TIMER Press and hold Buttons (1) and (2) on your timer for 3 - 8 seconds. See Fig. 12. ON' will appear in the display. See Fig. 13. Press Button (2) to change the display to 'Of'. The key symbol ( ) appears in the display. The oven will now not operate. After a few seconds the time of day will show in the display. Wait 3 seconds before selecting another function. 1 Fig.
THE CERAMIC HOB CAUTION: DO NOT USE THE APPLIANCE IF THE CERAMIC GLASS IS DAMAGED. IF A FAULT OR CRACK BECOMES VISIBLE DURING COOKING, DISCONNECT THE APPLIANCE IMMEDIATELY FROM THE ELECTRICITY SUPPLY AND CONTACT YOUR LOCAL SERVICE FORCE CENTRE. USING THE HOB · To operate the hotplates, turn the control knobs in either direction to vary the heat setting. · The highest number represents the hottest setting and the lowest number represents the coolest setting.
· · 5. Double frying chips. To prolong the life of the hotplates:· DO NOT place foil and plastic vessels on the hot surface of the ceramic hob and DO NOT use the surface for storage purposes. · Never use utensils with a skirt, e.g. a bucket. · Never use an asbestos mat. · Never leave the hotplates ON when not covered with a saucepan. Double frying will ensure good chips. First fry the chips for a few minutes at 170°C/340°F to seal the outside. Remove the chips from the oil.
THE GRILL CAUTION – ACCESSIBLE PARTS MAY BECOME HOT WHEN THE GRILL IS IN USE. CHILDREN SHOULD BE KEPT AWAY. SELECTING THE GRILL · THE GRILL PAN AND HANDLE To operate the grill, open the grill door and turn the top oven/grill control clockwise so that ‘0’ on the control knob lines up with setting 1, 2 or 3. · Setting 3 represents the grill on Full. At settings 1 and 2 the grill may turn on and off over time and you may prefer to use these settings for keeping food warm.
To correctly locate the grill pan on the shelf, ensure that the cut out on the underside of the handle bracket locates over the front bar of the shelf. To check the progress of the food being grilled, the grill pan should be withdrawn on the shelf to tend the food during cooking. · Accompaniments such as tomatoes and mushrooms may be placed underneath the grid when grilling meats.
THE TOP OVEN USES OF THE TOP OVEN The top oven is the smaller of the two ovens. It is heated by elements in the top oven and bottom of the oven. It is designed for cooking smaller quantities of food. It gives especially good results if used to cook fruit cakes, sweet or savoury flans or quiche. The top oven is also ideal for use as a warming compartment to warm dishes and keep food hot. temperature setting of 90°C – 100°C on the top oven control dial.
HINTS AND TIPS · All cooking should be carried out using an oven shelf positioned in one of the shelf runners. · Stand dishes on a suitably sized baking tray on the shelf to prevent spillage onto the oven base and to help reduce cleaning. · There should always be at least 2.5cm (1”) between the top of the food and the element. This gives best cooking results and allows room for rise in yeast mixtures, Yorkshire puddings, etc. · When cooking cakes, pastry, scones, bread, etc.
THE MAIN FAN OVEN USES OF THE FAN OVEN PREHEATING The fan oven quickly reaches its temperature, so it is not usually necessary to preheat the oven. Without preheating however, you may find you need to add an extra 5 – 10 minutes on the recommended cooking times. For recipes needing high temperatures, e.g. bread, pastries, scones, soufflés etc., best results are achieved if the oven is preheated first. For best results when cooking frozen or cooked chilled ready meals always preheat the oven first.
HINTS AND TIPS · Arrange the shelves in the required positions before switching the oven ON. Shelves positions are numbered from the bottom upwards. · When cooking more than one dish in the fan oven, place dishes centrally on different shelves rather than cluster several dishes on one shelf, this will allow the heat to circulate freely for the best cooking results. · When batch baking one type of food e.g. Victoria sandwich cakes, those of similar size will be cooked in the same time.
OVEN COOKING CHART The oven temperatures are intended as a guide only. It may be necessary to increase or decrease the temperature by 10°C to suit individual preferences and requirements Shelf positions are counted from the bottom of the oven.
ROASTING CHART ROASTING CHART INTERNAL TEMPERATURES – Rare : 50-60°C; Medium : 60-70°C; Well done : 70-80°C MEAT SECOND/FAN OVEN COOKING TIME 20-35 minutes per ½kg (1lb) and 20-35 minutes over Beef 160-180°C Beef, boned 160-180°C 25-35 minutes per ½kg (1lb) and 25-35 minutes over Mutton and Lamb 160-180°C 25-35 minutes per ½kg (1lb) and 25-35 minutes over Pork and Veal 160-180°C 30-40 minutes per ½kg (1lb) and 30-40 minutes over Ham 160-180°C 30-40 minutes per ½kg (1lb) and 30-40 minutes ove
DEFROST FEATURE USES OF DEFROST FEATURE Small or thin fish fillets, frozen peeled prawns, cubed or minced meat, liver, thin chops, steaks etc., can be thawed in 1 – 2 hours. This fan oven function defrosts most foods faster than more conventional methods. It is particularly suitable for delicate frozen foods which are to be served cold e.g. cream filled gateaux, cakes covered with icings or frostings, cheesecakes, biscuits, scones, etc.
CARE AND CLEANING If Hob Brite is unavailable, one or more of the cleaning agents below may be used temporarily: a) Cif Cream Cleaner b) Baking Soda BEFORE CLEANING THE APPLIANCE, ALWAYS ALLOW THE COOLING FAN TO COOL THE APPLIANCE DOWN BEFORE SWITCHING OFF THE ELECTRICITY SUPPLY. TO REMOVE MORE STUBBORN MARKS 1. Bar Keepers Friend may be used to clean off more stubborn stains or to remove discolourations. It may be necessary to rub the marks hard for several minutes. 2.
CLEANING THE APPLIANCE HINTS AND TIPS TO REDUCE HOB SOILAGE: · Make sure the bottom of the saucepan and the cooking area are clean and dry before cooking begins. · Ensure saucepans are large enough accommodate food to avoid boil overs. · If possible, wipe up spills and splatters as they occur, but take care to avoid steam burns. · Avoid using a dishcloth or sponge to clean the hob.
CLEANING INSIDE THE GRILL COMPARTMENTS OVEN HINTS AND TIPS AND The sides and back panel of the main oven are coated with special Stayclean coating. The Stayclean surfaces inside the oven should not be cleaned manually. See below ‘Care of Stayclean Surfaces’. The vitreous enamel in the top oven, grill compartment and fan oven base can be cleaned using normal oven cleaners or aerosol oven cleaners with care.
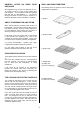
TO REPLACE THE OUTER GLASS CLEANING THE DOOR GLASS 1. Holding the oven glass with both hands, gently place the locators into the holes of the brackets at the bottom of the oven door. To prevent damaging or weakening of the door glass panels avoid the use of the following: · Household detergents and bleaches · Impregnated pads unsuitable for nonstick saucepans · Brillo/Ajax pads or steel wool pads · Chemical oven pads or aerosols · Rust removers · Bath/Sink stain removers 2.
SOMETHING NOT WORKING? We strongly recommend that you carry out the following checks on your appliance before calling a Service Engineer. It may be that the problem is a simple one which you can solve yourself without the expense of a Service call. If our Service Engineer finds that the problem is listed below you will be charged for the call whether or not the appliance is under guarantee. The appliance does not work at all: * Check that the appliance has been wired in and is switched on at the wall.
SERVICE AND SPARE PARTS In the event of your appliance requiring service, or if you wish to purchase spare parts, please contact your local Service Force Centre by telephoning:- 0870 5 929929 Your telephone call will be automatically routed to the Service Force Centre covering your post code area. For the address of your local Service Force Centre and further information about Service Force, please visit the website at www.serviceforce.co.
GUARANTEE CONDITIONS Standard guarantee conditions We, Tricity Bendix, undertake that if within 12 months of the date of the purchase this Tricity Bendix appliance or any part thereof is proved to be defective by reason only of faulty workmanship or materials, we will, at our option repair or replace the same FREE OF CHARGE for labour, materials or carriage on condition that: · · The appliance has been correctly installed and used only on the electricity supply stated on the rating plate.
Tricity Bendix, 55-77 High Street, Slough, Berkshire SL1 1DZ Consumer care telephone number 08705 950950 IMPORTANT NOTICE In line with our continuing policy of research and development, we reserve the right to alter models and specifications without prior notice. This instruction booklet is accurate at the date of printing, but will be superseded if specifications or appearance are changed.