IMPORTANT USER INFORMATION A Please cu sure that you have read the whole instruction book before using the appliance. These warnings are provided in the interest of safety. You must read them carefully before installing or using the appliance. It fs importance that this insulation hook should be retained with the appliance for future reference.
CONTENTS Page important User formation 1 Your Appliance 3 How to Install your Appliance (Before using your appliance) 4 Adjustment of Door 7 Reversible Hinging 8 Decor Kits 9 How to Use the Temperature Control Dial 10 Your Refrigerator i1 Temperatures 11 Fresh Food Compartment 11 Door Bro rage 11 Helpful Hints when Buying Food 12 Preparing Rods for Storage 12 Fresh Food Storage Guide 12 Frozen Food Compartment 14 Frozen Food Storage 14 Defrosting Your Refrigerator 18 Replacement of Interior Light But 17 Cle
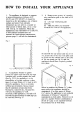
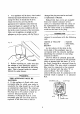
HOW TO INSTALL YOUR APPLIANCE 1. This appliance is designed o operate in ambient temperatures between 16°C and 32°C It should be Innovated in a dry atmosphere, out of direct sunlight and away from outre me temperature eg. HOt Ext o 2 conker or other sources of direct hea, oF in a very cold room eg. an nuthouse, where the temperateness may fall below 16°C (BOROUGH, If these ambient temperatures are exceeded the food storage temperatures given on page 11 will not be maintained. Fig. 2 TR 2.
4. Your appliance will be heavy when loaded with food and mast therefore be stop dona strong firm floor. Tt should also be Revel Adjust the level by screwing out the appropriate love! adjusters in the from fom using your Finger or & spewer (sec fig, 5). Level adjusters are ally available in the bear feet in the event of excessive floor unevenness. Make sere the appliance is upright wd ot adjusters ave i firm contact with the floor so that the cabinet doesn't rock in any direction. §.
, The appliance muse be protected by 2 13A PASTA approved (BS1362) fuse, if a 13A (BSE363) plug or a non irrevocable plug is used, or i any other type of plug is used by a 134 fuse either in the plug ar adapter o at the Distribution Board, 9, If at any time 2 replacement deaf is required, the cross sectional area of s conductors must oot be lest than 0.75 mm?. 10, I it becomes necessary 1o replace ihe supply cod, the cable lamp should be tightened $0 as 1o retain the new cord. 1.
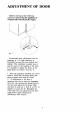
ADJUSTMENT OF DOOR Before carrying out te following instruction ensure that the appliance is switched olf ai the electricity supply. Occasionally door adjustment may be necessary e, if a slight clearance ks noticeable between the door gasket and cabinet, This condition is mainly due to uneven floors or the loading of the door. I is possible bo stadium the doors af the hinge points as follows: (see fig.
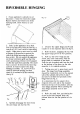
REVERSIBLE HINGING 1 If your appliance is already in use discomfit it from the electricity supply. Remove shelves and other lose items including deaf. Store {vod in a cool place. 74/” 2. Gently lay the appliance oo ity back with the top held away from the floor by & least 30 cm (1273 (use a stool or something distributor. Mike sure 10 wse o towel or lath at the base of the product to protect the sides of the fridge ensuring the product dares not slip.
9. Replace the level adjuster (1) in the small fur, 10, Sand the appliance upright. 15 IF your applause has a side 6ix jangle (see fig. 113 i} Protect the paintwork from damage with masking tape or other suitable material ha tween the blade and painted surface, while using a blat knife or similar instrument o carefully pries out the pastie plugs from alternative handle positions on the opposite side of the soot.
YOUR REFRIGERATOR _ TEMPERATURES b The function of a refrigerator is 1o reduce the development of organisms which cause decay and bacterial activity, aud thus increase the storage Rife of food. 2. The fresh food compartment has been designed 1o operatic between §°C (329F) and 5°C {41 and is in accordance with British and European Standards. FRESH ¥FOOD COMPARTMENT 1.
HELPFUL HINTS WHEN BUYING FOODS L. Always ensure that food you purchase is of good quality aod in prime condition, 2. Hap at & reliable source and buy the “freshest™ looking packing avowal shopworn labels or produce covers in dust. 3. Avoid buying chilled food if vou cannot swore it straight awa e use of an insulated container s advisable. 4, Buy and consume foods prior (o the H Sell By or < Best Befora™ dares. 5. When you arrive home place perishable goody In the refrigerator intermediately. 6.
Shelf Position Storage Time Middle Shelves Pastry products 3-4 days Cooked Meat Poles/ Sausage Rolls 2 days Cooked Fruit up to 4 days Bottom Shelves Stoke and Gravies 2 days Fresh Sigh £at same day Fresh Meats 3 days Fresh Poultry 2 days Sausages up to ¥ days Minced Meats, Burgers 1 day Salad Drawer Careen Vegetables 3.5 days Sadat Parables 3-8 days Fresh Fruit 3 days DO NOT KEEP BANANAS IN THE REFRIGERATOR.
FROZEN FOOD COMPARTMENT ALL MODELS NET STORAGE CAPACITY 0,32 cut (B.12L). #* WEIGHT OF STORED FOOD 6,610 (3kg). 1. This compartment is not designed to freeze fresh food or evoked food. 2. The 2 soar frozen food compartment of the refrigerator is designed 10 maintain temperature below 1290 This temperature will allow medium term storage of frozen ford up to §} month providing the correct setting has been selected.
DEFROSTING YOUR REFRIGERATOR iar defrosting is necessary 1o ensure efficient operation of the refrigerator. Frost will build in the frozen food compartment. This is due to moist me i in the air which enters the refrigerator when the door is opened and indenture from the stoned food. As a guideline the frost trifled up should not exceed Gmm (47 The appliance should be defrosted at regular intervals depending on sage to ensure efficient tanning. PREPARING FOODS WHEN DEFROSTING 1.
PUSH BUTTON DEFROSTING METHOD On Models RF500W & RF500AL Only This method may be more convenient but as the deftest period is longer, should only he used when frozen food stocks are low or are ot being steed. Make sure the defrost oay fug s removed and a suitable container placed below Lo collect water, 1. Emily the frozen food compartment. 2. Press the bunion located in the center of the control knob dirndl it licks. 3.
REPLACEMENT OF ¥ LIGHT BULB L. Should the interior light fall to work, first switch off and pull sut the mains plug and then replace the bulb as follows: {see fig, 16}, CRIER 2. Remove the Legit cover by removing the screw at the rear with a screwdriver and pulling the rear outwards towards the middle of the cabinet. Unscrew the but and replace it with a new 15 wait Ei4 SES bulb (available from your nearest customer service recent. 3.
..JF GOING ON HOLIDAY I you are going away for a period of time the following advice should be followed: L. For 2 days Mo need to remove any food from the refrigerator except perishable foods such as meats and poultry. week Remove alf goody except for eggs, butter and bacon, providing the “*Best Before” date or recommended storage Rimes are not exceeded, 3. Over I week B Empty all contemns, switch off electricity supply, defrost, cheat and dry. Leave the door open.
SOMETHING NOT WORKING SERVICE CHECK B the appliance is noisy: I, Ensure that the appliance compressor unit has not been pushed against the wall, or that any foreign objects are not Testing against the compressor unit & the base of the appliance. 2, Check the appliance is level, see “How to stall your seaplane” section, 3. Ensure that the tubes at the back of the appliance are not vibrating against the cabinet or any other part. 1 this s so, they should be cased away gently, 4.
HELP US TO HELP YOU — 10 the evens of your appliance requiring service Trinity Bendix Lid. have an arrangement with Electra lux, Group Service. Before calling ol an engines, please ensure you have followed the checklist and that you nave the model number and repurchase date 1o hand. Telephone numbers are detailed on the List headed “Trinity Bendix Service Cenire®. Please note that all generics concerning service should be addressed 10 your local service center.