User Manual Electric Cooker SB200/3 100 1 1 1 1 1 5 5 5 5 5 150 3 2 2 2 3 2 200 3 3 2 4 4 4 4 4 3
Important safety information These warnings are provided in the interests of your safety. Ensure that you understand them all before installing or using the appliance. Your safety is of paramount importance. If you are unsure about any of the information in this book contact the Customer Care Department. Installation The appliance must be installed according to the instructions supplied. The installation work must be undertaken by a qualified electrician or competent person.
Ensure your hand is protected before handling the pan. During use the appliance becomes hot. Care should be taken to avoid touching the heating elements inside the oven. Ensure that all vents are not obstructed to ensure ventilation of the oven cavity. Never line any part of the appliance with foil. Always stand back from the appliance when opening the oven door to allow any build up of steam or heat to release. Never leave the appliance unattended when the oven door is open.
Contents For the user Important safety information Description of the appliance Getting to know your appliance Before using the appliance Rating plate Preparing to use your appliance Control panel indicator neon(s) Condensation and steam Grill and oven furniture 2 5 6 7 7 7 7 7 7 The radiant hob Using the hob Recommended saucepans Hints & tips 8 8 8 8 The grill Using the grill Things to note The grill pan and handle Hints & tips Grilling chart 9 9 9 9 10 11 The main oven Using the main oven Things to
Description of the appliance Electric splashback single oven 100 1 1 1 1 1 5 5 5 5 5 150 3 2 2 2 3 2 200 3 3 2 4 4 4 4 4 Control panel Grill Main oven 5 3
Getting to know your appliance The control panel A Features A - Hotplate controls B - Grill control C - Main oven temperature control D - Main oven indicator neon 6 B C D
Before using the appliance Rating plate This is situated on the lower front frame of the appliance and can be seen upon opening the door. Alternatively the rating plate may also be found on the back or top of some models (where applicable). The appliance must be protected by a suitably rated fuse or circuit breaker. The rating of the appliance is given on the rating plate. Do not remove the rating plate from the appliance as this may invalidate the guarantee.
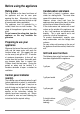
The radiant hob Using the hob • Turn the control knob in either direction to vary the heat setting. • The highest number represents the hottest setting and the lowest number represents the coolest setting. Recommended saucepans Only saucepans with flat bases and close fitting lids are recommended. The saucepan base should be approximately the same size as the cooking area. Ensure that new saucepans are well scrubbed to remove edges and take off any deposits left from manufacture.
The grill CAUTION – Accessible parts may be hot when the grill is in use. Young children should be kept away. Using the grill • • • To operate the grill open the grill door and turn the grill control in either direction. The highest number represents the hottest setting and the lowest number represents the coolest setting. At lower settings the grill may turn on and off over time and you may prefer to use these settings for keeping food warm.
To remove the handle, press the button on the handle with the thumb and pivot the handle slightly upwards and towards the right to remove from the bracket. Protect your hands when removing the grill pan handle. Always remove the grill pan handle during grilling. To correctly locate the grill pan ensure the pan locates into the runners in the grill compartment side panels. There are two alternative positions.
Grilling chart Food Bacon Rashers Beefburgers Position Grill time (mins in total) Adjust 5-6 grill 10 - 15 Chicken Joints 30 - 40 setting Chops – Lamb Pork and 15 - 20 20 - 30 Fish – Whole Trout/Mackerel grill 15 - 25 Fillets - Plaice/Cod pan 10 - 15 Kebabs grid 20 - 30 to 8 - 12 suit 10 - 20 different 20 - 30 Steaks – Rare Medium Well Done thicknesses of 6 - 12 12 - 16 14 - 20 Toasted Sandwiches food 3-4 Kidneys – Lamb/Pig Liver – Lamb/Pig Sausages The times quoted above
The main oven Using the main oven • Turn the main oven temperature control to the required setting. Things to note • The indicator neon will glow. It may turn ON and OFF during use to show that the setting is being maintained. To fit the main oven shelves The shelves should be fitted with the straight rods uppermost on the frame and the forms towards the back of the oven. If not fitted correctly the anti-tilt and safety stop mechanism will be affected.
Cooking chart The oven temperatures are intended as a guide only. It may be necessary to increase or decrease the temperatures to suit individual preferences and requirements. Food Biscuits Bread Bread rolls/buns Cakes: Small & Queen Sponges Victoria Sandwich (7”) Madeira (7)” Rich Fruit (8)” Christmas (8)” Gingerbread Meringues Flapjack Shortbread Casseroles: Beef/Lamb Chicken Convenience Foods Fish Fish Pie (Potato Topped) Fruit Pies, Crumbles Milk Puddings Pasta/Lasagne etc.
Roasting chart INTERNAL TEMPERATURES – Rare : 50-60°C; Medium : 60-70°C; Well done : 70-80°C MEAT TEMPERATURE COOKING TIME 20-35 minutes per ½kg (1lb) and 20-35 minutes over Beef/ Beef boned 180-200°C Mutton/Lamb 180-200°C 25-35 minutes per ½kg (1lb) and 25-35 minutes over Pork/Veal/Ham 180-200°C 30-40 minutes per ½kg (1lb) and 30-40 minutes over Chicken 180-200°C 15-20 minutes per ½kg (1lb) and 20 minutes over Turkey/Goose 180-200°C 15-20 minutes per ½kg (1lb) up to 3½kg (7lb) then 10 minut
Care and cleaning Before cleaning always allow the appliance to cool down. Cleaning materials Before using any cleaning materials on your appliance, check that they are suitable and that their use is recommended by the manufacturer. Cleaners that contain bleach should NOT be used as they may dull the surface finishes. Harsh abrasives must also be avoided. Cleaning the outside of the appliance Do not use abrasive cleaning materials e.g.
Cleaning the hob and hotplate trims Hints and tips Clean the hob surface with liquid detergent or a mild abrasive cleaner, e.g. Cif. The chrome hotplate trims are removable for cleaning, and can be washed in the dishwasher. The chrome hotplate supports should NOT be removed. The spillage tray below the hotplates can be cleaned using a soap impregnated steel wool pad. For convenience , the hob is hinged and can be supported using the stay rod during cleaning.
Something not working Please carry out the following checks on your appliance before calling a Service Engineer. It may be that the problem is a simple one that you can solve yourself without the expense of a service call. In-guarantee customers should make sure that the checks have been made as the engineer will make a charge if the fault is not a mechanical or electrical breakdown. Please note that proof of purchase is required for in-guarantee service calls.
Service and spare parts In the event of your appliance requiring service, or if you wish to purchase spare parts, please contact your local Service Force Centre by telephoning:O870 5 929929 Your telephone call will be automatically routed to the Service Force Centre covering your post code area. For the address of your local Service Force Centre and further information about Service Force, please visit the website at www.serviceforce.co.uk.
Guarantee conditions Products of Tricity Bendix manufacture which are not marketed by Tricity Bendix.
Technical details Voltage: 230-240 Volts AC 50Hz Wattage: 9.8 - 10.7kW Height: 1240mm Width: 460mm Depth: 585mm Weight: 51.4 kg This appliance complies with: European Council Directives 73/23/EEC. EMC Directive 89/336/EEC, CE Marking Directive 93/68/EEC. Energy Label Directive 2002/40/EC Installation instructions Warning: This appliance must be earthed. If your appliance has been damaged in transit, contact your supplier immediately. DO NOT attempt to install it.
The electrical connection should be made using a double pole isolating switch (cooker socket) with at least 3mm contact separation in all poles. The cable must have conductors of sufficiently high crosssectional area to prevent overheating and deterioration. The recommended cross-section area is six square millimetres (6.00mm2). Fig.1. The cable should be routed away from potentially hot areas marked by X. See Fig.1.
Notes 22
Notes 23
www.electrolux.com www.tricity-bendix.co.