OPERATING & INSTALLATION INSTRUCTIONS ELECTRIC COOKER SE 211 GB
WARNINGS It is most important that this instruction book should be retained with the appliance for future reference. Should the appliance be sold or transferred, always ensure that the book is left with the appliance in order that the new owner can get to know the functions of the appliance and the relevant warnings. These warnings are provided in the interest of safety. You MUST read them carefully before installing or using the appliance.
CONTENTS Instructions for the Installer Tehnical features 5 Installation 6 Location 6 Electrical connections 7 Instructions for the User Use and care 8 Before the first use of the oven 9 Electric oven 10 Oven function control knob 10 Cooking in the oven 10 Grilling 11 Hints and tips 11 Electric hotplates 12 Hints and tips 13 Maintenance and cleaning 14 Something Not Working 16 Service and spare parts 17 Guarantee Conditions 18 How to read the instruction book The symbols be
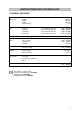
INSTRUCTIONS FOR THE INSTALLER TECHNICAL FEATURES Dimensions Height Width Depth Oven Capacity Hob Front left Back left Front right Back right 900 mm 500 mm 600 mm 49 l Hob element Ø 180 mm Hob element Ø 145 mm Hob element Ø 145 mm Hob element Ø 180 mm 2000 - 2090 W 1000 - 1050 W 1000 - 1050 W 1500 - 1570 W Total hob rating 5500 - 5760 W Oven element Grill element Cleaning 1650 - 1700 W 1825 - 1900 W manual Total oven rating 1825 - 1900 W Supply Rated voltage Rated frequency 230 - 240 V 50 Hz
INSTALLATION This cooker must be installed in accordance with the IEE Wiring Regulations (Current Edition). Detailed recommendations are contained in the following British Standards Codes Of Practice: B.S. 6172/ B.S. 5440, Par.2 and B.S. 6891 Current Editions. Before your appliance is connected to the mains electricity supply, check to ensure that the voltage and the frequency shown on the rating plate correspond with your supply voltage. This appliance must be earthed.
ELECTRICAL CONNECTIONS Any electrical work required to install this hob and the supply cable should be carried out by a qualified electrician or competent person, in accordance with the current regulations. NOTE: The earth wire should be about 2 cm longer than the live and neutral wires. THIS COOKER MUST BE EARTHED. After installation and connecting, the cable must be placed so that it cannot at any point reach a temperature of more than 50°C above the ambient temperature.
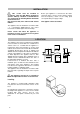
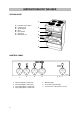
INSTRUCTIONS FOR THE USER USE AND CARE A A. B. C. D. E. F. G. Hob with electric plates Control panel Shelf supports Shelf Door handle Oven door Adjustable feet B C D E F G CONTROL PANEL SE211X 1 1. 2. 3. 4. 8 2 3 Back left hotplate control knob Front left hotplate control knob Front right hotplate control knob Back right hotplate control knob 4 5 6 7 5. Main pilot light 6. Oven thermostat pilot light 7.
USE OF APPLIANCE Before the First Use of the Oven Before the first use ensure that the room is well ventilated: V.M.C. (Mechanic ventilation) or opened window. Remove all packaging, both inside and outside the oven, before using the oven. Before first use, the oven should be heated without food. During this time, an unpleasant odour may be emitted. This is quite normal. 1. Remove the oven accessories. 2. Remove any adhesive labels or protective films, if there are any. 3.
ELECTRIC OVEN Oven Function Control Knob The control knob is used to select the desired temperature and to select either the grill or oven function. 0 Oven switched off 50-250 Temperature selection (bottom and top heat) Grill - The grill cannot be used at the same time as the oven. The oven door must be closed when grilling. The grill temperature is not adjustable and always operates at maximum. For oven cooking use the control knob to select the desired temperature between 50º – 250ºC.
Grilling When grilling, the accessible parts of the appliance are hot and the appliance should not be left unattended. Take care that children do not play near it. During use the appliance becomes hot. Care should be taken to avoid touching heating elements inside the oven. The grill pan will become hot during use, always use oven gloves when removing or replacing a hot grill pan. All grilling must be carried out with the oven door closed.
ELECTRIC HOTPLATES To switch on a hotplate, turn the relevant control knob to the required heat setting. The control knob is numbered 0 – 6 0 – OFF 1 – Minimum 6 – Maximum. The hob has two types of hotplates: Normal Hotplates We recommend the plates are switched to maximum (6) for a short while to boost the plate, and then adjusted to the required setting. Rapid Hotplate (Front left) The rapid hotplates indicated by a red spot, will heat up more quickly than a normal plate.
Hints and Tips Saucepans for use on solid hotplates should have several characteristics: • They should be fairly heavy duty. • They should fit the heat area exactly, or be slightly larger for efficient use, NEVER smaller. • They should have a flat base to ensure good contact with the hotplate. This is particularty important when using pans for high temperature frying presure cooking.
MAINTENANCE AND CLEANING The oven should be kept clean at all times. A build-up of fats or other foodstuffs could result in a fire. Before cleaning, ensure all control knobs are in the OFF position, and the appliance has cooled completely. Before any maintenance or cleaning can be carried out, you must DISCONNECT the cooker from the electricity supply. Cleaning the Oven door For a more complete cleaning of the oven door, it is advisable to remove it in the following way: - Open the door completely.
The Hob Top Restoring The hob is best cleaned whilst it is still warm, as spillage can be removed more easily than if it is left to cool. Regularly wipe over the hob top using a soft cloth well wrung out in warm water to which a little washing up liquid has been added. Avoid the use of the following: • household detergent and bleaches; • impregnated pads unsuitable for non-stick saucepans; • steel wool pads; • bath/sink stain removers.
SOMETHING NOT WORKING If the appliance is not working correctly, please carry out the following checks, before contacting your local Service Force Centre. IMPORTANT: If you call out an engineer to a fault listed below, or to repair a fault caused by incorrect use or installation, a charge will be made even if the appliance is under guarantee.
SERVICE AND SPARE PARTS In the event of your appliance requiring service, or if you wish to purchase spare parts, please contact your local Service Force Centre by telephoning:- 08705 929929 Your telephone call will be automatically routed to the Service Force Centre covering your post code area. For the address of your local Service Force Centre and further information about Service Force, please visit the website at www.serviceforce.co.
GUARANTEE CONDITIONS Standard Guarantee Conditions We Tricity Bendix undertake that if, within 12 months of the date of the purchase, this Tricity Bendix appliance or any part thereof is proved to be defective by any reason only of faulty workmanship or materials, we will, at our option, repair or replace the same FREE OF ANY CHARGE for labour, materials or carriage on condition that: • The appliance has been correctly installed and used only on the electricity supply stated on the rating plate.
Customer Care Department Tricity Bendix 55-77 High Street Slough Berkshire SL1 1DZ Tel: 08705 950 950 SE 211 - 342701425-A-060505-01 © Electrolux plc 2005 From the Electrolux Group. The world’s No.1 choice The Electrolux Group is the world’s largest producer of powered appliances for kitchen, cleaning and outdoor use. More than 55 million Electrolux Group products (such as refrigerators, washing machines, vacuum cleaners, chain saws and lawn mowers) are sold each year to a value of approx.