INSTRUCTION BOOK GAS COOKER SG211X
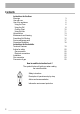
Contents Instructions for the User Warnings Use and care Use of the appliance Using the Oven Using the Grill Cooking Chart Using the Hob Hints and tips Maintenance and cleaning Something Not Working Service and spare parts Guarantee Conditions Instructions for the Installer Technical Features Advice for safety Gas connection Electrical connections Installation Gas connection Conversion of gas How to read the instruction book ? The symbols below will guide you when reading the instruction book Safety instruc
Important safety information You MUST read these warnings carefully before installing or using the appliance. If you need assistance, contact our Customer Care Department on 08705 950950. Installation • This cooker must be installed by qualified personnel, according to the manufacturer’s instructions and to the relevant British Standards. • This cooker is heavy. Take care when moving it. • Any gas installation must be carried out by a registered CORGI installer.
• Unstable or misshapen pans should not be used on the hob burners as unstable pans can cause an accident by tipping or spillage. • Never leave the cooker unattended when cooking with oil and fat. • Never pull the appliance by the oven handle. • This cooker should be kept clean at all times. A build-up of fat or foodstuff could result in a fire. • Never use steam or high pressure appliances for cleaning the oven. • Never use plastic dishes in the oven or on the hob burners.
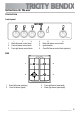
Instructions for the user Use and care Control panel SG211X 1. 2. 3. 1 2 3 Back left burner control knob Front left burner control knob Front right burner control knob 4 5 4. 5. 6. 6 Back right burner control knob Ignition switch Oven/Grill burner control knob (selector) Hob 1. 2. 1 4 2 3 Back left burner (auxiliary) Front left burner (rapid) 3. 4.
Use of appliance Before the First Use of the Cooker Remove all packaging both inside and outside of the cooker, before using it. Before first use, the oven should be heated without food. During this time, an unpleasant odour may be emitted. This is quite normal. 1. Remove the oven accessories and ensure all packaging has been removed. 2. Ignite the oven burner (see instructions) and turn the control knob to maximum. 3. Open a window for ventilation. 4.
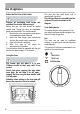
Ignition Attention: when turning on the oven and grill burner the oven door has to be opened. • Open the oven door, push and turn the control knob to the left to position 8, keeping the control knob pressed. • At the same time, push the electronic ignition knob (see fig). Keep it pushed until the gas ignites (1 spark / second). • Release the knob after 10 seconds and check that the burner is ignited through the holes in the burner cover.
Using the Grill • When grilling, the accessible parts of the appliance are hot and the appliance should not be left unattended. Take care that children do not play near it. While the grill is operating leave the oven door half open and put the grill deflector “A” into place. OR A Upon ignition, keep the knob pressed for approximately 10 seconds (until the safety valve automatically keeps the grill burner lit). During a power cut • Open the oven door.
The grill pan will become hot during use, always use oven gloves when removing or replacing a hot grill pan. Grilling • Slide the roasting grid in the guide 4 and the roasting tray in the guide 3. • When the first side is brown, turn the meat without pricking it in order that the juices are not lost. • Grill the second side. Cooking time is determined by the thickness of the piece to be grilled not by its weight.
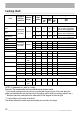
Cooking chart\ Food Preheating No. Tray type or Material of Shelf ThermoThermo of dimension Time the tray position stat -stat tray (dxwxh) cm (min) pos. pos. Cooking Time (min) Roasting meal - beef - lamb 20 min. for each 0.5 Kg / rare 25 min. for each 0.5 Kg/ medium 30min. for each 0.5 Kg/well done 25 min. for each 0.5 Kg/ medium 30min. for each 0.5 Kg/well done 30 min. for each 0.5 Kg/ medium 35min. for each 0.
Using the Hob The Hob Burners The symbol on the control panel shows which burner is operated by the knob. (See control panel). Off Maximum level Minimum level • Upon ignition, adjust the flame as required. OR Power Cut • Push the corresponding knob in completely and turn it left to the “large flame“ symbol and ignite with a match. • Release the knob and check that the burner has ignited. • Upon ignition, adjust the flame as required.
For a correct ignition always keep the burner ring and the spark plugs clean. The following diameter pans can be used: Power Diameter (mm) Burner (kW) min. max. Rapid 3,00 160 280 Semi-Rapid 2,00 140 240 Auxiliary 1,00 120 180 Accessories delivered with the appliance The following accessories are supplied with your appliance. • Grill Deflector To be used when the grill is operation. • Shelf for placing dishes on (roast, pastry mounds) The dish should be put in the middle of the shelf to balance the weight.
Hints and Tips Condensation and steam When food is heated it produces steam in the same way as a boiling kettle. The oven vents allow some of this steam to escape. However, always stand back from the oven when opening the oven door to allow any build up of steam or heat to release. If the steam comes into contact with a cool surface on the outside of the oven, e.g. a trim, it will condense and produce water droplets. This is quite normal and is not a fault with the oven.
Maintenance and cleaning • • The oven should be kept clean at all times. A buildup of fats or other foodstuffs could result in a fire. Before cleaning, ensure all control knobs are in the OFF position, and the appliance has cooled completely. Before any maintenance or cleaning can be carried out, you must DISCONNECT the cooker from the electricity supply. Cleaning materials Before using any cleaning materials on your oven, check that they are suitable and that their use is recommended by the manufacturer.
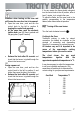
Oven door Removing oven door from its hinges To make it easier to clean the oven, the oven door can be removed. Open the oven door into the horizontal position. Then lift up the clips on the two door hinges as far as they will go (a). Slowly close the door again as far as the stop and lift the door until the hinges come out (b). Replacing the oven door on its hinges When putting the door back on its hinges, reverse the procedure for removing the door from its hinges.
Something not working If the appliance is not working correctly, please carry out the following checks, before contacting your local Service Force Centre. IMPORTANT: If you call out an engineer to a fault listed below, or to repair a fault caused by incorrect use or installation, a charge will be made even if the appliance is under guarantee. Symptoms 1.
Service and spare parts In the event of your appliance requiring service, or if you wish to purchase spare parts, please contact your local Service Force Centre by telephoning:- Zanussi-Electrolux Electrolux Group (Ire) Ltd Long Mile Road Dublin 12 Republic of Ireland 08705 929929 Tel: + 353 (0) 1 4090 751 Email: service.eid@electrolux.ie Your telephone call will be automatically routed to the Service Force Centre covering your post code area.
Guarantee conditions Standard Guarantee Conditions We Zanussi-Electrolux undertake that if, within 12 months of the date of the purchase, this ZanussiElectrolux appliance or any part thereof is proved to be defective by any reason only of faulty workmanship or materials, we will, at our option, repair or replace the same FREE OF ANY CHARGE for labour, materials or carriage on condition that: • The appliance has been correctly installed and used only on the electricity supply stated on the rating plate.
Instructions for the installer Technical features Free standing Hob Pan support Front right burner Back right burner Front left burner Back left burner Hob ignition Enamelled Semirapid Semirapid Rapid Auxiliary Class 1 2000 W 2000 W 3000 W 1000 W Spark Oven Oven Oven burner power Grill Grill burner power Oven ignition Cleaning Gas 3000 W Gas 2000 W Spark Manual Cavity dimensions Height Width Depth Oven volume 267 mm 405 mm 381 mm 41,2 l Accessories Oven shelf Roasting tray Roasting grid +2 handle
Advice for safety Gas connections • Before installation ensures that the local distribution conditions (gas type and pressure) and the pre-setting of the appliance are consistent. • This appliance must be installed only in a room with good ventilation. • This appliance must not connect to a chimney. It has to be installed and connected in accordance with the rules in force. Special attention should be paid to the applicable disposal concerning ventilation.
The cooker is supplied with a 3 core flexible supply cord incorporating a 13amp plug fitted. In the event of having to change the fuse, a 13amp ASTA approved (BS 1362) fuse must be used. Should the plug need to be replaced for any reason, the wires in the mains lead are coloured in accordance with the following code: Green and Yellow Blue Brown - - Before connecting check that: • The plug used for connection is easily accessible when the appliance is installed.
Installation Location of appliance The appliance must not be installed in a bed-sitting room of volume less than 20m3 or in a bathroom or shower room. It is essential that the appliance is positioned as in the enclosed figure i.e. shelves, wall cabinets and cooker hoods must be fitted a minimum of 690mm directly above the hob and 400mm above the hob when fitted in line with the outside of the appliance.
Levelling The appliance is provided with adjustable small feet placed in the back and front corners of the base. By adjusting the small feet it is possible to change the height of the appliance so as to ensure a better levelling with other surfaces and a uniform distribution of the liquids contained in pans or pots. Gas connections Gas connection must be carried out according to the rules in force. Your cooker is delivered adjusted for the kind of gas stated on the rating plate.
Connection shall be by means of an appliance flexible connector for use with a self-sealing plugin device, complying with: Flexible hoses, end fittings and sockets for gas burning appliances – BS 669; - The appliance flexible connector should not be subjected to undue forces either in normal use or whilst connected or disconnected; The socket which the plug of the appliance flexible connector fits should be permanently attached to a firmly fixed gas installation pipe and positioned such that the appliance f
Conversion of gas Your cooker is designed to work with natural gas, and is convertible for use with propane or butane. The LPG conversion kit is available from your Service Force Centre and must be fitted by a Corgi Registered engineer. For changing the gas type it is necessary to: • replace the nozzles (hob, oven and grill); • • adjust the minimum level (hob and oven); check the gas connection; Stick the label supplied with the appliance (in the nozzles bag) corresponding to the gas type utilised.
Replace the nozzles of the hob burners Before any modifications or conversion to a kind of different gas, you must DISCONNECT the cooker from the electricity supply and ensure that all control knobs are in the OFF position, and the appliance has cooled completely. The top burners do not need adjustment of primary air. Check that, turning the knob quickly from the maximum position to the minimum one, the flame does not go out.
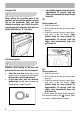
Replace the nozzles of the oven burners Oven burner To replace the gas oven nozzle, follow this procedure: • Check the table no.1 for diameter of nozzle; • Remove the oven removable base panel; • Remove the screw 1 on the oven burner • Remove the oven burner by pulling it forwards. • Replace the nozzle by means of a No 7 socket spanner; Reassemble the parts following the same procedure in reverse. Before fixing of the screw 1, ensure that the oven burner is pushed correctly to the back panel.
www.electrolux.com Albania +35 5 4 261 450 Rr. Pjeter Bogdani Nr. 7 Tirane Belgique/België/Belgien +32 2 363 04 44 Bergensesteenweg 719, 1502 Lembeek Česká republika +420 2 61 12 61 12 Budějovická 3, Praha 4, 140 21 Danmark +45 70 11 74 00 Sjællandsgade 2, 7000 Fredericia Deutschland +49 180 32 26 622 Muggenhofer Str. 135, 90429 Nürnberg Eesti +37 2 66 50 030 Pärnu mnt. 153, 11624 Tallinn España +34 902 11 63 88 Carretera M-300, Km. 29,900 Alcalá de Henares Madrid France www.
Portugal +35 12 14 40 39 39 Quinta da Fonte - Edificio Gonçalves Zarco - Q 35 -2774-518 Paço de Arcos Romania +40 21 451 20 30 Str. Garii Progresului 2, S4, 040671 RO Schweiz - Suisse - Svizzera +41 62 88 99 111 Industriestrasse 10, CH-5506 Mägenwil Slovenija +38 61 24 25 731 Gerbičeva ulica 98, 1000 Ljubljana Slovensko +421 2 43 33 43 22 Electrolux Slovakia s.r.o., Electrolux Domáce spotrebiče SK, Seberíniho 1, 821 03 Bratislava Suomi www.electrolux.
www.electrolux.