
User's Manual


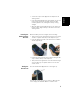
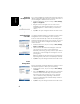
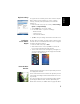
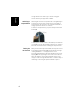
Table Of Contents
- What is MobileMapper 100?
- First-Time Use
- Unpacking
- Charging the Battery for the First Time
- Inserting the Battery Into the Receiver
- Turning the Receiver On
- Adjusting Backlight Level
- Setting Backlight Idle Time
- Power Management
- Regional Settings
- Locking the Screen and the Keypad
- How to Hold the Receiver
- Switching to Suspend Mode
- Turning the Receiver Off
- System Description
- Special Features
- Using MobileMapper Field Software
- Post-Processing Option and MobileMapper Office
- GNSS Toolbox
- Installing Geoids
- Platform Specifications

English
3
• Connect the output cable [5] of the AC adapter to the
docking station.
• Insert the battery [6] vertically, label inwards, into the slot
located at the back of the docking station.The light
indicator [7] turns red, meaning the battery is being
charged.
• When the light indicator [7] turns green, this means the
battery is fully charged and you can remove it from the
docking station.
Inserting the
Battery Into the
Receiver
When the battery has been charged, do the following:
• Turn over the receiver and rotate the finger screw counter-
clockwise a quarter turn and pull the trap door open.
• Insert the battery as shown. The label must be outwards
and the right way up.
• Put the trap door back into place by first inserting the two
clips located at the top of the trap door.
• Then push the door against the case and rotate the finger
screw clockwise by one-quarter turn for a secure and
sealed closure.
Turning the
Receiver On
Press the Power button [8] until the screen lights up.
Then let the receiver run its boot sequence. Wait until the
screen displays the Windows Mobile 6.5 Start screen.
[8]