
User's Manual

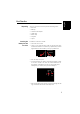
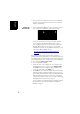
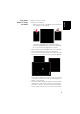
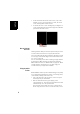
Table Of Contents
- 12.Users manual-未完.pdf
- 111.pdf
- First-Time Use
- Unpacking
- Inserting the Battery Into the Receiver
- Turning the Receiver On
- Using the AC Adapter to Charge the Battery
- Adjusting Backlight Level and Idle Time
- Power Management
- Setting Time & Date
- Regional Settings
- Locking the Screen and the Keypad
- How to Hold the Receiver
- Using the Quick Toolbar
- Switching the Receiver Manually to Suspend Mode
- Turning the Receiver Off
- Receiver Description
- GNSS Toolbox
- Advanced Features
- Platform Specifications
- First-Time Use
- 15.19; 15.21; 15.105
- 111.pdf
- 15.19; 15.21; 15.105

English
3
Using the AC
Adapter to Charge
the Battery
Follow the instructions below.
• Prepare the AC adapter:
– Remove the protective cover [1] by pushing the button
then sliding the cover forward.
– Choose the plug that fits your country’s AC outlet
standard (see [2]) and slide it into the AC adapter [3}.
(A “click” must be heard when fully inserted.)
• Take the USB cable provided [4]. Connect the end fitted
with a standard USB connector to the AC adapter.
Connect the other end (fitted with a mini-USB connector)
to the bottom side of the receiver (open the flap [5] first).
• Connect the AC adapter to an electric outlet. The receiver
screen lights up and an icon shows up indicating that the
battery is being charged.
• Let the AC adapter charge the battery. To read the battery
charging status, refer to the instructions in Turning the
Receiver On on page 2. You may not wait until the battery
is fully charged if you are in a rush, but you should make
[1] [2] [3]
[4]
[4]
[4]
[3][3]
[5]