
Installation Instructions


OPERATION
MAINTENANCE
CLEANING AND STORAGE
Fig. 5
NOTE: Some maintenance procedures may require special tools or
skills. If unsure about these procedures, take the unit to a
qualified service dealer. Call 1-800-345-8746, or 1-800-668-
1238 in Canada.
LUBRICATING THE BLADE
• For easier operation and longer blade life, lubricate the hedge
trimmer attachment blade before and after each use.
• Before lubricating, be sure the powerhead is turned OFF.
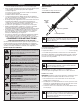
• Apply light machine oil along the edge of the top blade strap (Fig. 6).
• If the hedge trimmer attachment requires lubrication during use,
stop the hedge trimmer prior to applying oil. Do not lubricate the
hedge trimmer while the blades are moving. Trimming may be
resumed after lubrication has been completed.
OTHER MAINTENANCE
• The cutting blades are made from high quality hardened steel.
During normal use, they will not require resharpening unless they
become nicked through contact with a wire fence, glass, stones,
bricks or other hard objects. If the nick interferes with operation,
turn the powerhead OFF and use a fine toothed file or
sharpening stone to remove the nick.
• If the unit is dropped, carefully inspect it for damage. If the blade
is bent, the housing is cracked or the handle is broken, contact a
professional service center for repair prior to using the unit.
• Contact with fertilizers and other garden chemicals can greatly
accelerate the corrosion of metal. Do not store the unit on or
adjacent to fertilizers and chemicals.
NOTE: To assure product safety and reliability, repairs, maintenance
and adjustments should be performed by a professional service
center using identical replacement parts.
WARNING:
To prevent serious injury, never perform
maintenance or repairs while the unit is running. Always
allow the unit to cool before servicing or repairing the unit.
Disconnect the spark plug wire to prevent the unit from
starting accidentally.
Fig. 6
C
LEANING
Use a small brush to clean the outside of the unit. Do not use strong
d
etergents. Household cleaners that contain aromatic oils such as
pine and lemon, and solvents such as kerosene, can damage plastic.
Wipe off any moisture with a soft cloth.
Clean the blade with water. Wipe the blade with a light machine oil to
prevent rust.
WARNING:
To avoid serious personal injury, always stop
the unit and allow it to cool before cleaning or maintaining
the unit.
STORAGE
• Never store a fueled unit where fumes may reach an open flame
or spark.
• Allow the engine to cool before storing.
• Lock up the unit to prevent unauthorized use or damage.
• Store the unit in a dry, well-ventilated area.
• Store the unit out of the reach of children.
Short-term Storage (1-2 weeks)
1. Store the unit in a horizontal position. If this is not possible, store
the unit vertically with the engine at the top.
Long-term Storage
1. Remove the fuel cap, tip the unit and drain the fuel into an
approved container.
2. Start the engine and allow it to run until it stalls. This ensures
that all fuel has been drained from the carburetor.
3. Allow the engine to cool. Remove the spark plug and put 5 drops
of any high quality motor oil into the cylinder. Pull the starter rope
slowly to distribute the oil. Reinstall the spark plug.
4. Thoroughly clean the unit and inspect it for any loose or
damaged parts. Repair or replace damaged parts and tighten
loose screws, nuts or bolts.
Preparing the Unit for Use after Long-term Storage
1. Remove the spark plug and drain all of the oil from the cylinder.
NOTE: Do not use fuel that has been stored for more than 30 days.
Dispose of old fuel according to federal, state and local regulations.
5