OWNERS MANUAL iForks Rev.18.02.
PLEASE RETAIN THESE INSTRUCTIONS FOR FUTURE REFERENCE If you have any queries concerning the duration and terms of the guarantee, please contact your supplier. We would also refer you to our General Sale and Supply Conditions, which are available on request. The manufacturer accepts no liability for any damage or injury caused by failure to follow these instructions, or from negligent operation or assembly, even if this is not expressly stated in this instruction manual.
Table of contents page 1. Introduction 2. Warnings & safety measures 3. Exploded-view & parts list 4. System setup 4.1 Installing the iForks 4.2 Installing the indicator 4.3 Placing battery modules in the iForks 4.4 Switching on the iForks 4.5 Switching on indicator 4.6 Switching off the system 5. Changing the batteries 5.1 Low battery indication iForks 5.2 Changing the batterypacks of the iForks 5.3 Changing the batteries of the indicator 6. Use 6.1 Use (accurate weighing) 6.2 Level correction 6.
1. Introduction This manual describes the installation and use of the iForks. Read this manual carefully. The installer must be informed of the contents of this manual. Follow the contents of the manual precisely. Always do things in the correct order. This manual should be kept on a safe and dry place. In case of damage or loss the user may request a new copy of the manual from RAVAS. 2.
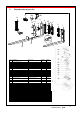
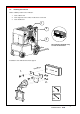
3. Exploded-view & parts list 17 16b 16a 18 9 15 8 14 13 65 4 3 2 1 7 10 11 12 Part nr. 1 2 3 4 5 6 7 8 9 10 11 12 13 14 15 16a 16b 17 18 20 21 22 23 24 25 26 27 28 29 30 31 32 Designation Assembled weighing fork Battery pack (assembly) A = with standard 1.5 V (standard) B = with rechargable 1.2 V (option) Top housing battery pack Batteries (D-cell) A = regular 1.5 V D-cells (standard) B = rechargeable 1.
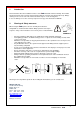
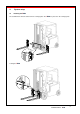
4. System setup 4.1 Installing the iForks The standard forks must be taken from the carriage plate. The iForks are placed on the carriage plate. 1. 2.
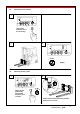
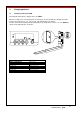
4.2 Installing the indicator Find a suitable position for the indicator: 1. at the cabin’s roof 2. at the right side of the cabin, mounted onto a side-rail 3. at the dashboard 1 2 3 The indicator should be easy to reach and read out ! Installation of the indicator bracket & support 1. 2.
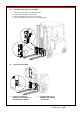
Placing the batterypacks in the iForks 4.3 1. 2. 3. 4. Lift up the locking clips on the battery holders. Position the batterypacks in both forks. Click the batterypacks into the battery holders. Push the locking clips down to secure the batterypacks. 1. 2. 4. 3. 4.4 Switching on the iForks 2. LED 1. 1. Switch on the forks by pressing the blue buttons on both batterypack holders. 2. The blue LED’s on the iForks will start blinking automatically.
4.5 Switching on the indicator 1 NET e1 e2 PT ID CODE e3 F1 TOTAL F2 PCS KG/LB CLR Start up the indicator. Press the on/off key. 2 3 NET e1 ID CODE e2 PT e3 TOTAL F1 F2 PCS KG/LB CLR 5 sec. Weigh ! 4.6 Switching off the system 1 2 8 sec. NET NET ID CODE ID CODE e1 e1PT PT e2 e2 e3 e3 TOTAL TOTAL F1 F1 F2 F2 PCS PCS KG/LB KG/LB CLR CLR Switch off the indicator by pressing the on/off key for 3 seconds. Switch off the forks by pressing the blue buttons for 8 seconds.
5. Changing batteries 5.1 Low battery indication iForks Exchangeable batterypacks supply power to the iForks . When the voltage level of the batterypacks is running low, the low bat indicator will light up and the pointer of the relating fork - “F1”, ”F2” or both - will start blinking in the display. The blue LED’s on the relating fork will start blinking very slowly (twice every 10 sec). The iForks will switch off automatically after 10 minutes.
5.2 Changing the batterypacks of the iForks 5.2.1 Take out both batterypacks 1. 2. 5.2.2 1. 2. 3.
5.2.3 Place 4 full D-cell batteries in each batterypack. Replace the top housing of the batterypack and tighten the 6 Philips-head screws M3 x 25 (not too tight). 5.2.4 Replace the batterypacks of the iForks (see step 4.3, page 8) 5.2.5 Charge the rechargeable batterypacks (option) The system additionally can be equipped with rechargeable batterypacks and a charger. Charge the battery for at least 8 hours. This will prevent loss of battery capacity.
5.4 Changing the batteries of the indicator As standard, the indicator is equipped with 4 AA batteries. As an option the power supply can be sourced via the truck’s main battery. This must be ordered separately, since the indicator needs to be equipped with an integrated power regulator or converter. 1 2 NET e1 ID CODE e2 PT e3 F1 TOTAL F2 PCS KG/LB CLR Replace batteries as soon as the low bat indicator starts blinking. 3 Use a M6 hex key to release the bolts of the indicator housing.
6. 6.1 Use Use (accurate weighing) 3 - 5 min. OK M1 After 3 to 5 minutes the load cells have reached the operational temperature. Don’t lift loads before the zero-point correction has been executed.
6.
6.3 Establish Bluetooth communication and weigh! 1 2 NET e1 e2 PT ID CODE e3 F1 TOTAL F2 PCS KG/LB CLR Switch on the iForks: press the blue button below both batterypacks. 3 Start up the indicator: press the on/off key. 4 NET NET e1 ID CODE e2 PT e3 TOTAL F1 e1 F2 PCS e2 PT ID CODE KG/LB e3 F1 F2 PCS TOTAL KG/LB CLR CLR 5 sec. Before each weighing: check the zero point! Before each weighing it is necessary to check whether the system is unloaded and free.
6.4 Auto shut-off indicator 1 2 20 sec. NET e1 e2 PT ID CODE e3 F1 TOTAL F2 PCS KG/LB CLR 2 min. no action ! Countdown starts: Press any key during to cancel auto-shut-off and go back to the weighing mode.
6.5 Auto shut-off iForks 1 2 NET NET e1 ID CODE e2 PT e3 TOTAL F1 F2 PCS e1 KG/LB e2 e3 PT ID CODE F1 TOTAL F2 PCS KG/LB CLR 2 hour CLR - iForks off -Indicator off no weighing ! 3 4 NET e1 ID CODE e2 PT e3 TOTAL F1 F2 PCS KG/LB CLR Switch on the iForks: press the blue button below both batterypacks. Restart the indicator: Press the on/off key.
6.
Key functions Each key has 2 operational and one entry function Standard function (Short key press) Key Special function (long key press) Value entering function (entry mode) ID CODE zero setting code entry enter automatic tare PT pre-set tare decrease the value of the digit flashing print weight and add to the total TOTAL check subtotal and print total increase the value of the digit flashing sampling a piece weight PCS enter a piece weight shift to the next digit on the left On switch a