
Instructions / Assembly


ASSEMBLY INSTRUCTIONS
© 2017 TRINITY - 800.985.5506
4
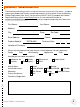
Screw the TOP POLE (A) into the BOTTOM
POLE (B). The tops of these poles are
indicated by the BLACK END CAP.
STEP 5: INSTALLING TOP POLES
A (4)
STEP 6: INSTALLING SHELVES
On POLE (A+B), place 1 pair of SLIP SLEEVES (D) at the desired
distance between SHELVES (C). Please make sure the arrow
faces up and that the word “TOP” is right side up. Do this for
each POLE (A+B), and make sure that the heights are
identical for each POLE (A+B).
Lower SHELF (C) over the TOP POLES (A) so that the corner
cylinders of the SHELF (C) are positioned over the SLIP
SLEEVES (D).
Repeat Step 6 to install other SHELVES (C) as desired.
**Use a rubber mallet, if needed, to secure the SHELVES (C).
D (24) C (3)