
Instructions / Assembly


© 2022 TRINITY - 800.985.5506
ASSEMBLY INSTRUCTIONS
3
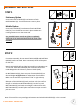
Place SHELF (C) on its side and slide each BOTTOM POLE (A)
through each corner cylinder on SHELF (C). Make sure SHELF (C)
corner cylinders are positioned over SLIP SLEEVES (D).
Stand the unit upright.
Note:
• Level side of SHELF (C) is TOP side (TRINITY logo on corner
cylinders should be right-side up.)
• Use a rubber mallet, if needed, to secure SHELF (C).
• For convenience, place BOTTOM POLES (A) with Locking
Casters on long side of shelf if rack will be pushed against a
wall, OR, if rack is frequently rolled around like a cart, place
BOTTOM POLES (A) with Locking Casters on the side being
pushed or pulled.
C (1)
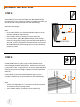
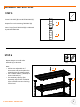
On BOTTOM POLE (A), place 1 pair of SLIP SLEEVES (D) at
desired height between SHELVES (C). Make sure arrow faces
up and word "TOP" is right side up. Do this for each BOTTOM
POLE (A) and make sure height is identical for each BOTTOM
POLE (A).
Lower SHELF (C) over each BOTTOM POLE (A) so corner
cylinders of SHELF (C) are positioned over SLIP SLEEVES (D).
Note:
• Shelves are adjustable in 1" increments and can be placed
as needed to best fit storage needs.
• Use a rubber mallet, if needed, to secure SHELF (C).
D (8) C (1)
STEP 3
STEP 4
C
A
A
C
A