
Installation & Assembly


E
O
L
ASSEMBLY INSTRUCTIONS
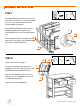
STEP 5
STEP 6
L (4) O (1)
A+B (1) E+F (1)
C
N (4) O (1)
L (4)
C (2)
Carefully lay the assembly from STEP 5 on its
side with the opening for the drawers facing up.
Orient SHELVES (C) so the flat surface faces the
DRAWER FRAME (B) and raised ledge is on the
same side as the back of the drawer.
Place DOWELS (N) into the blind holes on the
sides of SHELVES (C) that face the HANDLE
FRAME (E). Push SHELVES (C) and HANDLE
FRAME (E) together.
Place FRAME SCREWS (L) through holes in
SHELVES (C) and tighten with SCREWDRIVER (O)
to nuts in HANDLE FRAME (E).
Bring HANDLE FRAME (E) to the side of WOOD
TOP (A) with DRAWER FRAME (B) from STEP 2.
Choose which side of the Kitchen Cart you want
the handle to be on.
Insert FRAME SCREWS (L) through holes on side
of the DRAWER FRAME (B). Fasten FRAME
SCREWS (L) to nuts on HANDLE FRAME (E) and
tighten with SCREWDRIVER (O).
L
O
N
© 2017 TRINITY - 800.985.5506
4