
User Manual


12 CamView IP Pro Series Combined User Manual
www.Triplett.com
4. HOW TO USE YOUR CAMVIEW IP PRO, PRO-C, OR PRO+
4.1 Main Menu
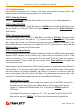
When the CamView IP Pro-C/Pro+/Pro-D first boots up, you will see the following Main Screen.
(NOTE—CamView IP Pro Testers will show fewer options.)
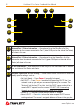
You can navigate this screen using the Up or Down Arrow Keys. Once you have highlighted the
function you want to use, press the Right Arrow Key to go to the Interface Screen for that feature.
4.2 Testing IP Cameras using the ONVIF Test Interface
4.2.1 Overview
The ONVIF test function is designed to act as a three-step installation and trouble-shooting guide
for IP Camera testing. It combines Ethernet tests, POE tests, IP settings, camera discovery,
camera authorization, video display, PTZ control, camera settings, and more.
4.2.2 How to Connect the IP Camera to the Tester
There are three ways you can connect your IP cameras in order to test them:
OPTION 1
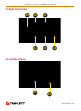
For Power-over-Ethernet (POE) IP cameras, you can directly connect the camera to the Tester
using the Tester’s Network Port 1 using an ethernet cable. The Tester will first detect the POE
device and then supply power. The POE information and packet activitiy will be displayed on the
screen. (You can verify incoming POE from the Switch by plugging that cable into Network Port 2.)
Note—When powering POE devices, the 12V output of the Tester is disabled. When a
POE powered device requires more power than max power, the POE power output will ter-
minate. The Tester’s PSE meets the 802.3af / 802.3at standard. The maximum power is 25.5W.