
User Manual


36 CamView IP Pro Series Combined User Manual
www.Triplett.com
4.7.4 Exporting Reports
Any screen shots, video, or ONVIF IP camera reports you have saved on your Tester can be
exported to your computer.
STEP 1: Power Up the Tester
Press the Power Button on the side of your Tester to turn it on if it is not already powered on.
STEP 2: Connect the Tester to the Computer
Plug the mini-USB end of the cable into the Tester, and plug the standard USB end of the cable
into your computer.
STEP 3: Select the Settings Screen
On the Main Menu, highlight “Settings” (press the MODE button to enter the Main Menu if you are
not already on it; press the Up or Down Arrow Keys to highlight it). Once the “Settings” option is
highlighted, press the Right Arrow Key to access the Device Settings screen.
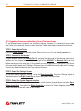
STEP 4: Select the Start USB Storage function
While on the Device Settings screen, scroll down to the Start USB function using the Up or Down
Arrow Keys. Once the option is highlighted, press the Right Arrow Key. The Tester’s flash drive
should now be accessible as an external drive on your computer, and you should see the image
below on the Tester’s screen while the connection is in place.
NOTES — Due to data sharing problems, the USB storage function is off by default. When using
USB Storage, do not press MODE or the power key as doing so will cause the USB storage device
to be unplugged from the host computer, and you may lose data. To disconnect the USB connection
from a computer, eject or unmount the disk from the host system before disconnecting the cable.