pr ch re od an gis Re Wa uc ce te g rr t— to r o is an ww w nlin tra ty w. in a e tio tri F tod n pp R a : lit EE y f e. T or co rip a m p /w Li ar te ra nt y Owner’s Manual Portable Air Conditioning Unit SRCOOL12K (120 V, 60 Hz) SRXCOOL12K (230V, 50 Hz) Introduction Important Safety Instructions Features Installation Operation Maintenance Troubleshooting Storage & Service Warranty & Warranty Registration Español Français Русский 2 2 3 4 8 9 9 10 10 11 21 31 1111 W.
Introduction The self-contained Portable Air Conditioning Unit provides 12,000 BTU (up to 3.4 kW) of supplemental cooling capacity. Designed for IT environments, it’s ideal for cooling overheated rack enclosures, IT equipment hot spots and network closets without access to facility air conditioning. The Portable Air Conditioning Unit can focus cool air through its flexible cooling duct or cool a small room through its louvered vent.
Features Front View A Control Panel I A B Recessed Handles C Air Filter Covers D Drainage Outlet E Casters F Front Panel G Cool Air Output H M K G C L H Louvered Vent Insert (Pre-Installed) I Cooling Duct Adapter (Optional) B B F J J Rear Panel N K Warm Air Exhaust L Evaporator Drainage Outlet M Evaporator Filter D N Condenser Filter E E Control Panel H G A “POWER” Button B “FUNCTION” Button C “TIMER” Button D “FAN SPEED” Button E “QUIET” Button F Temperature Control Buttons G Numeric
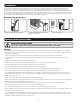
Installation Warning: After removing the unit from the shipping container, check for damage or missing parts. (Refer to the parts list below.) If you notice a problem, visit www.tripplite.com/support for service. Do not attempt to operate a damaged unit.
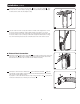
Installation (continued) 2-3 Connect the flexible cooling duct (shorter tube A ) to the cooling duct adapter B . Align 1 the duct with the circular adapter opening, push the duct downward and turn the duct clockwise until it screws into the adapter solidly. B 2 A 2-3 2-4 Place the other end of the cooling duct near the air intake of the target device or rack enclosure, using the straightest, shortest path available.
Installation 4 (continued) Drop Ceiling Exhaust Connection Warning: Some ceilings may require modified installation procedures. The user must determine the fitness of hardware and procedures before installing. The procedures described in this manual may not be appropriate for all applications. Self-Tapping Screw 4-1 Choose a removable drop ceiling panel near the unit to provide the straightest, shortest path available for the flexible exhaust duct.
Installation Screw Horizontal Self-Tapping Window Opening (continued) 5-3 Insert the exhaust panel into the window opening, then close the window against the exhaust panel. A tight seal will permit maximum cooling efficiency. Note: There must be at least 10 inches (25.4 cm) of open space behind the exhaust panel to allow adequate airflow. Horizontal Window Opening Note: The flexible exhaust duct can extend to a maximum length of 118 inches (300 cm). Provide the straightest, shortest path available.
Operation Warning: Install the unit according to the instructions in the “Installation” section before attempting to operate it. Power Turn the unit on or off by pressing the “POWER” button. The unit has a three-minute compressor delay in order to prevent potential circuit overloads at start up. Automatic Restart Feature The unit will turn on and resume operation automatically when power is restored after a power outage.
Operation (continued) Alarm When the water tank is full, the unit will display the message “E4” on its screen. To resume normal function, turn the unit off, remove the drainage plug and drain the excess water from the unit. Replace the plug and turn the unit on to begin cooling. Maintenance Periodic maintenance extends the unit’s lifespan and permits maximum operating efficiency. Cleaning the Air Filters It is important to keep the air filters clean and free of dust.
Troubleshooting (continued) Additional Display Error Codes The Tripp Lite SRCOOL12K has the ability to continually monitor itself. Should an error occur, the display will show one of 5 error codes below: Error Code Description Code E4 can be cleared by emptying the water tank. Consult the owner’s manual for details.
Manual del Propietario Unidad Portátil de Aire Acondicionado SRCOOL12K (120V, 60 Hz) SRXCOOL12K (230V, 50 Hz) Introducción Instrucciones Importantes de Seguridad Características Instalación Operación Mantenimiento Solución de Problemas Almacenamiento y Servicio Garantía y Registro de Garantía English Français Русский 12 12 13 14 18 19 20 20 20 1 21 31 MÁS DE 1111 W. 35th Street, Chicago, IL 60609 USA • www.tripplite.com/support Copyright © 2013 11 Tripp Lite.
Introducción La Unidad independiente Portátil de Aire Acondicionado proporciona 12,000 BTU (hasta 3.4 kW) de capacidad complementaria de enfriamiento. Diseñada para ambientes de TI, es ideal para enfriar gabinetes de rack sobrecalentados, puntos calientes de equipo de TI y gabinetes de cableado de red sin acceso al aire acondicionado de la instalación.
Características Vista Frontal A Panel de Control I A B Manijas Empotradas C Cubiertas del Filtro de Aire D Salida del Drenaje E Ruedas F Panel Frontal G Salida de Aire Frío H I Adaptador de Ducto de Enfriamiento M K G C L H Inserto de Ventilación con Persiana (Pre-Instalado) B B F J (Opcional) N J Panel Posterior K Descarga de Aire Caliente D L Salida de Drenaje del Evaporador M Filtro del Evaporador N Filtro del Condensador E E Panel de Control H G A Botón “POWER” [encendido] B Bot
Instalación Advertencia: Después de retirar la unidad del contenedor de embarque, compruebe para detectar daños o partes faltantes. (Consulte la siguiente lista de partes.) Si detecta un problema, visite www.tripplite.com/support para solicitar servicio. No intente operar una unidad dañada.
Instalación (continued) 2-3 Conecte el ducto flexible de enfriamiento (el tubo menor A ) al adaptador del tubo de 1 enfriamiento B . Alinee el ducto con la abertura del adaptador circular, empuje el ducto hacia abajo y gire el ducto en sentido de las manecillas del reloj hasta que atornille sólidamente en el adaptador.
Instalación 4 (continued) Conexión de Descarga de Falso Plafón Advertencia: Algunos plafones pueden requerir procedimientos de instalación modificados. El usuario debe determinar la aptitud de los accesorios y los procedimientos antes de la instalación. Los procedimientos descritos en este manual pueden no ser apropiados para todas las aplicaciones. 4-1 Elija un panel desmontable del falso plafón próximo a la unidad para proporcionar la ruta más recta y corta posible para el ducto flexible de descarga.
Tornillo Autoroscante Abertura Horizontal de Ventana Instalación (continued) 5-3 Inserte el panel de descarga en la abertura de la ventana, cierre entonces la ventana contra el panel de descarga. Un sello hermético permitirá la máxima eficiencia de enfriamiento. Nota: Debe haber al menos un espacio abierto de 10 pulgadas (25.4 cm) detrás del panel de descarga para permitir el flujo adecuado de aire.
Funcionamiento Advertencia: Instale la unidad de acuerdo a las instrucciones en la sección de “Instalación” antes de intentar operarla. Encendido Encienda o apague la unidad oprimiendo el botón “POWER” [Encendido]. La unidad tiene un retraso del compresor de tres minutos a fin de evitar posibles sobrecargas del circuito al arranque. Característica de Reinicio Automático La unidad encenderá y reasumirá la operación automáticamente cuando se restablezca la energía después de un apagón.
Operation (continued) Alarma Cuando el tanque de agua esté lleno, la unidad mostrará el mensaje “E4” en la pantalla. Para restablecer el funcionamiento normal, apague la unidad, retire el tapón del drenaje y vacíe el exceso de agua de la unidad. Coloque el tapón y encienda la unidad para iniciar el enfriamiento. Mantenimiento El mantenimiento periódico extiende la vida útil de la unidad y permite la máxima eficiencia de operación.
Solución de Problemas (continued) Códigos Adicionales de Error de Pantalla El SRCOOL12K de Tripp Lite tiene la capacidad de auto-monitorearse continuamente. Si ocurriere un error, la pantalla mostrará uno de los 5 códigos de error siguientes: Código de Error Descripción El código E4 puede borrarse vaciando el tanque de agua. Para detalles, consulte el Manual del Propietario.
Manuel du propriétaire Climatiseur portatif SRCOOL12K (120 V, 60 Hz) SRXCOOL12K (230V, 50 Hz) Introduction Consignes de sécurité importantes Caractéristiques Installation Fonctionnement Maintenance Dépannage Entreposage et service Garantie et enregistrement de la garantie English Español Русский 22 22 23 24 28 29 30 30 31 1 11 31 1111 W. 35th Street, Chicago, IL 60609 USA • www.tripplite.com/support Copyright © 2013 21 Tripp Lite.
Introduction Le climatiseur portatif autonome fournit 12 000 BTU (jusqu’à 3,4 kW) de capacité de refroidissement supplémentaire. Conçu pour les environnements TI, il est idéal pour le refroidissement des armoires de bâti surchauffées, les points sensibles de l’équipement TI et les armoires de réseau n’ayant pas accès à la climatisation de l’établissement.
Caractéristiques Vue de face A Tableau de commande I A B Poignées encastrées C Couvercles des filtres à air D Ouverture de drainage E Roulettes F Panneau avant G Sortie de l’air frais H M K G C L H Évent à lames (préinstallé) I Adaptateur du conduit de refroidissement B B F J (Optionnel) N J Panneau arrière K Évacuation de l’air chaud L Ouverture de drainage de l’évaporateur D M Filtre de l’évaporateur N Filtre du condenseur E E Panneau de commande H G A Bouton « POWER » (ALIMENTATION
Installation Avertissement : Après avoir retiré l’appareil du conteneur d’expédition, vérifiez la présence de dommages et l’absence de pièces. (Se reporter à la liste des pièces ci-dessous.) Si vous remarquez un problème, visitez www.tripplite.com/support pour obtenir du service après-vente. Ne tentez pas d’utiliser un appareil endommagé.
Installation (suite) 2-3 Connectez le conduit de refroidissement flexible (du tuyau court A ) à l’adaptateur du 1 conduit de refroidissement B . Alignez le conduit avec l’ouverture circulaire de l’adaptateur, poussez le conduit vers le haut et tournez le conduit dans le sens des aiguilles d’une montre jusqu’à ce qu’il soit vissé solidement en place dans l’adaptateur.
Installation 4 (suite) Connexion de l’évacuation à un faux-plafond Avertissement : Certains plafonds peuvent exiger des procédures d’installation modifiées. L’utilisateur doit déterminer la compatibilité de la quincaillerie et des procédures avant d’effectuer l’installation. Les procédures décrites dans le présent manuel peuvent ne pas être appropriées pour toutes les applications.
Installation OuvertureVis de autotaraudeuse fenêtre verticale (suite) 5-3 Insérez le panneau d’évacuation dans l’ouverture de la fenêtre, puis fermez la fenêtre contre le panneau d’évacuation. Une bonne étanchéité permettra une efficacité de refroidissement maximale. Remarque : Il doit y avoir un espace d’au moins 25,4 cm (10 pouces) derrière le panneau de plafond pour permettre une circulation d’air appropriée.
Fonctionnement Avertissement : Installez l’appareil conformément aux directives de la section « Installation » afin de tenter de la faire fonctionner. Alimentation Activez ou désactivez l’appareil en pressant le bouton « POWER » (ALIMENTATION). L’appareil est équipé d’un circuit qui retarde l’activation du compresseur de trois (3) minutes pour éviter les surcharges potentielles du circuit au démarrage.
Operation (continued) Changement des unités de température L’appareil SRCOOL12K peut afficher la température en unités Celsius ou en unités Fahrenheit. Le réglage par défaut pour la SRCOOL12K est en Fahrenheit et la SRXCOOL12K est Celsius. Pour alterner entre les unités, commutez le SRCOOL12K au mode d’attente. Le climatiseur se trouve dans le mode d’attente lorsqu’il est branché à une prise de courant sous tension, alors que l’appareil est commuté hors tension.
Dépannage (continued) Codes d’erreur d’affichage supplémentaires Le SRCOOL12K de Tripp Lite a la possibilité de se surveiller continuellement.
Руководство пользователя Переносной блок кондиционирования SRCOOL12K (120 В, 60 Гц) SRXCOOL12K (230 В, 50 Гц) Введение Важные правила техники безопасности Детали и элементы Установка Эксплуатация Техническое обслуживание Выявление и устранение неисправностей Хранение и обслуживание Гарантийные обязательства и регистрация гарантии English Español Français 32 32 33 34 38 39 40 40 40 1 11 21 1111 W. 35th Street, Chicago, IL 60609 USA • www.tripplite.com/support Copyright © 2013 Tripp Lite.
Введение Автономное переносное устройство кондиционирования воздуха обеспечивает дополнительную холодопроизводительность в размере 12 000 BTU (до 3,4 кВт). Это устройство, предназначенное для работы в ИТ-средах, идеально подходит для охлаждения перегревающихся корпусных стоек, мест плотного размещения ИТ-оборудования и сетевых узлов, расположенных вне зоны действия системы центрального кондиционирования объекта.
Возможности (свойства) Вид спереди A Панель управления I A B Утопленные ручки C Крышки воздушных фильтров D Водоотводное отверстие B B E Ролики F Передняя панель H G Выход холодного воздуха G C L H Жалюзийная вставка (устанавливается в выходное отверстие на заводеизготовителе) M K F J I Переходник воздуховода охлаждения N (приобретается дополнительно) J Задняя панель K Канал для выпуска нагретого воздуха D L Водоотводное отверстие испарителя M Фильтр испарителя N Фильтр конденсатора E
Установка Внимание! После извлечения устройства из транспортировочного контейнера проверьте его на предмет наличия повреждений или отсутствующих деталей (см. приведенный ниже перечень деталей). В случае выявления какой-либо проблемы обращайтесь за помощью по адресу: www.tripplite.com/support. Не пытайтесь эксплуатировать устройство при наличии повреждений.
Установка (продолжение) 2-3 Подсоедините гибкий воздуховод охлаждения (короткая трубка A ) к своему переходнику B . Совместите воздуховод с круглым отверстием переходника, надавите на него вниз и вращайте его по часовой стрелке до тех пор, пока он прочно не ввинтится в переходник. 1 B 2 A 2-3 2-4 Расположите противоположный конец воздуховода охлаждения вблизи воздухозаборного отверстия охлаждаемого устройства или корпусной стойки, проведя его по наиболее прямому и короткому пути.
Установка (продолжение) 4 Проводка вытяжного воздуховода через подвесной потолок Внимание! Для некоторых потолков может потребоваться измененный порядок установки. Пользователь должен установить пригодность оснастки и предполагаемых процедур до начала установки. Процедуры, описанные в настоящем руководстве, могут не подходить для всех вариантов применения.
Саморез Горизонтальная установка в оконном проеме Установка (продолжение) 5-3 Вставьте вытяжную панель в оконный проем и закройте окно при установленной вытяжной панели. Максимальную эффективность охлаждения обеспечит герметичное уплотнение. Примечание. Для обеспечения достаточного воздухообмена глубина свободного пространства за вытяжной панелью должна составлять не менее 25,4 см. Горизонтальная установка в оконном проеме Примечание.
Эксплуатация Внимание! Перед началом эксплуатации данного устройства произведите его установку согласно указаниям, приведенным в разделе “Установка”. Питание Включайте и выключайте устройство путем нажатия кнопки “POWER”. Во избежание возможных перегрузок цепей в момент пуска устройство имеет трехминутную задержку включения компрессора.
Эксплуатация (продолжение) Изменение температурных единиц Устройство может отображать температуру как в градусах Цельсия, так и в градусах Фаренгейта. По умолчанию в устройстве SRCOOL12K установлены градусы Фаренгейта, а в устройстве SRXCOOL12K – градусы Цельсия. Для переключения между режимами отображения температур переведите устройство в режим ожидания. Устройство кондиционирования воздуха находится в режиме ожидания, когда оно включено в сеть переменного тока без подачи питания.
Выявление и устранение неисправностей (продолжение) Коды ошибок, выводимые на дисплей Устройство Tripp Lite SRCOOL12K имеет возможность непрерывно контролировать свою работу. В случае возникновения ошибки на дисплее отображается один из пяти нижеперечисленных кодов ошибок: Код ошибки Описание Для устранения ошибки с кодом E4 необходимо опорожнить емкость для сбора воды. Более подробную информацию см. в руководстве пользователя.