Owner’s Manual DVI Dual Link/USB KVM Switch with Audio and Peripheral Sharing Models: B004-DUA2-HR-K, B004-DUA4-HR-K Table of Contents Package Contents Optional Accessories Console Requirements Computer Requirements Features Safety Instructions Installation Basic Operation Firmware Upgrade Utility Factory Default Settings Specifications Warranty & Warranty Registration 2 2 2 2 3 6 7 8 15 16 17 18 1111 W. 35th Street, Chicago, IL 60609 USA • www.tripplite.com/support Copyright © 2014 Tripp Lite.
Package Contents • B004-DUA2-HR-K or B004-DUA4-HR-K KVM Switch • (x2) 6 ft. USB KVM Cable Kits (B004-DUA2-HR-K only) • (x2) 6 ft. 7.1 Surround Sound Cables (B004-DUA2-HR-K only) • (x4) 6 ft. USB KVM Cable Kits (B004-DUA4-HR-K only) • External Power Supply (Input: 100-240V, 50/60Hz, 0.5A Output: 5.3V, 2.
Features • 2-Port DVI Dual Link/USB KVM switch with 7.1 channel surround-sound audio and USB 2.0 peripheral sharing (B004-DUA2-HR-K) • 4-Port DVI Dual Link/USB KVM switch with 2.1 channel surround-sound audio and USB 2.0 peripheral sharing (B004-DUA4-HR-K) • Built-in 2-Port USB 2.0 hub allows USB devices to be shared amongst computers connected to the KVM switch • 3.
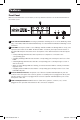
Features Front Panel Note: The B004-DUA4-HR-K is shown below, but the only difference between it and the B004-DUA2-HR-K are the number of ports. 1 2 3 4 1 Port Selection Pushbuttons: Pressing a pushbutton will bring the focus of the KVM only, Audio only, or the KVM, Audio and USB simultaneously. See the Manual Pushbutton Switching section for details. 2 Port LEDs: Each port contains a set of Orange and Green LEDs. The Orange LED is on top, and represents the status of the KVM.
Features Back Panel Note: The B004-DUA4-HR-K is shown below. It differs from the B004-DUA2-HR-K in the number of CPU ports, and the number of audio jacks per port. The B004-DUA2-HR-K supports 7.1 channel surround-sound audio, whereas the B004-DUA4-HR-K supports 2.1 channel surround-sound audio. 1 4 2 3 1 Console Ports: Your monitor, keyboard, mouse, and audio devices plug into these ports. 2 CPU Ports: The included cable kits connect from an available set of ports to a computer. 3 USB 2.
Safety Instructions • Read all these instructions. Save them for future reference. • Follow all warnings and instructions marked on the device. • Do not place the device on any unstable surface (cart, stand, table, etc.). If the device falls, serious damage will result. • Do not use the device near water. • Do not place the device near, or over, radiators or heat registers. The device cabinet is provided with slots and openings to allow for adequate ventilation.
Installation Refer to the following steps and diagram to set up your KVM switch installation. Note: 1. The diagram below shows a B004-DUA4-HR-K installation. A B004-DUA2-HR-K installation will contain fewer CPU ports, and will allow for the connection of a 7.1 channel surround-sound system. 2. Before making any connections, make sure that power to all devices being connected to the KVM switch is turned off. Unplug the power cords of any computers that have the Keyboard Power On function.
Basic Operation Powering Off and Restarting In the event that you need to power off the KVM switch, you must follow the steps below: 1. Shut down all computers connected to the KVM switch 2. Unplug the power supply from the KVM switch 3. Wait 10 seconds and then plug the power supply back into the KVM switch 4.
Basic Operation When enabled, the Mouse Port Switching Functionality allows users with scroll-wheel mice to simultaneously switch the focus of the KVM, Audio and USB between ports by double-clicking the scroll wheel on their mouse. When used, ports will be accessed in sequential order (e.g. port 1 will switch to port 2; port 2 to port 3, and so on). Hotkey Commands Keyboard hotkey commands allow you to switch the KVM functionality between ports using only the keyboard.
Basic Operation Hotkey Command [Scroll Lock] [Scroll Lock] [n]* [K] [S] [Enter] [Scroll Lock] [Scroll Lock] [n]* [U] [S] [Enter] [Scroll Lock] [Scroll Lock] [A] [Enter] [Scroll Lock] [Scroll Lock] [A] [n]* [Enter] Action Switches focus of the KVM and Audio to the selected port number. Switches focus of the USB and Audio to the selected port number. Initiates Auto Scan mode at the default interval of 5 seconds per port. Press the [Esc] or [Spacebar] key to exit Auto Scan mode.
Basic Operation When enabled for Auto-Detect, a pass-through keyboard mode is enabled in which keystrokes are sent directly to the computer without first going through the Mac or Sun emulator. List KVM Settings This function allows you to display a list of the current KVM settings; Hotkeys, Keyboard OS, Keyboard Emulation, Mouse Emulation, Mouse Port Switching, Power on detection and Keyboard Language. To perform this function, do the following: 1. Open up a Word, Wordpad, Notepad or Excel file 2.
Basic Operation Video Sync Video Sync allows the KVM to store the monitor’s EDID (Extended Display Identification Data), which helps to ensure that the optimal video settings are being used. To initiate a Video Sync, do the following: 1. Activate Hotkey Setting Mode using the aforementioned command 2.
Basic Operation Hotkey Setting Mode Command Summary Table Action Activate Hotkey Setting Mode Change Hotkey Setting Mode activation command to [Ctrl] [F12] Change the Port Switching Hotkey Command to [Ctrl] [Ctrl] Change the Keyboard Operating System List KVM Settings USB Keyboard/Mouse Reset Change the keyboard language Hotkey Beeper Control Disable Port Switching Hotkeys Firmware Upgrade Mode Restore Default Settings Video Sync Power on Detection Change the Manual Pushbutton Command functionality Keyboar
Basic Operation Sun Keyboard Emulation The PC compatible (101/104 key) keyboard can emulate the functions of the Sun keyboard using the PC keystrokes in the table below. Note: When more than one key is required on the PC Keyboard to emulate the Sun keyboard, press and release the first key, and then press and release the second key.
Firmware Upgrade Utility As firmware upgrades become available, they can be found at www.tripplite.com/support. The Firmware Upgrade Utility comes with the firmware upgrade file. To upgrade the firmware of your KVM switch, follow the steps below: 1. From a computer that is not connected to your KVM switch, go to www.tripplite.com/support to obtain the firmware upgrade for your KVM switch, and save it to your computer. 2. Shut down all of the computers connected to the KVM switch. 3.
Factory Default Settings Setting Port Switching Hotkey Command Hotkey Setting Mode Activation Command Keyboard Operating System Hotkey Beeper Port Switching Hotkeys Keyboard Emulation Mouse Emulation Mouse Switching Function Power on Detection SPC Mode Keyboard Language Auto Scan Interval Default [Scroll Lock], [Scroll Lock] [Num Lock], [-] Auto-Detect On Enabled Enabled Enabled Disabled Enabled Disabled English 5 Seconds 16 14-03-189-93334F.
Specifications Feature # of Computer Ports Form Factor Port Selection Console Keyboard/Mouse Ports Console Video Port Console Speaker/Mic Ports Computer Ports KVM Cable Kits Included KVM Cable Kits Power Jack Power Consumption USB 2.0 Hub Ports Keyboard/Mouse Emulation Max Video Resolution Operating Temperature Storage Temperature Humidity Unit Dimensions (H x W x D, In) Unit Weight (lbs) B004-DUA2-HR-K 2 Desktop Hotkeys, Pushbuttons, Mouse Switching Function* (x2) USB A Female DVI-I Female (x8) 3.
Warranty & Warranty Registration 1-YEAR LIMITED WARRANTY TRIPP LITE warrants its products to be free from defects in materials and workmanship for a period of one (1) year from the date of initial purchase. TRIPP LITE’s obligation under this warranty is limited to repairing or replacing (at its sole option) any such defective products. To obtain service under this warranty, you must obtain a Returned Material Authorization (RMA) number from TRIPP LITE or an authorized TRIPP LITE service center.
Notes 19 14-03-189-93334F.
1111 W. 35th Street, Chicago, IL 60609 USA • www.tripplite.com/support 20 14-03-189-93334F.